
Welcome to Odd Small Jobs
Big Solutions for the Small Stuff
Custom, Clever Handyman Services for Low-Risk Projects in New Hampshire
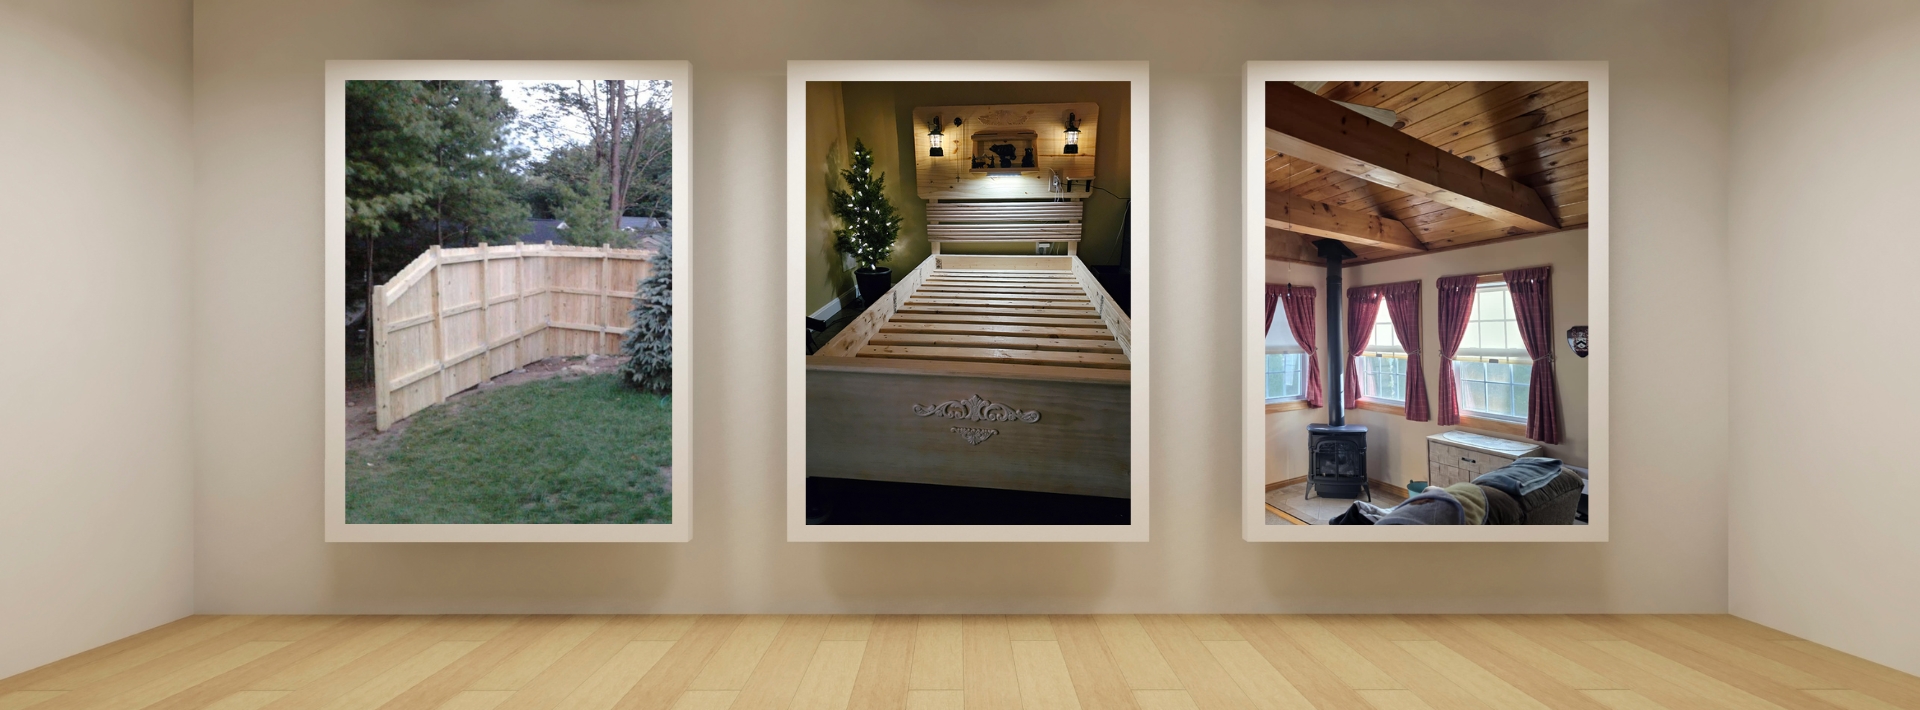
At Odd Small Jobs, we specialize in the kind of practical, low-risk projects most big contractors won’t touch — unless it’s part of a larger job. These are the odd jobs that make your space smarter, more organized, and more functional. Whether it’s building a custom bed frame, headboard and footboard (see below) with built-in lighting, shelves, hooks and USB ports, installing new shelving in your shed, or swapping out old outlets for modern upgrades, we’ve got the tools and the know-how to get it done right.
Registered New Hampshire Carpenter & Contractor – Fully Insured
Odd Small Jobs is an officially registered DBA with the State of New Hampshire and fully insured through Next Insurance. Our registration and coverage mean every home repair, carpentry project, or small-scale contracting job is handled with professionalism, safety, and the protection you deserve—giving you peace of mind from start to finish.
Our Larger Jobs
Though our focus is smaller projects, we will work on repairing decks, building small outdoor stuctures like small custom sheds, dog houses, detached decks, small fences, chicken coops, greenhouses, etc. We will also build interior walls to divide areas that are not finished, or require little or no demolition to install.
Based in Merrimack, Hollis, and Nashua, New Hampshire, we proudly serve homeowners, landlords and tenants throuhout New New Hampshire with light carpentry, minor drain and faucet plumbing, light electrical work, estate cleanups, custom rough-lumber furniture builds, and other hands-on projects that deliver real value — without large contractor involvement, and at a reasonable price. Let us tackle the odd, small stuff — so you don’t have to.
About Odd Small Jobs
David West, Handyman and Carpenter
Odd Small Jobs isn’t just a handyman service — it’s the product of decades of hands-on experience, craftsmanship, and a passion for practical problem-solving. My journey started over 40 years ago, learning the trade the old-fashioned way: on the job. I was fortunate to be trained by two master carpenters — John Bernard of Wilmington, MA and North New Portland, ME, and later his brother Dan Bernard of Wilmington, MA and Salem, ME. Their mentorship set the foundation for everything I do today.
Over the years, I’ve tackled projects ranging from building complete home additions (like the one featured above) to custom woodworking pieces built for people with specific needs — including furniture for the handicapped, personalized bed frames, coat racks, wall organizers, custom shelving, and gun racks. More recently, I’ve been doing light electrical like replacing ballasts, switches, and standard or USB outlets, and creating functional touches like wood bases for electric fireplaces.
This isn’t about chasing big contracts — I’m here for the interesting, meaningful projects that larger contractors don’t have time for, but homeowners still need done. I charge fairly and prefer working directly with people who appreciate solid craftsmanship on smaller-scale tasks they’d tackle themselves — if only they had the time, tools, or know-how.
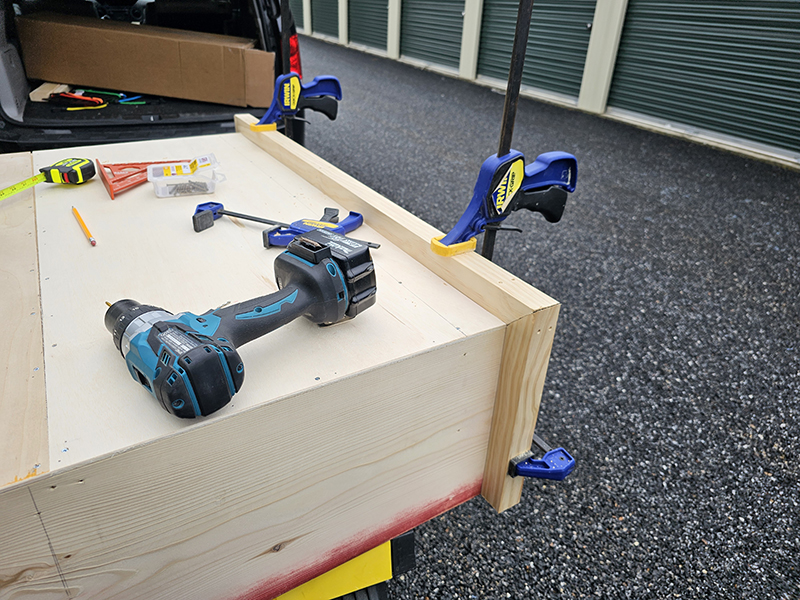
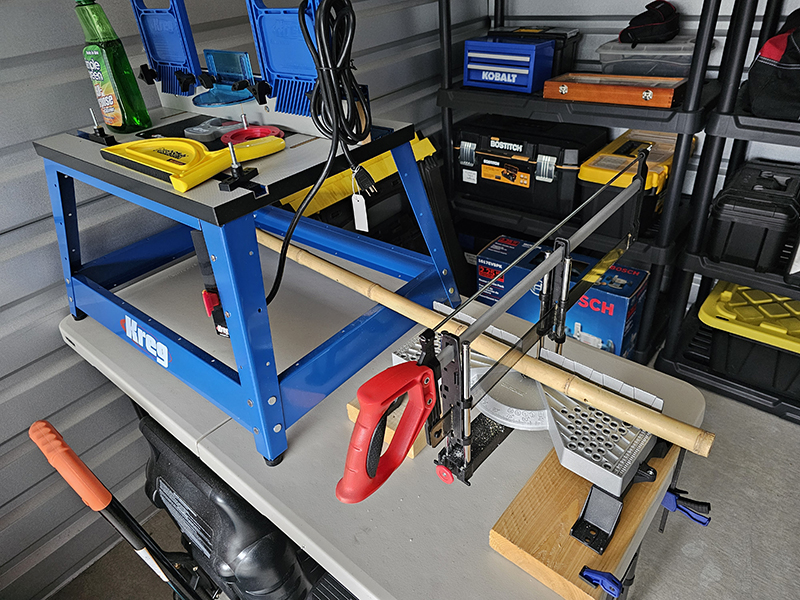
I’m selective with what I take on, focusing on reasonable, low-risk projects that align with my tools and experience. Odd Small Jobs comes fully equipped with a full range of Makita 18 volt cordless tools for remote work, along with a solid lineup of powered shop and pneumatic tools. If you’ve got a small project that matters, let’s talk.
Our Odd Small Jobs Services
At Odd Small Jobs, we focus on practical, low-risk projects that improve your home without the hassle of hiring a full-scale contractor. From light repairs to custom builds and clever home upgrades, we offer a range of handyman services tailored for homeowners and landlords who just need the job done right — and done simply. The photo above shows a custom privacy fence that I made made from pressure-treated lumber, featuring built-in plant shelves all the way around — a great example of the kind of creative, functional work I enjoy taking on.
Contact Odd Small Jobs
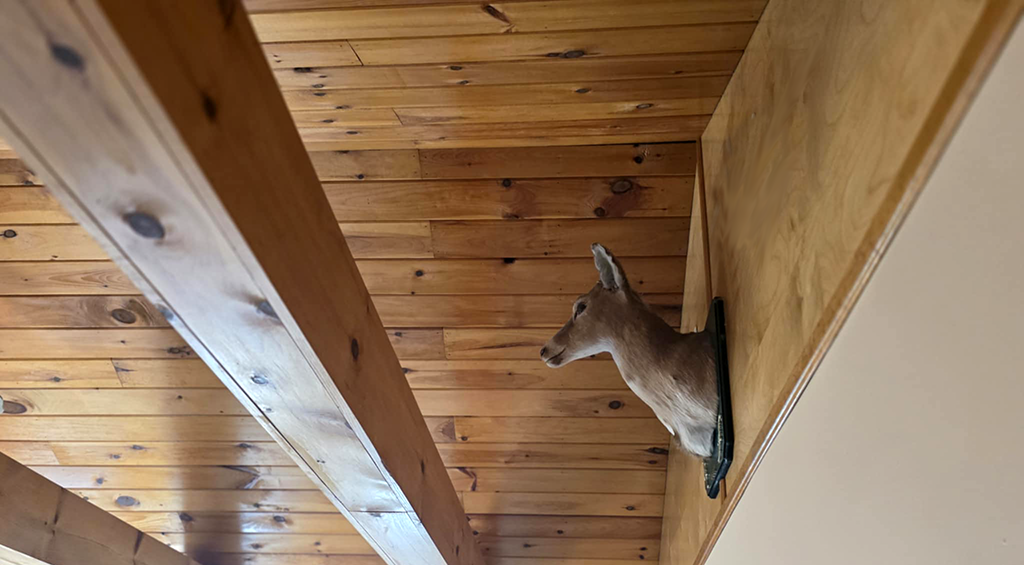
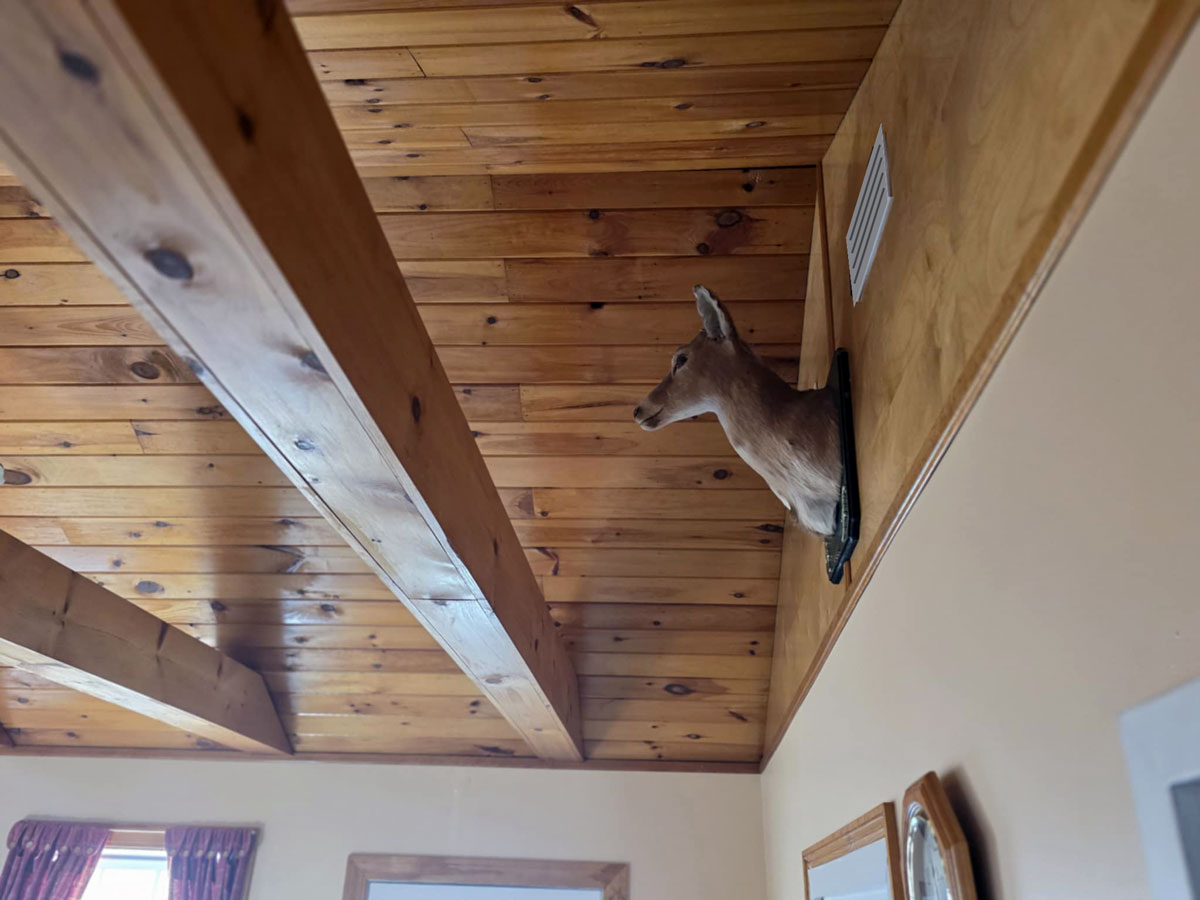
The photo above shows one of my favorite detail projects — a tongue and groove pine ceiling paired with birch plywood upper walls and boxed-in beams for a warm, finished look. The mounted deer adds a personal touch (no, I didn’t hunt it — I just thought it fit the space). If you're into custom woodwork or unique touches like this, feel free to reach out and let's talk about what you're envisioning.
Merrimack, NH 03054
Project Gallery
Take a look at some of the work I've done for homeowners and renters around New Hampshire — from custom furniture and creative carpentry to small repairs and detailed finishes. Each project reflects the kind of practical, hands-on work I enjoy most — the jobs that make a space more functional, comfortable, and uniquely yours. We'll be adding more as time goes on.
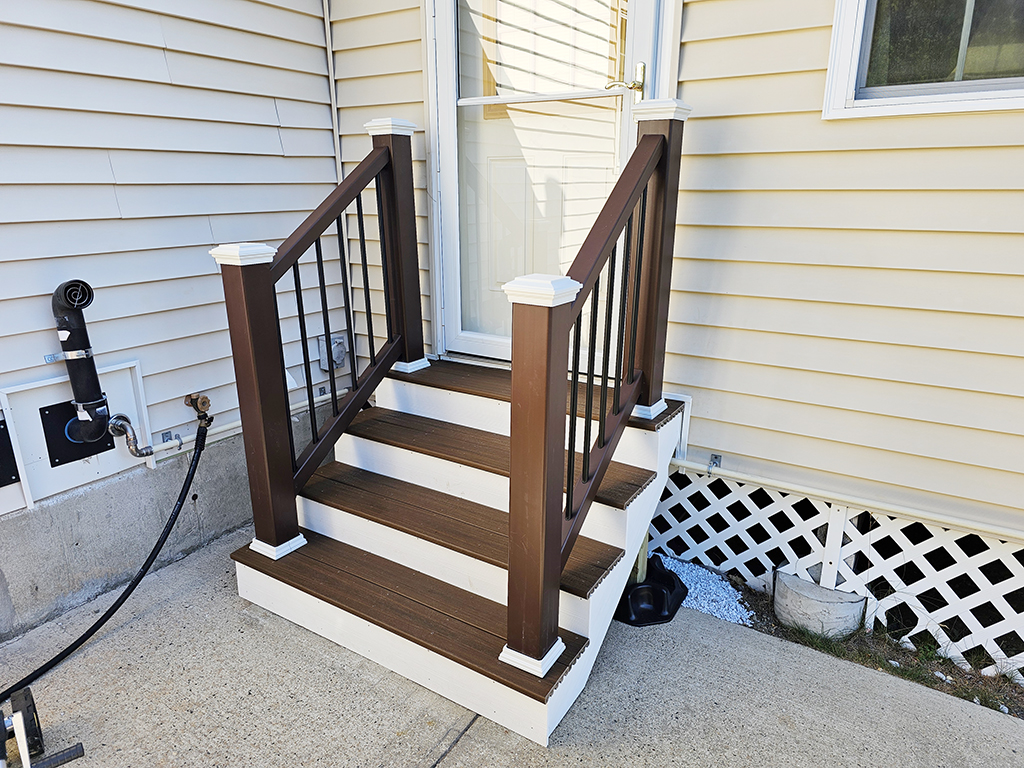
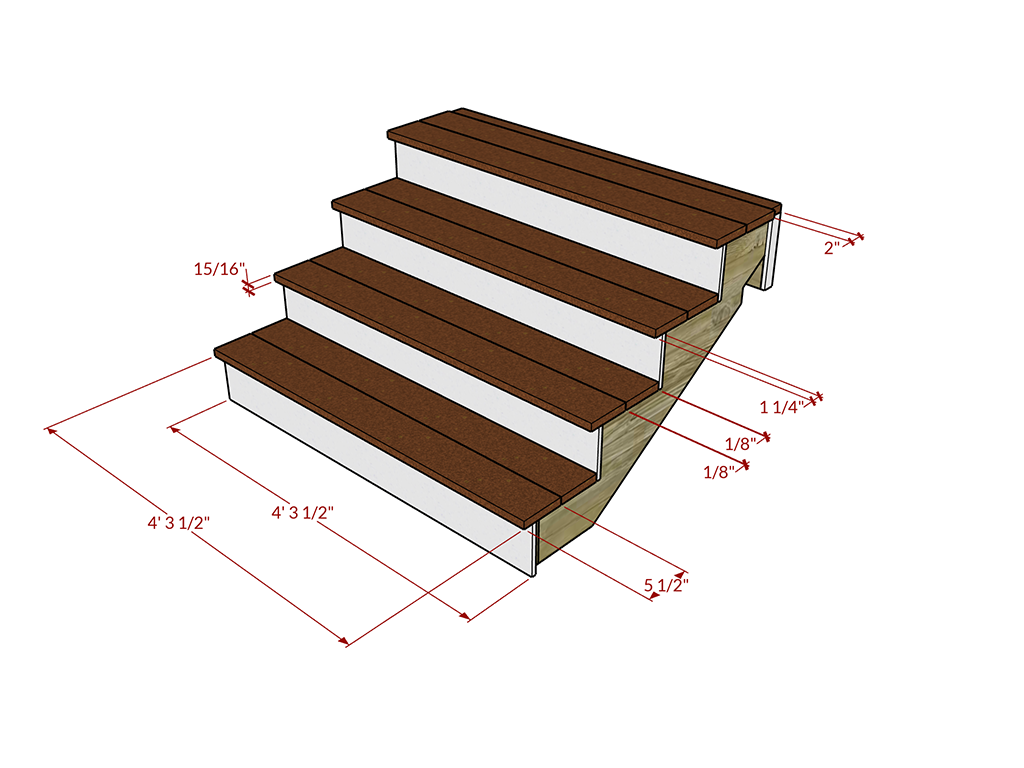
Replacing Old Pressure-Treated Back Steps
This project involved removing and replacing an aging set of pressure-treated stairs located at the rear of the property. The wood had weathered significantly over the years, becoming both unsightly and unsafe. The homeowner wanted a more durable and low-maintenance solution, so Trex composite materials were selected for the rebuild.
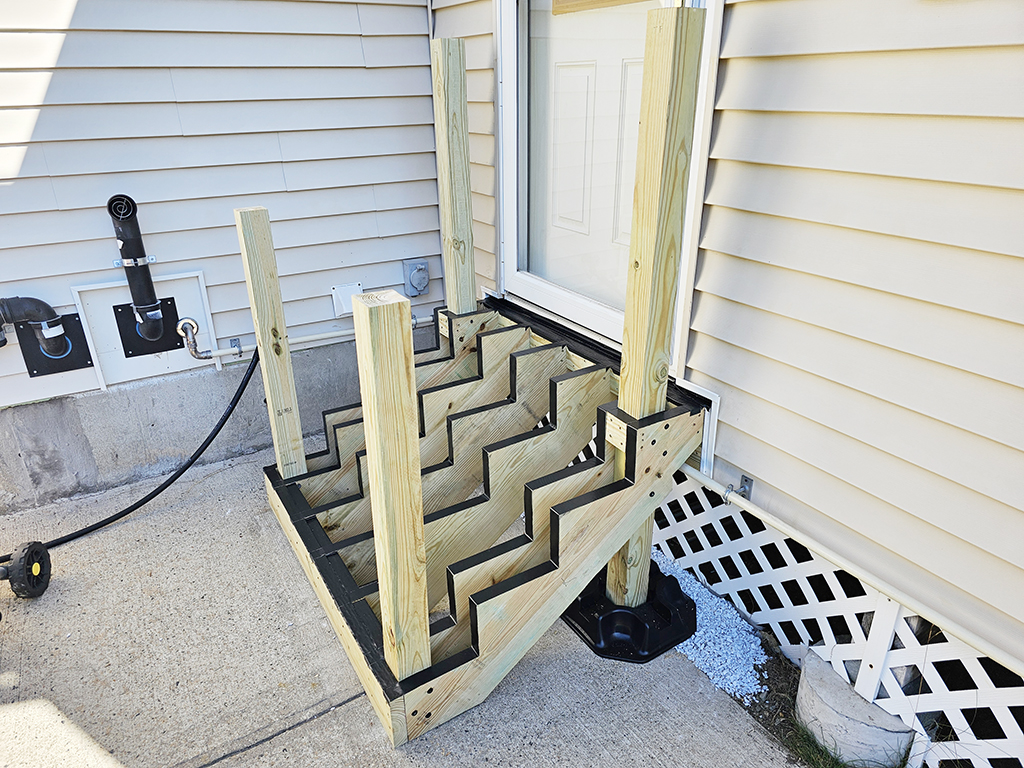
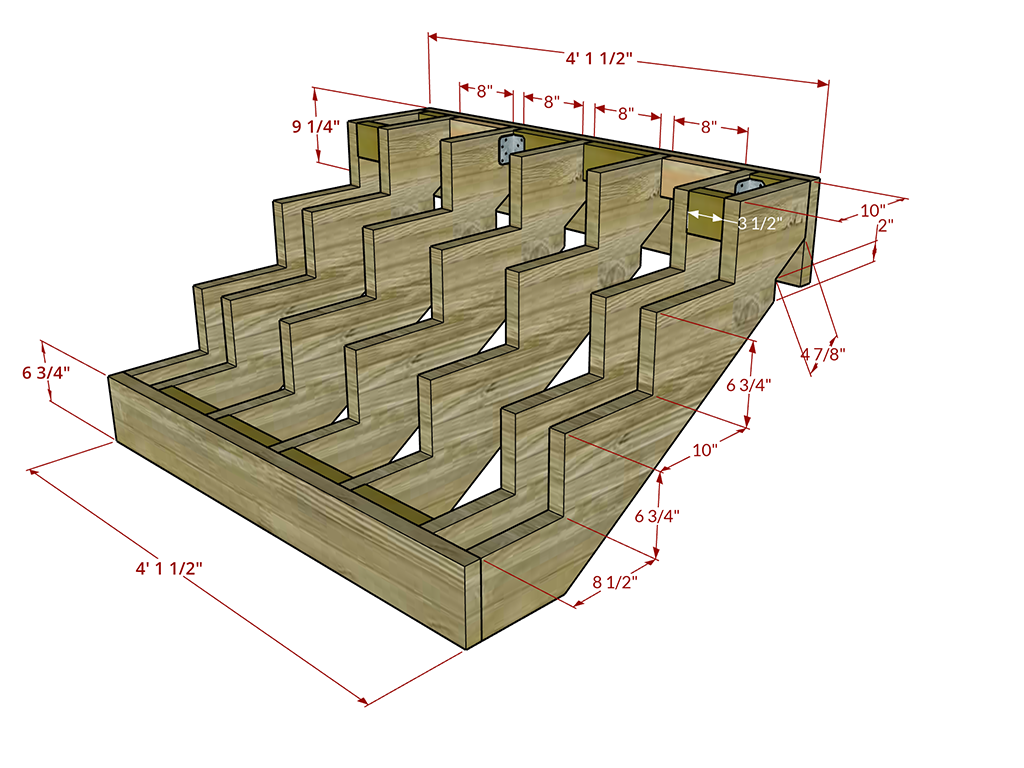
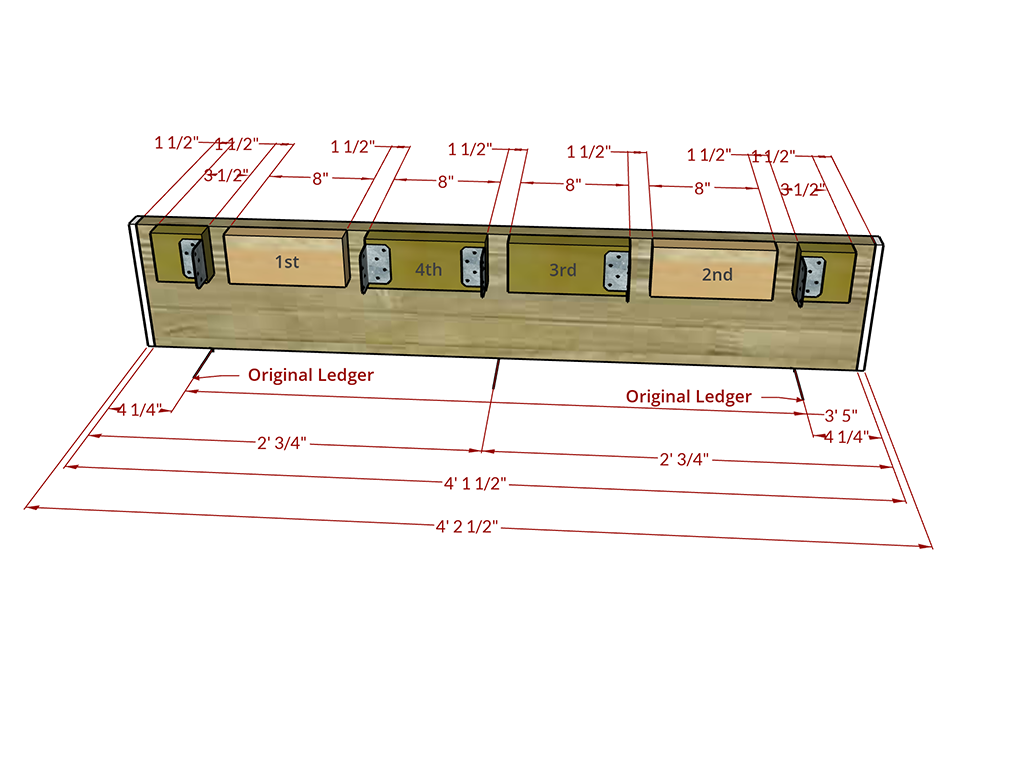
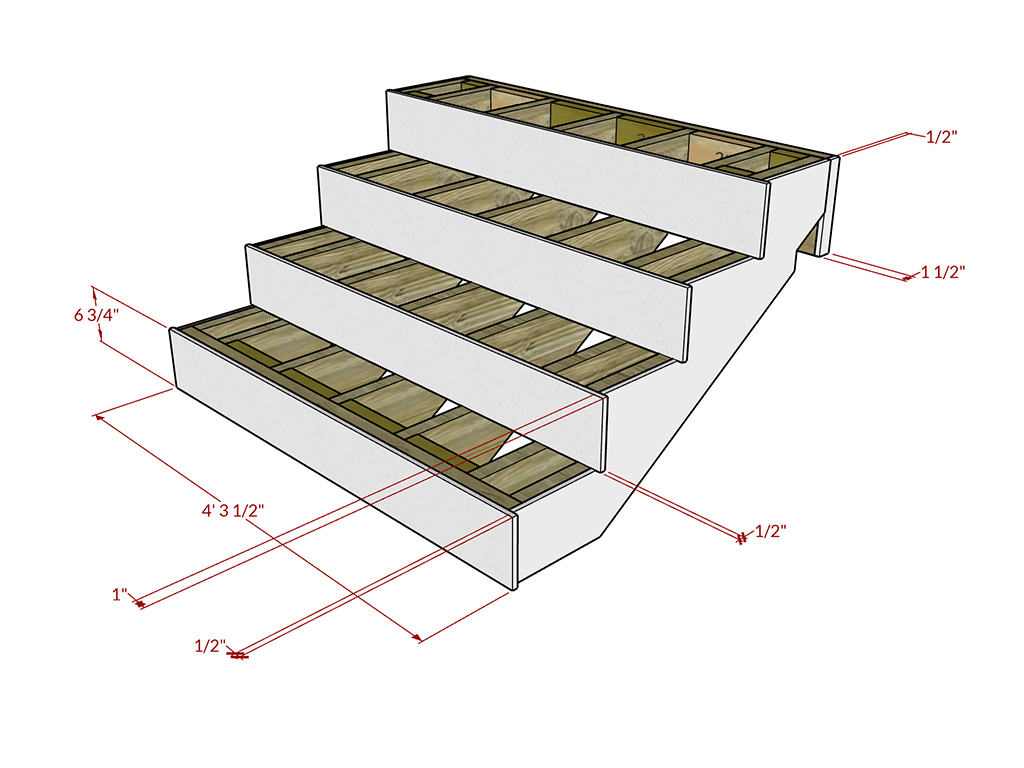
Design and Planning with SketchUp
Before construction began, 3D drawings were created using SketchUp to verify measurements and ensure proper alignment with the existing structure. These renderings helped clarify the ledger board placement, tread spacing, and riser height while also identifying potential framing and finishing conflicts ahead of time.

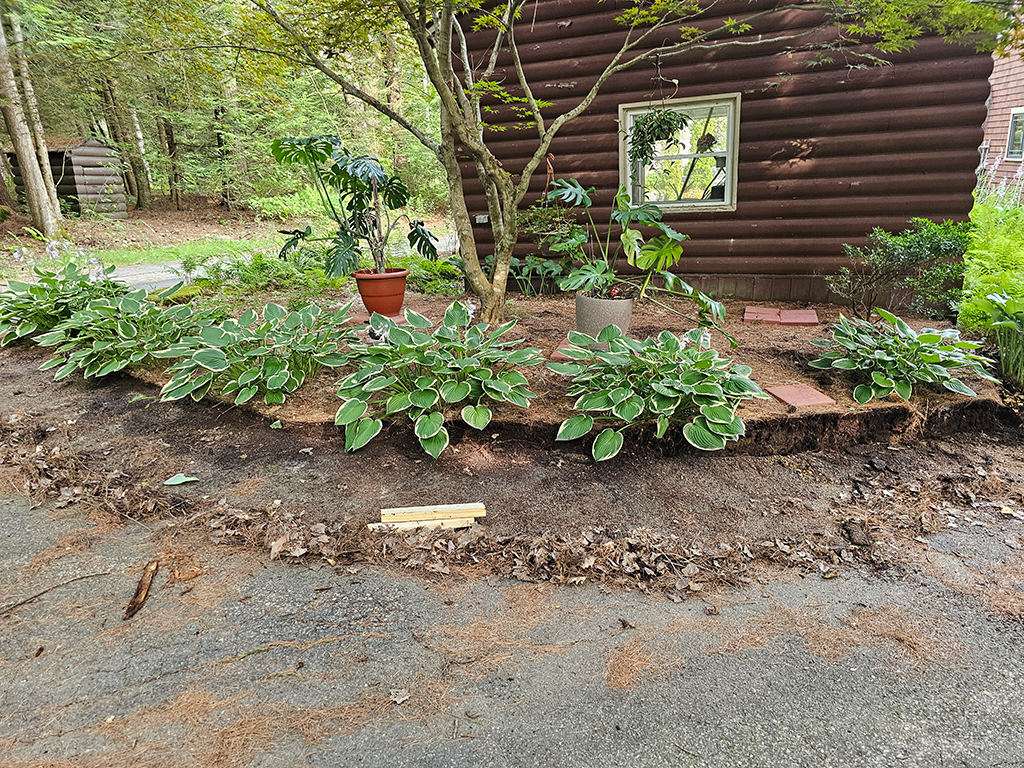
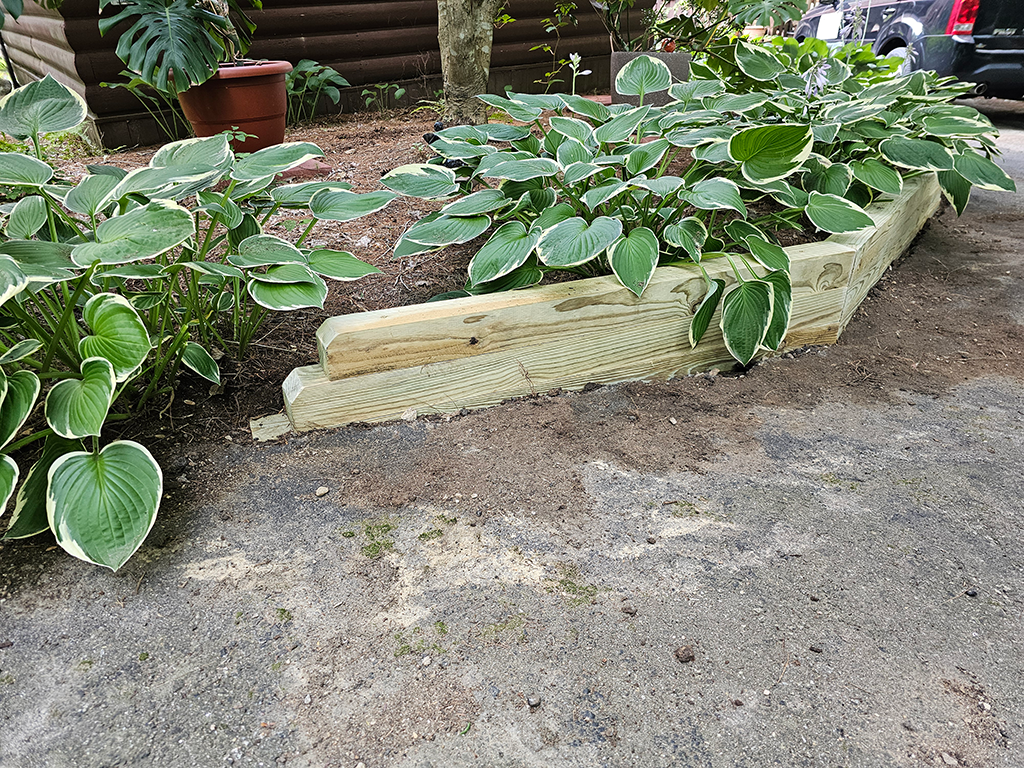
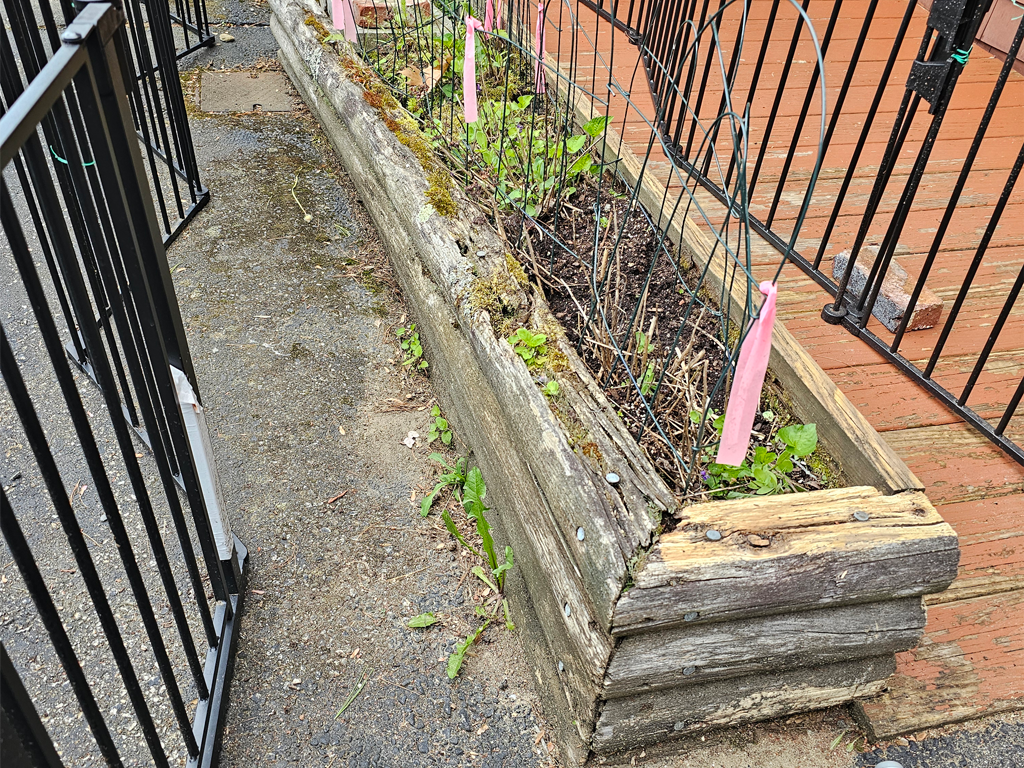
Rotted Timber Retaining Wall Removed to Improve Garden Entrance
The customer’s garden featured a variety of beautiful plants, but the original timber retaining wall at the entrance had severely rotted and become an eyesore. We opted to replace the wall using 4x4 pressure-treated lumber instead of rounded landscape timbers, which made precision angle cuts much easier during installation.

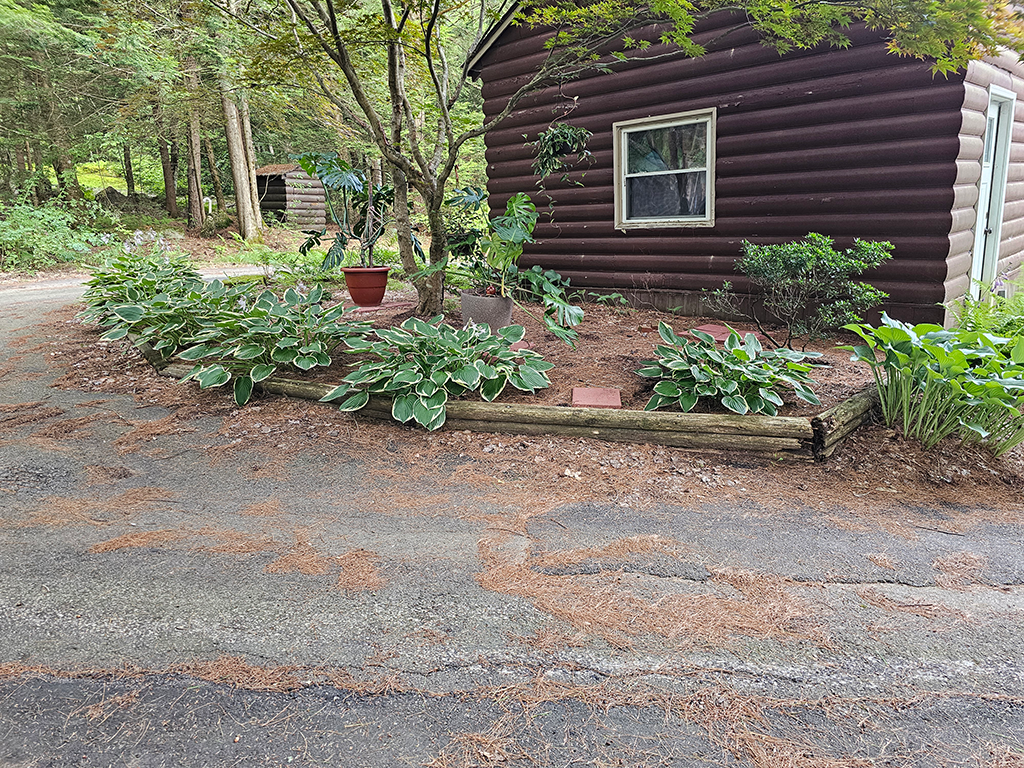
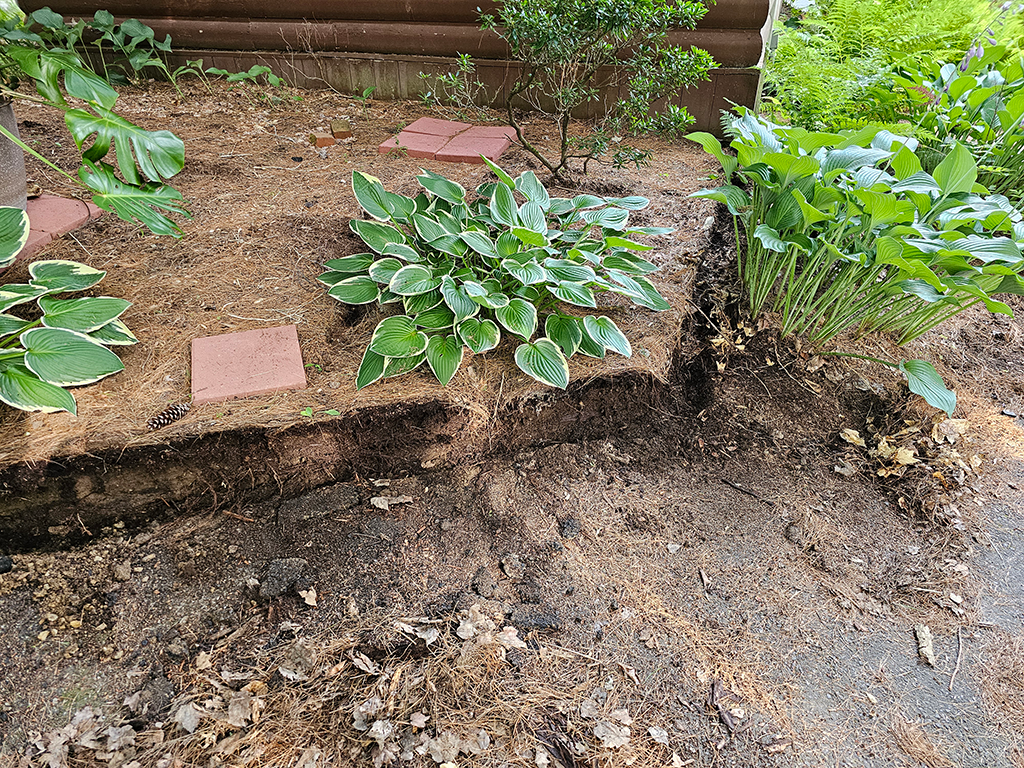
Challenging Demolition and Excavation of Deep-Set Timbers
While the removal of the old wall initially appeared straightforward, the reality proved much more labor-intensive. The original timbers were embedded deeply in the soil and badly deteriorated, making extraction slow and difficult. It took nearly a full day to remove the timbers and level the area enough to begin new construction.
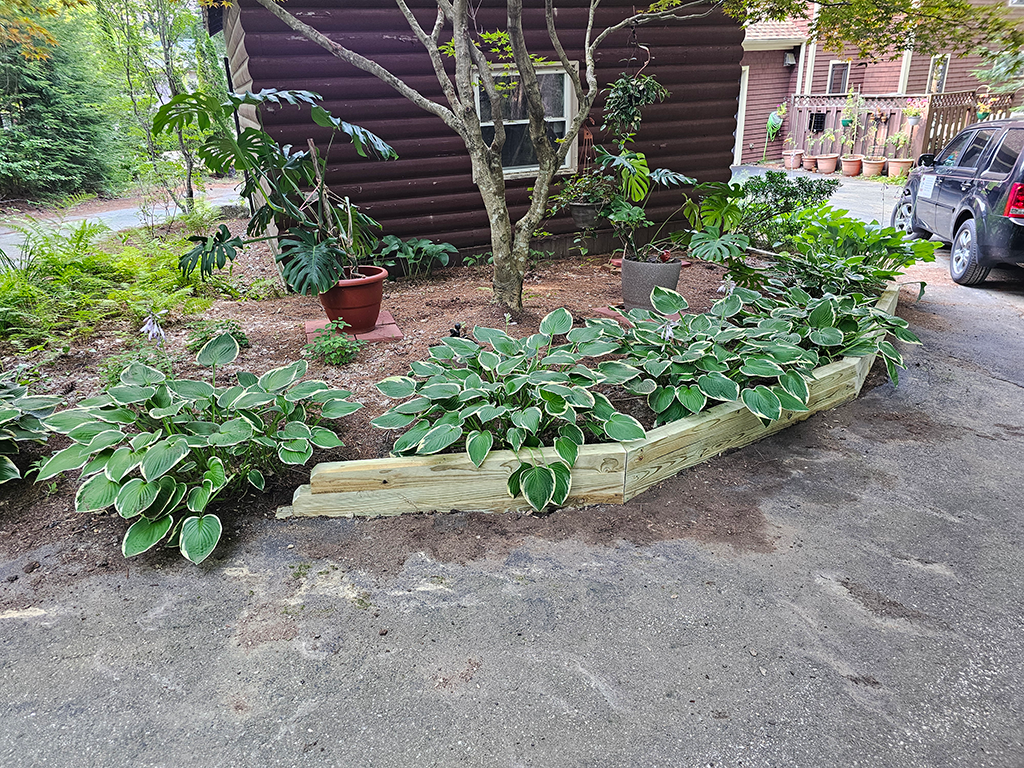
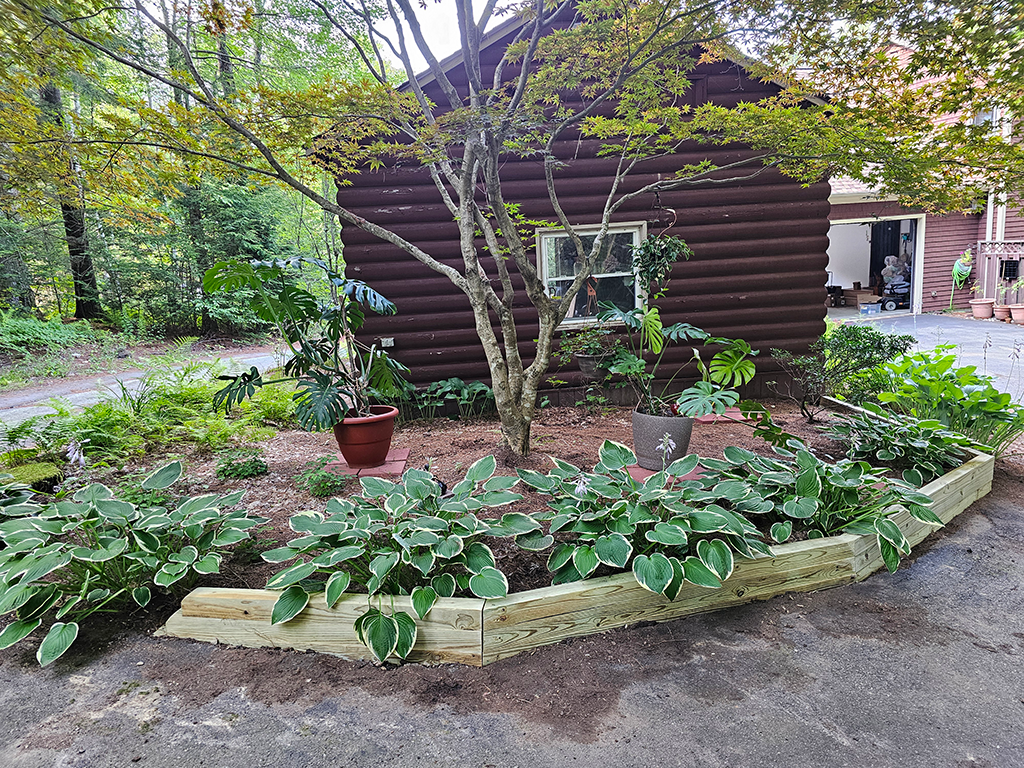
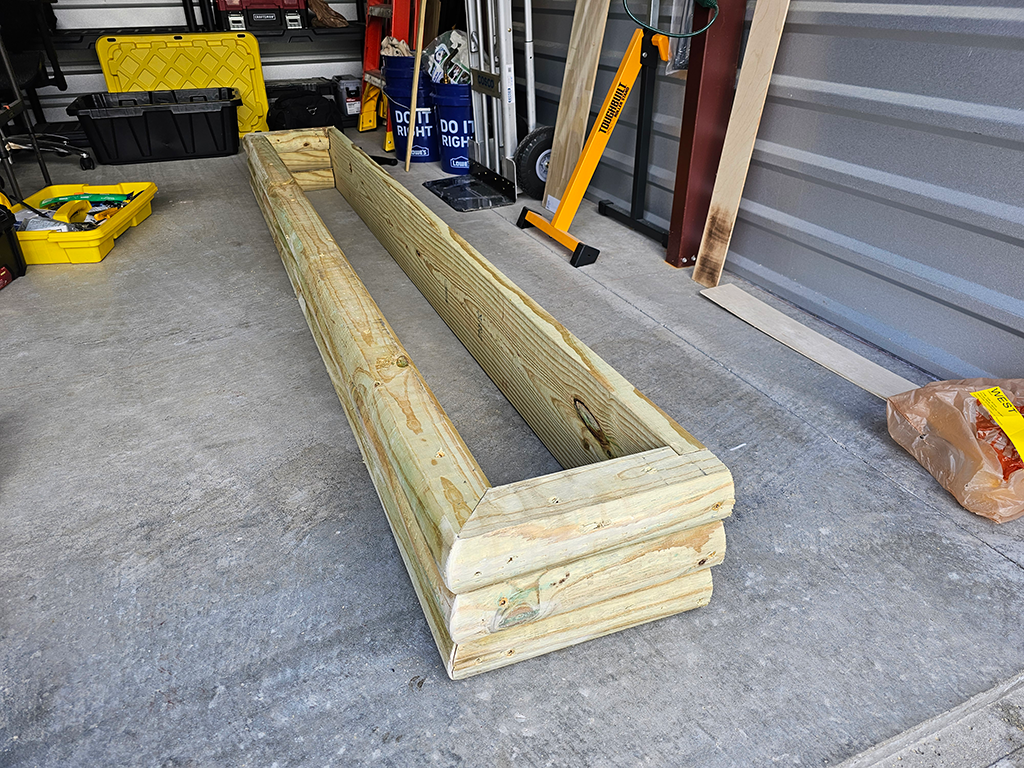
New 4x4 Pressure-Treated Timber Retaining Wall Installed
The new wall consists of four sections of 4x4 pressure-treated lumber, each stacked three timbers high. Most sections are roughly 8 feet long, with the final section shortened to fit the space. Each bottom timber was anchored into the ground with multiple 16-inch spikes, and upper layers secured using 6-inch decking screws. Precise angle cuts were critical to ensure a seamless transition between sections. Only one section required fine-tuning with a saw and block plane to match heights. The left end of the wall was tapered and chamfered to provide a clean, intentional finish.
Tiki Table Created from Upcycled Planter
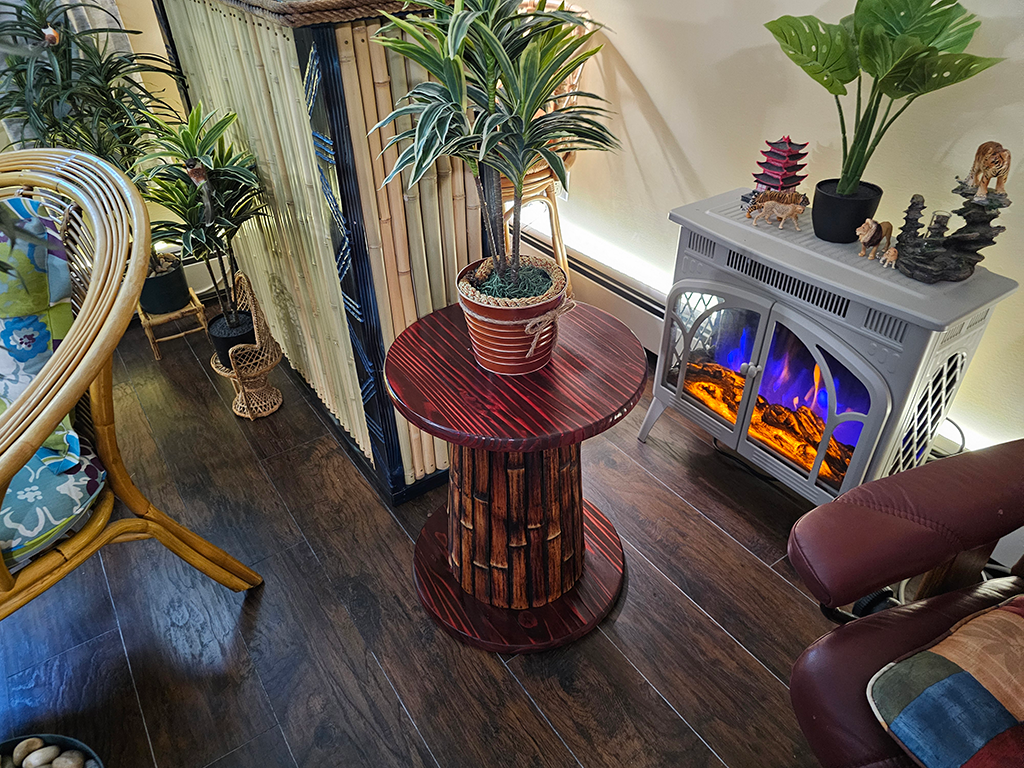
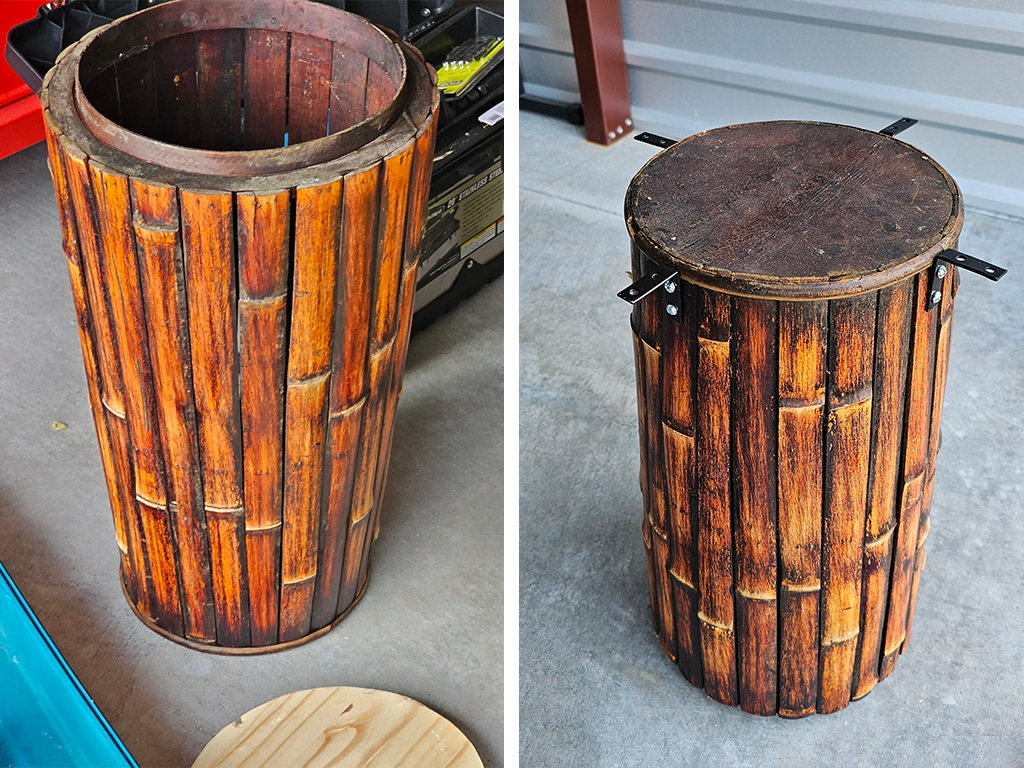
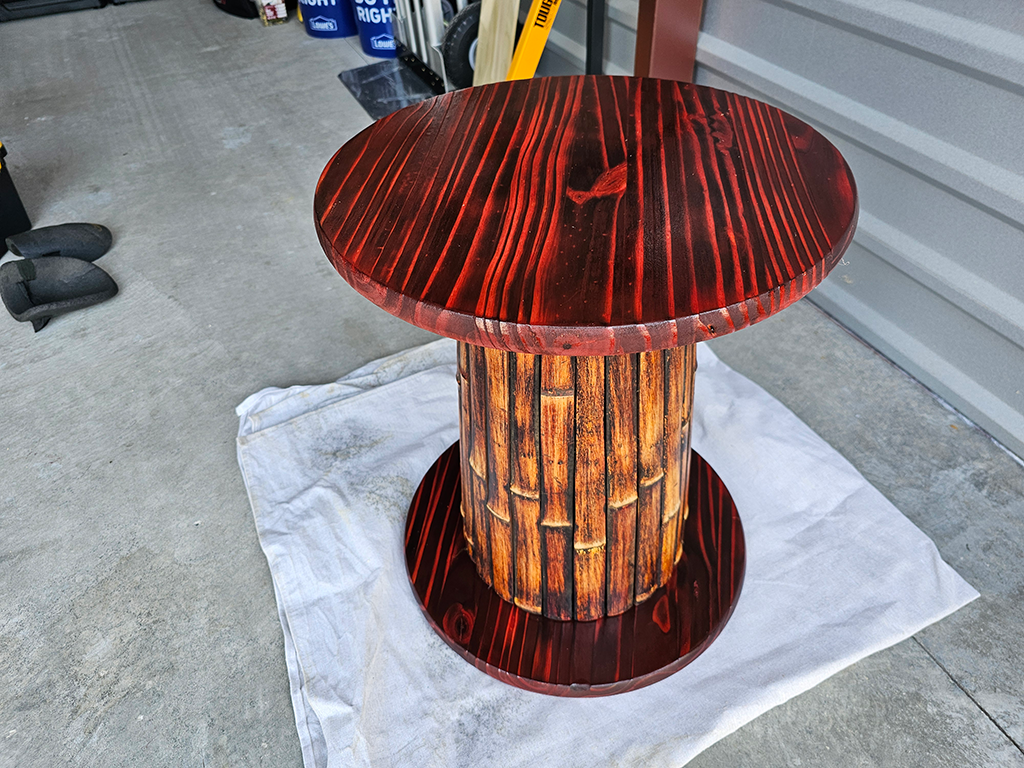
In search of a bamboo-style table to match the Tiki Bar room’s décor, nothing available on the market fit both the style and budget. I found a bamboo-finished planter on Facebook Marketplace for $10 and saw the potential to convert it into a table base. Flipping it upside down, I secured a round tabletop using angle brackets.
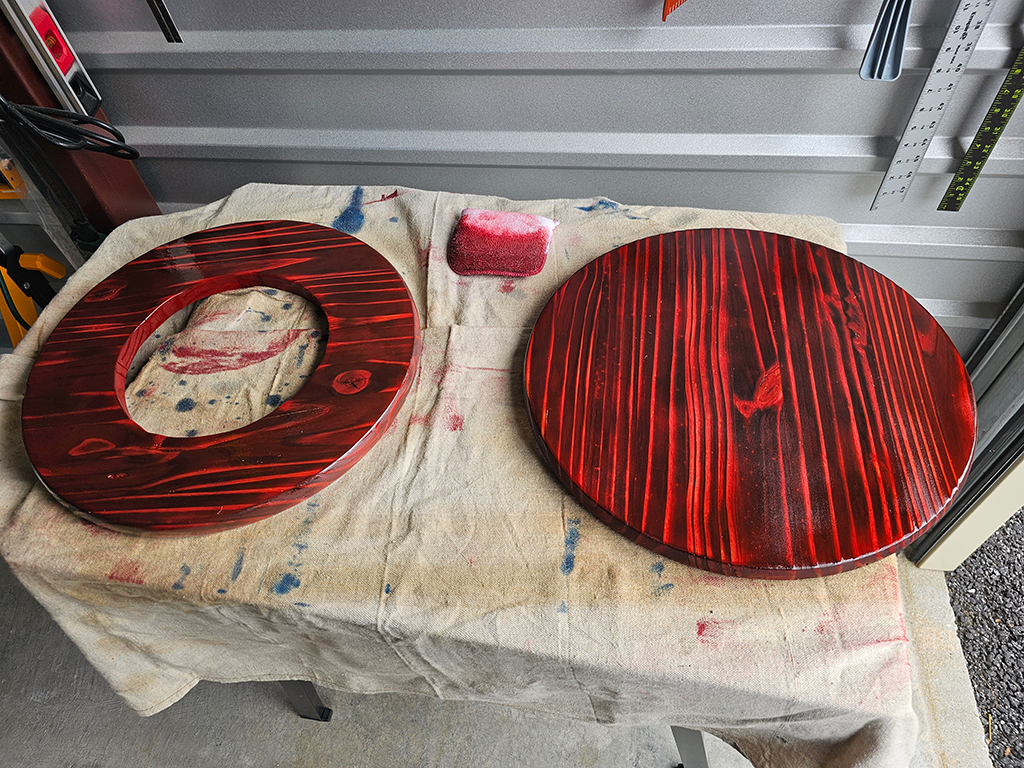
To complete the build, I purchased two laminated pine rounds—one for the tabletop, the other for the base—from a big box store. A hole was cut into the base to accommodate the planter’s existing metal rim. Both pieces were then enhanced with a modified Shou Sugi Ban (焼杉板) technique: torching and brushing to bring out the wood’s natural grain and knots. A red stain was applied to match the interior of the Tiki Bar and sealed with several coats of gloss.
Assembly and Final Placement
Once dry, the top and base were attached to the planter using screws, finalizing the structure. The completed Tiki Table now serves both as a visual accent and a functional piece for food and drinks. The red finish aligns perfectly with the Tiki Bar interior, adding unity and character to the space.

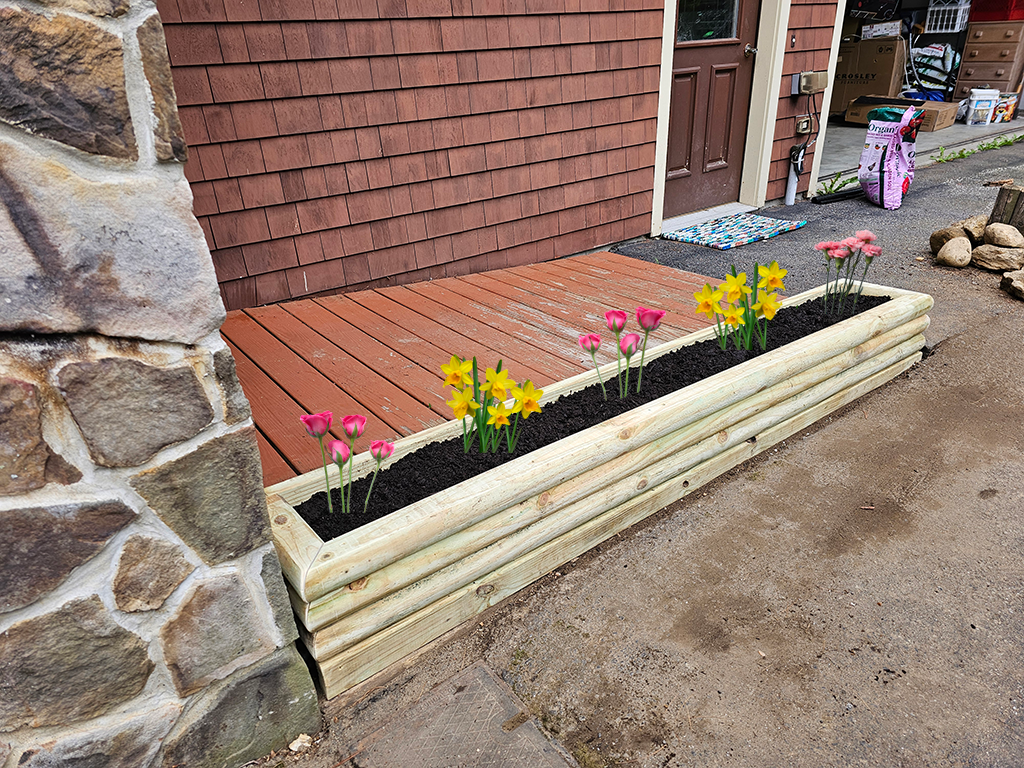
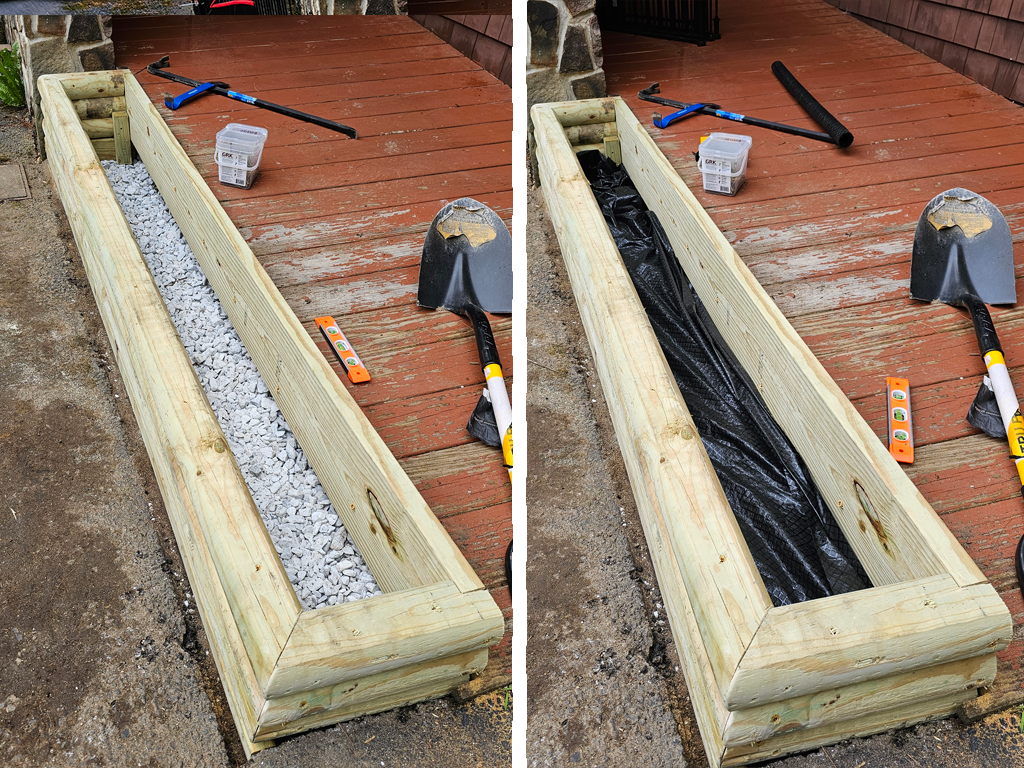
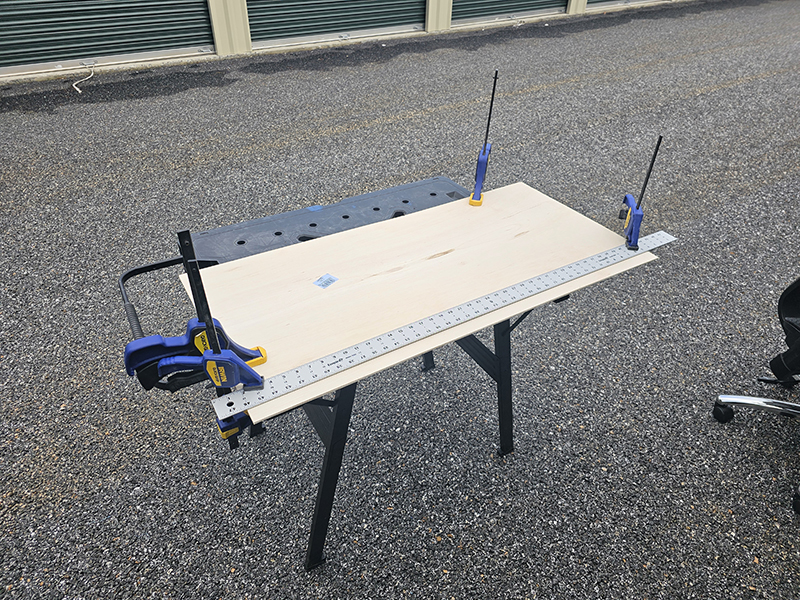
Replacing the Original Garden Bed with a New, Durable Raised Bed
The existing garden bed was falling apart due to age and construction using only nails. A new raised garden bed was built offsite at our shop using sturdy pressure-treated timbers, joined securely with 6-inch deck screws for long-term durability. By building offsite, we were able to work more efficiently and pass savings on to the client.
Leveling the Site and Final Installation
To ensure stability and drainage, marble chips were spread to level the site. A ripped 2x6 was installed at the front edge to compensate for the ground slope. Weed-blocking fabric was laid at the base to suppress weed growth and help contain the soil. The finished installation is shown here with simulated flowers. Initially, the client planned to let the wood weather naturally but later chose to stain it for a more polished look.
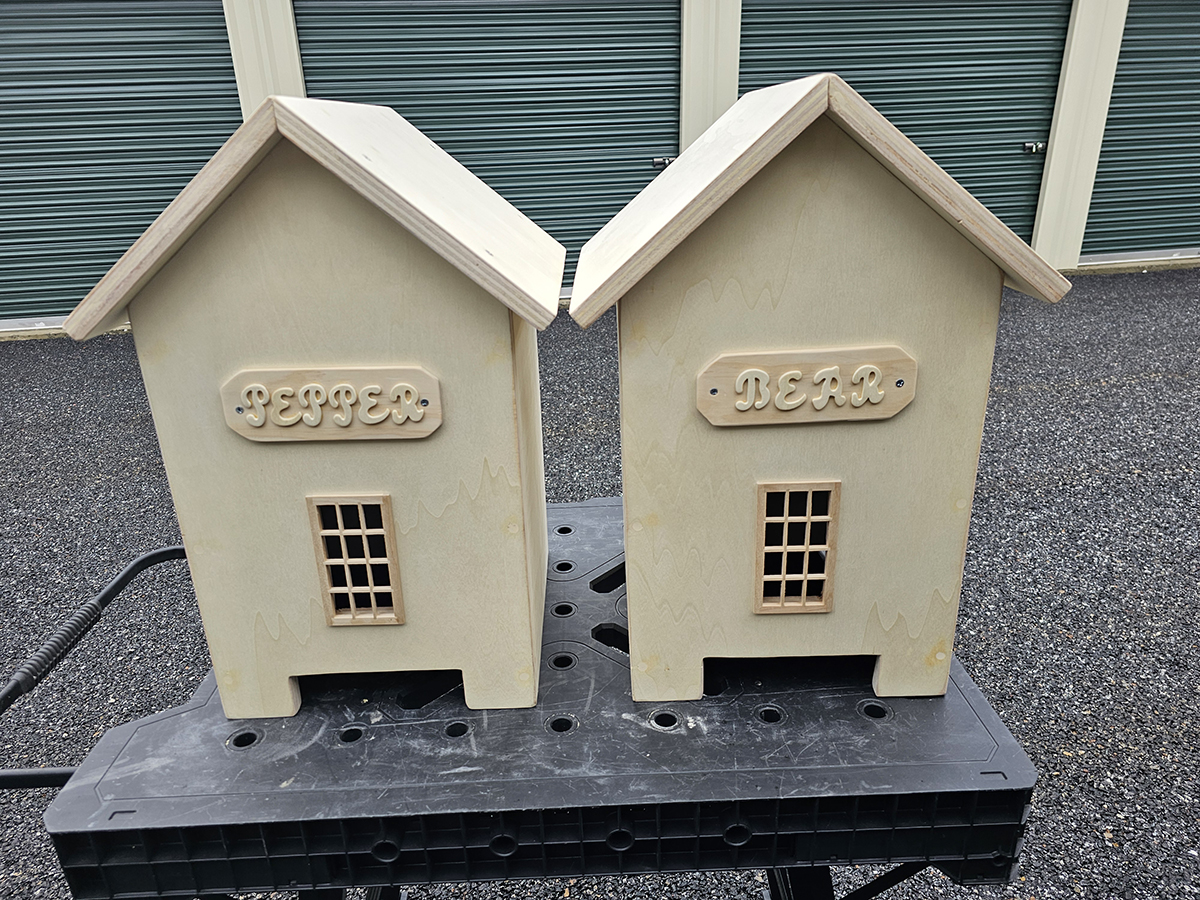
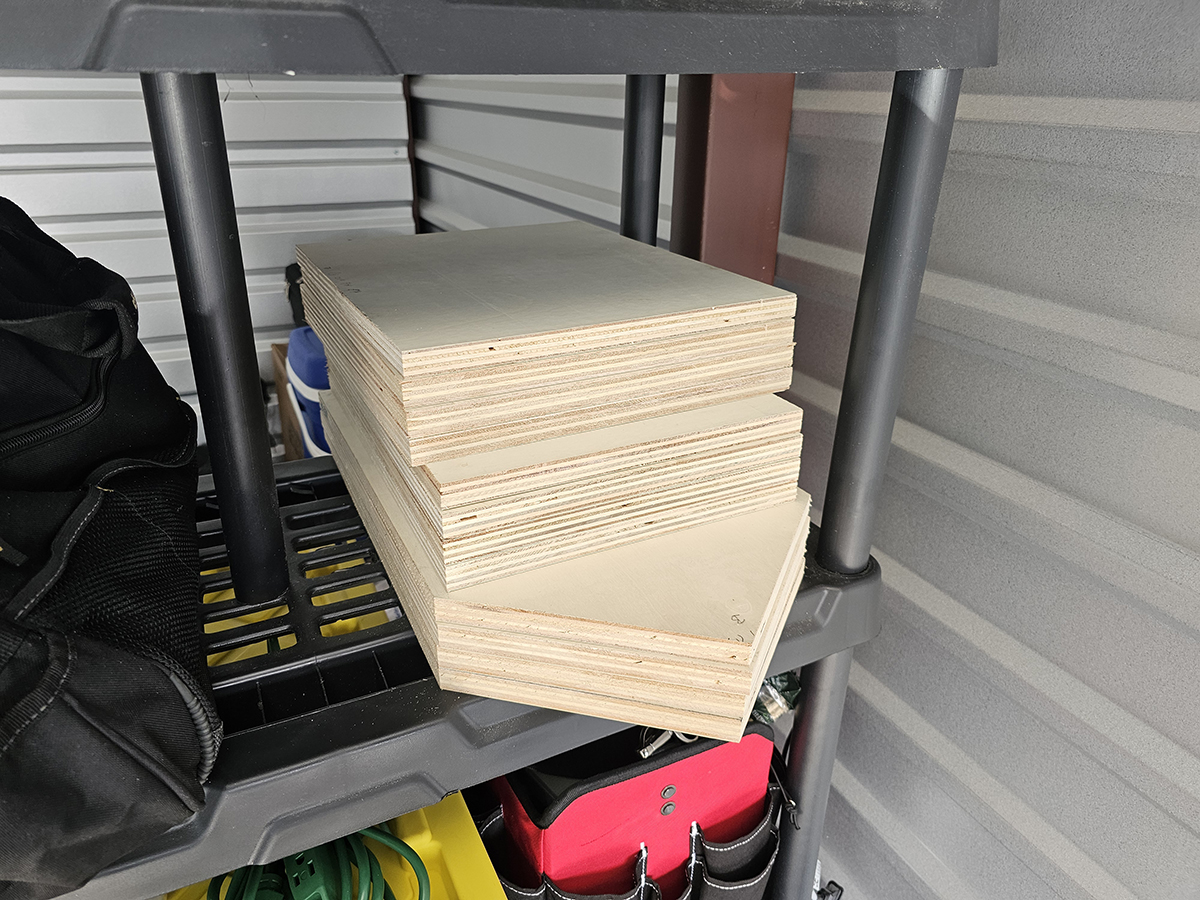
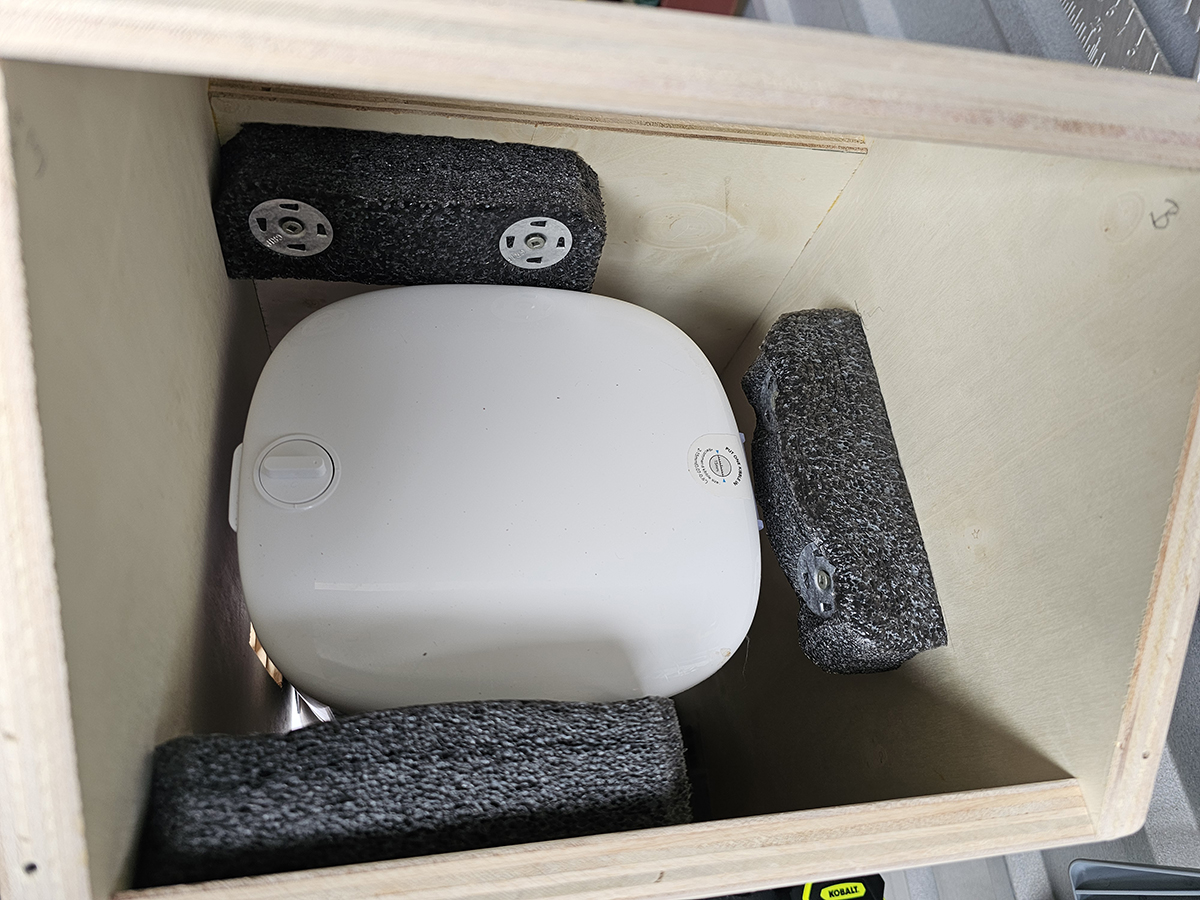
Weighted Cat Feeder Shelters – Keeps your feeders safe from feline food hacks!
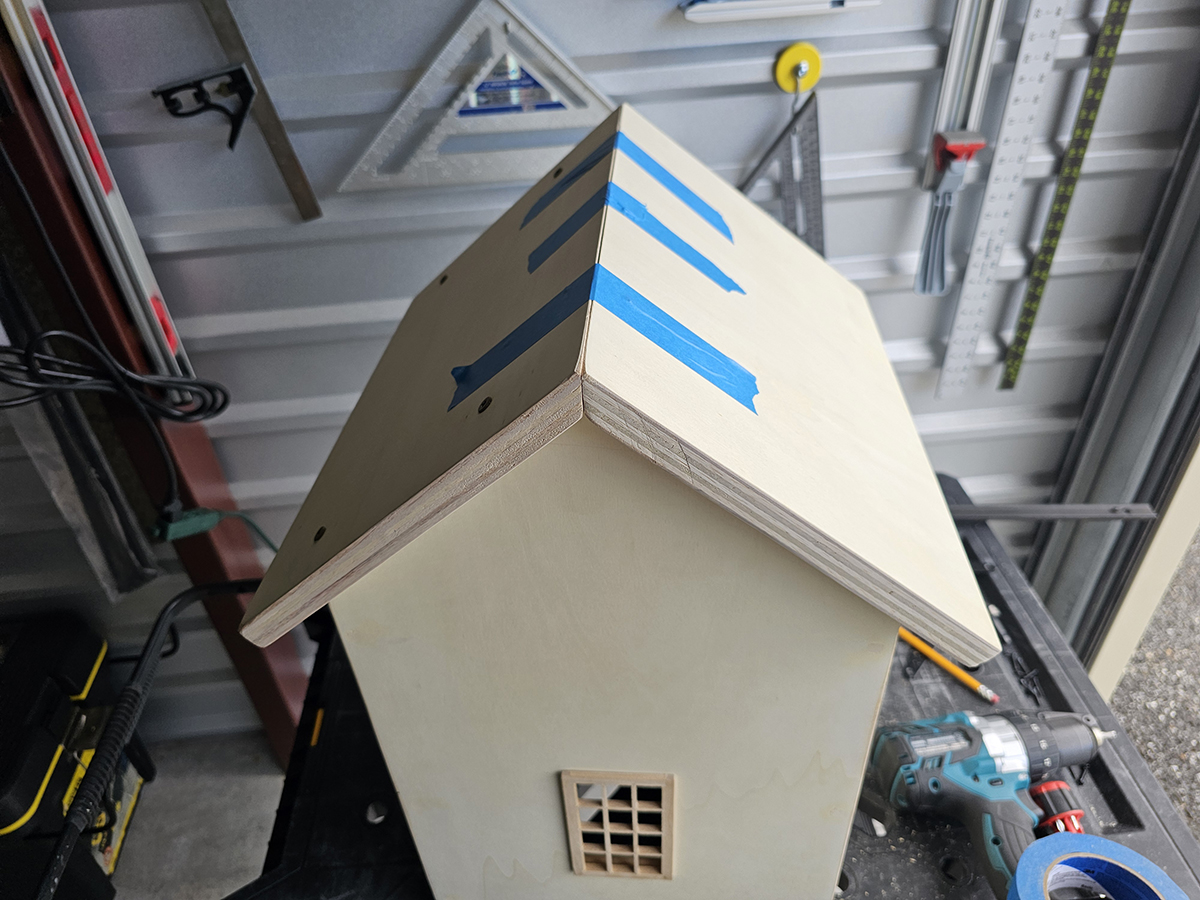
This project began with a Facebook post in a local Southern New Hampshire community group from a pet owner seeking a creative solution to a relatable problem: their enthusiastic cats, Bear and Pepper, were ramming into his automatic feeders to knock food loose. The request was for two simple plywood boxes with a roof-style top to prevent tampering — one for each feeder.
While I was initially provided with a basic plan, I decided to take a more thoughtful design approach. Using durable, cabinet grade, ¾” plywood, I created two custom enclosures with added stability and weight to prevent tipping or sliding. As an added touch, I incorporated dollhouse-style windows so the customer could easily see the feeder’s internal lights and monitor operation without removing the cover.
The end result was a pair of sturdy, functional, and visually appealing Cat Chow Cabins — tailored specifically to protect the automatic feeders while blending into the home environment.
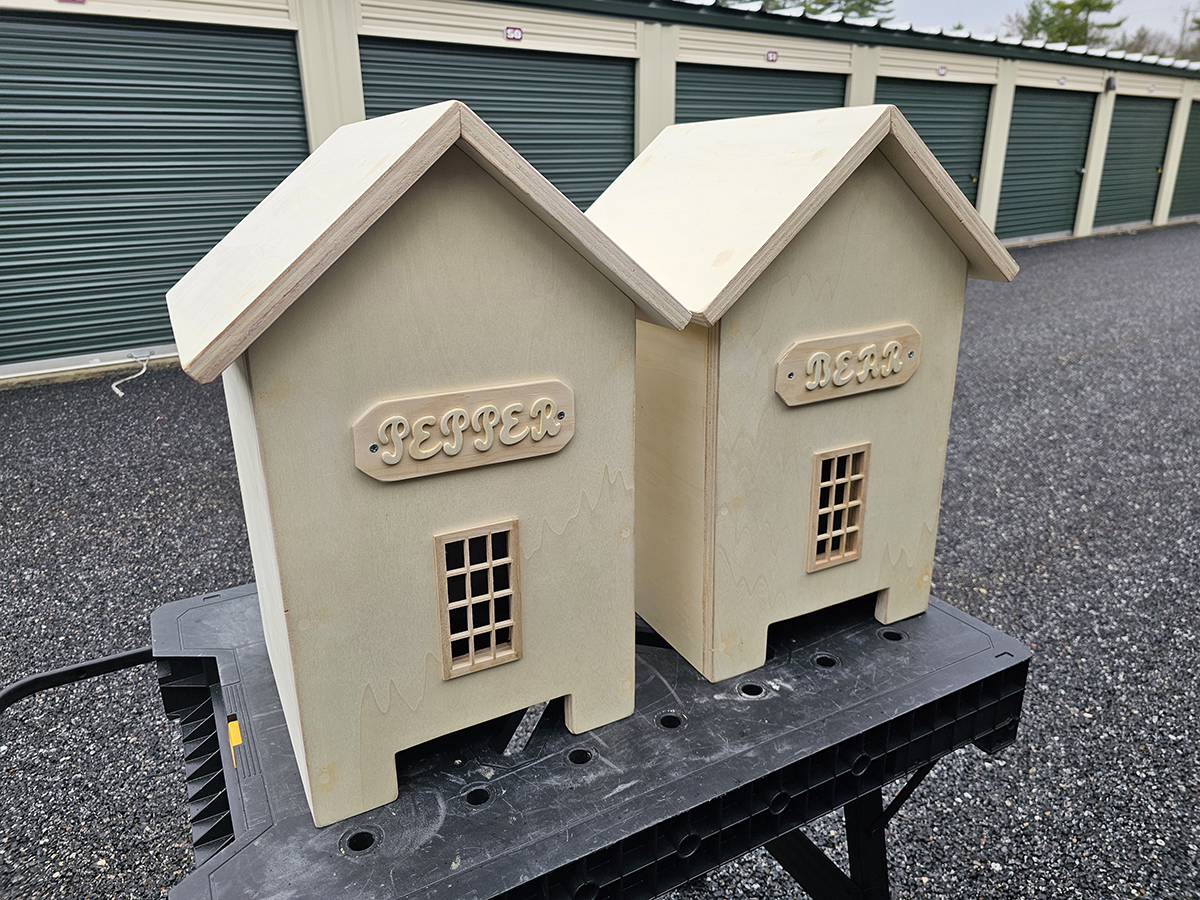
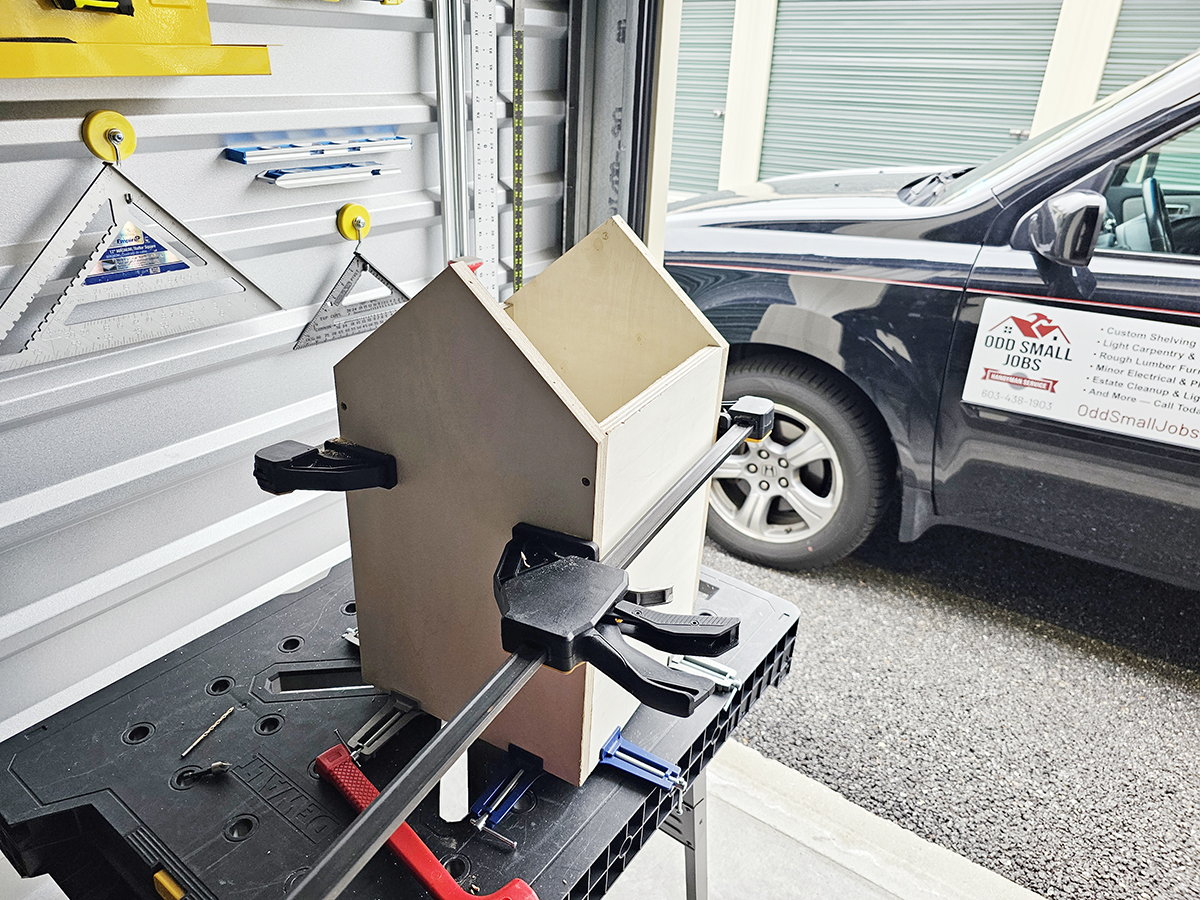
Cutting Materials and Assembling the Frame
After carefully measuring the dimensions of each feeder, I cut the plywood sheets to size for the side panels and roof sections. Using multiple clamps, I assembled the sides with precision to ensure clean alignment and a solid foundation.
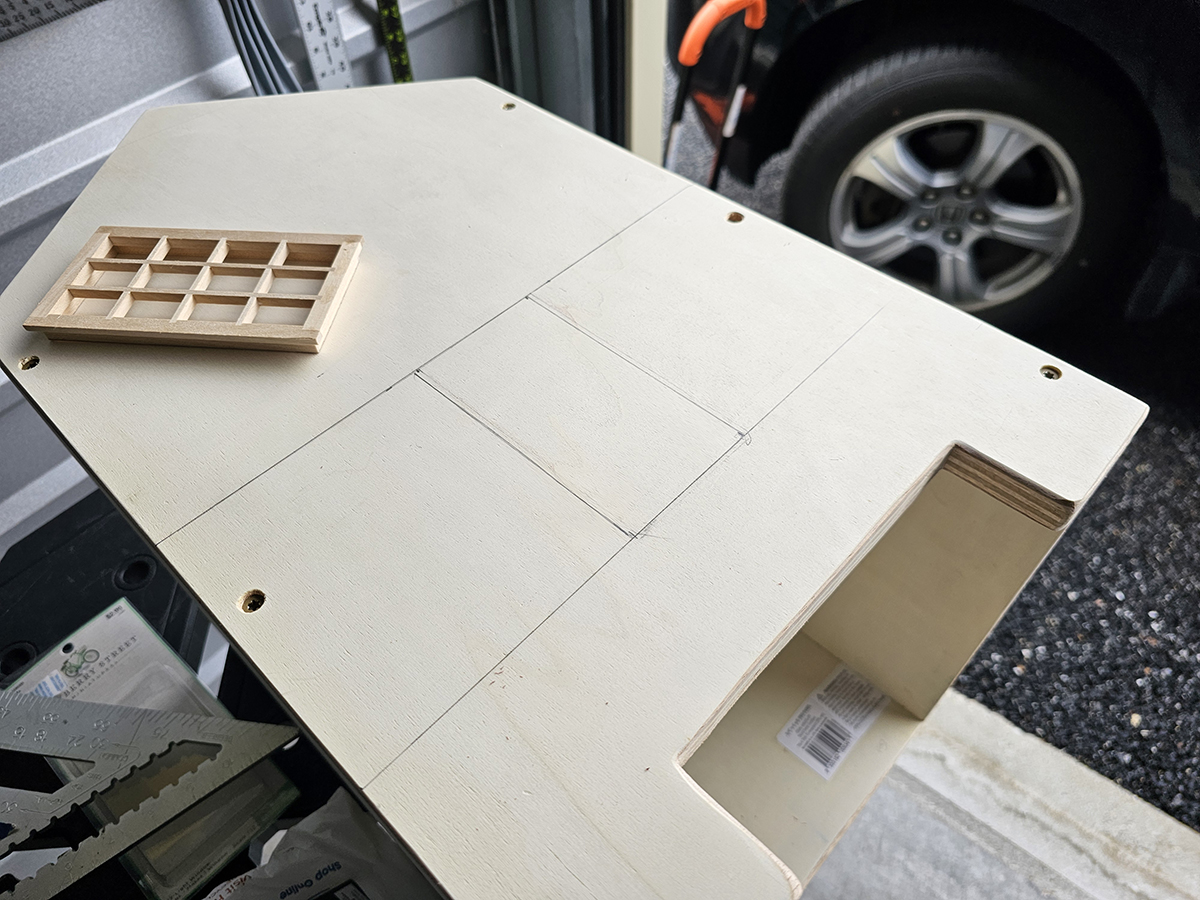
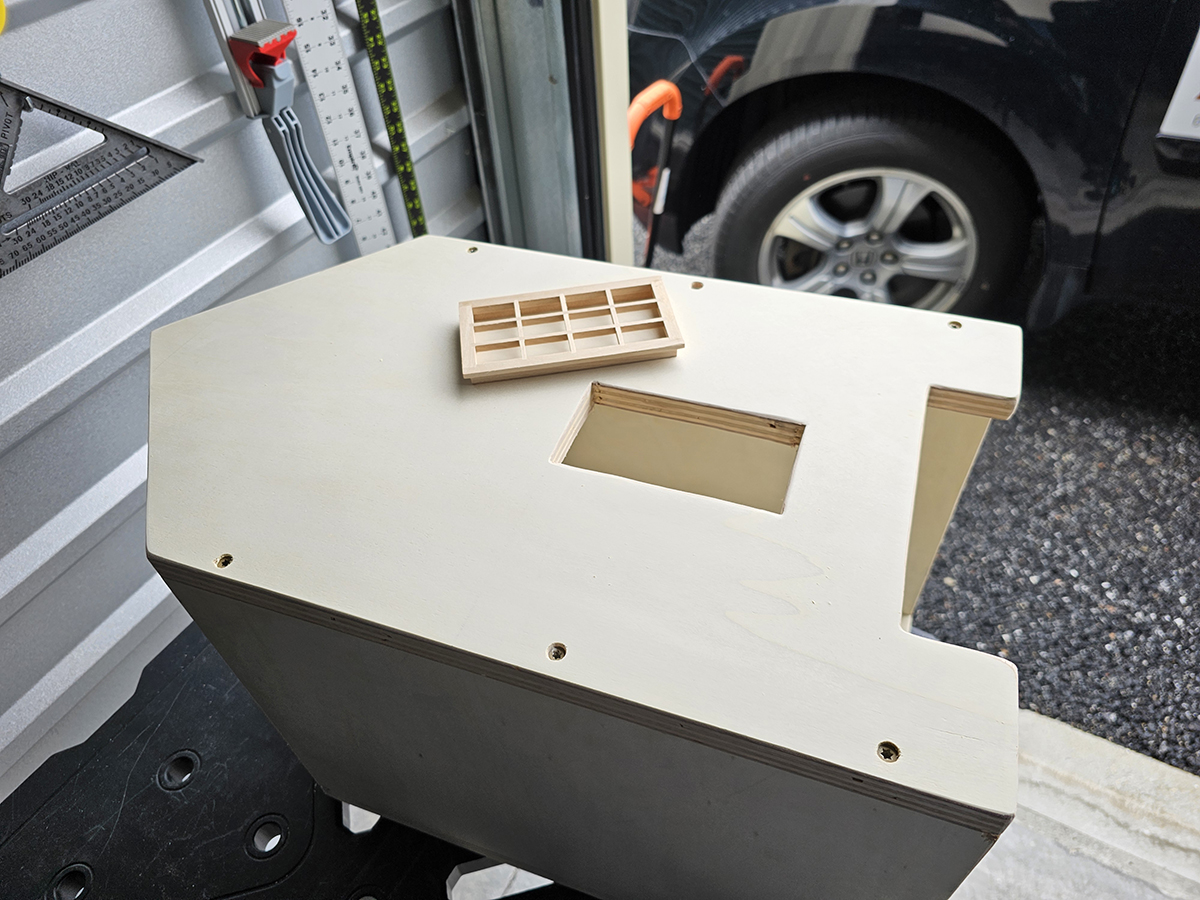
Window Layout and Installation
To create visibility into the feeder's status lights, I measured and marked each opening before cutting it out with a jigsaw. The windows, sourced from Hobby Lobby, fit snugly into place and are easily removable for painting. While the client only asked for basic visibility, I added framed windows to enhance both function and appearance.
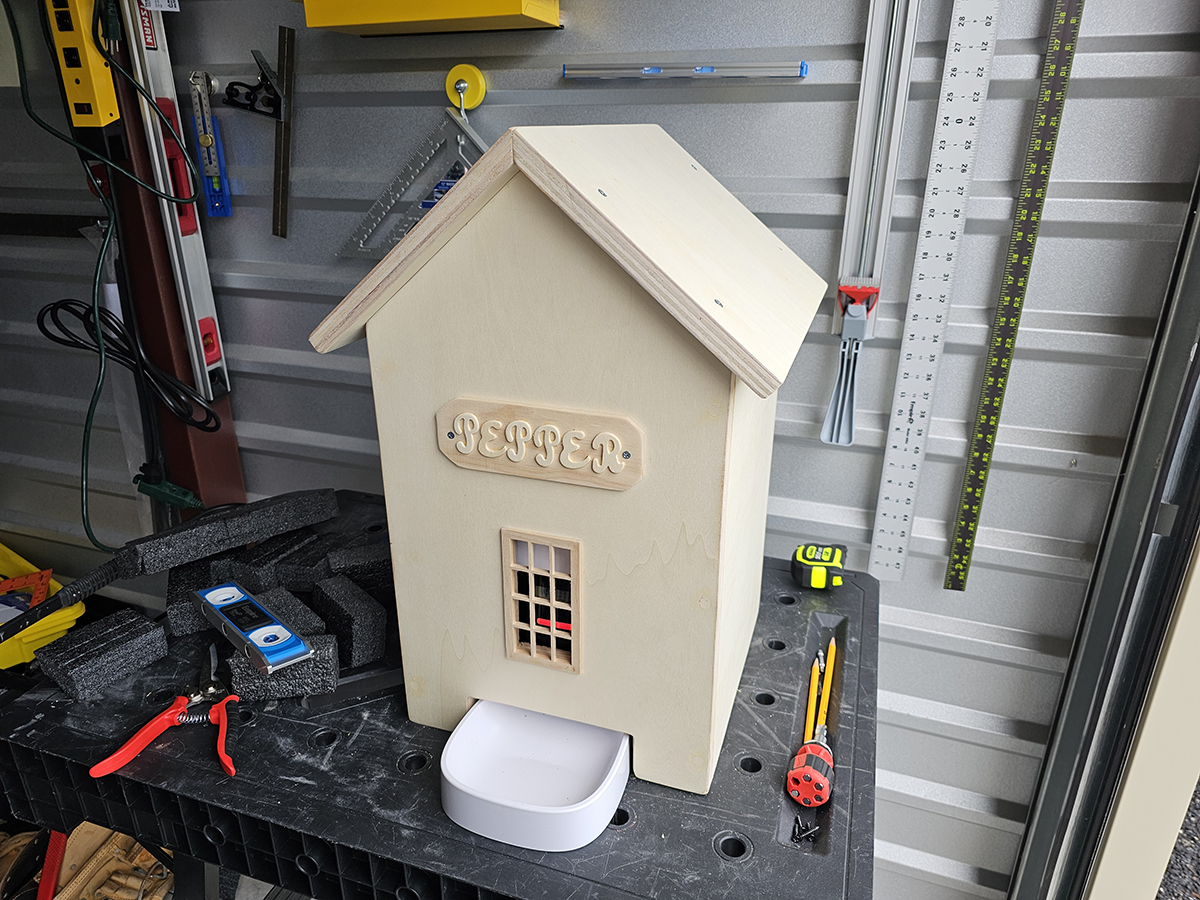
Foam Installation and Roof Assembly
The interior space allowed for foam padding, supplied by the customer, to help keep the feeder stable while preventing direct contact with the plywood. I reused foam board fasteners left over from a prior bathroom project, which worked perfectly for securing the insulation. I initially tested a hinged roof design, but ultimately chose to screw the tops down to avoid safety issues from the sharp peak. Masking tape helped position the roof panels securely during final installation.
From Concept to Completion
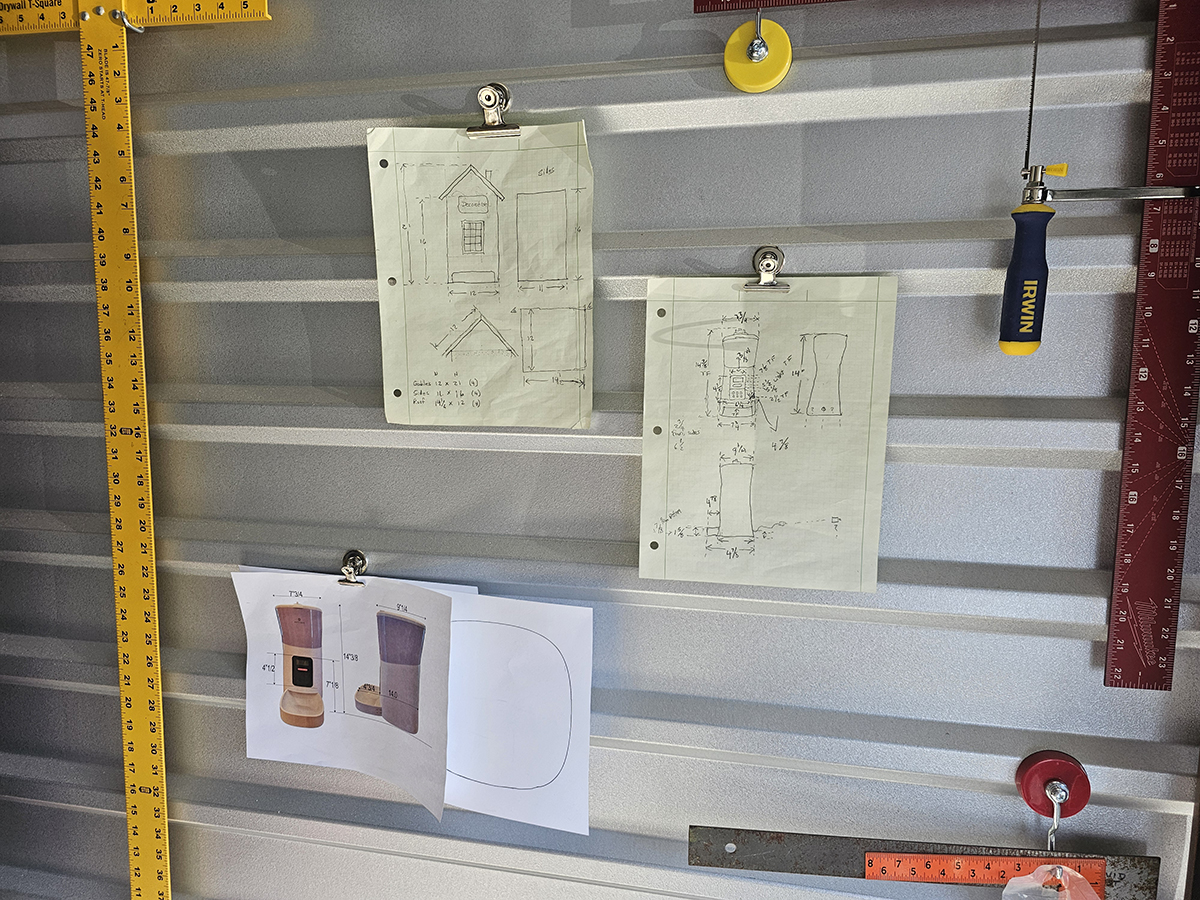
As with most of my custom projects, I began with a semi-to-scale sketch on graph paper, followed by precise measurements for the actual build. To personalize the project, I crafted removable wooden nameplates using letter tiles from Hobby Lobby or Michaels, adding a warm, custom touch. While I was compensated, I only charged a minimal amount for both cabins, as the project was close to my heart. The finished pieces were intended as a birthday gift from the parents to their daughter, and it was a pleasure to help bring that idea to life — especially for a fellow cat-loving family.
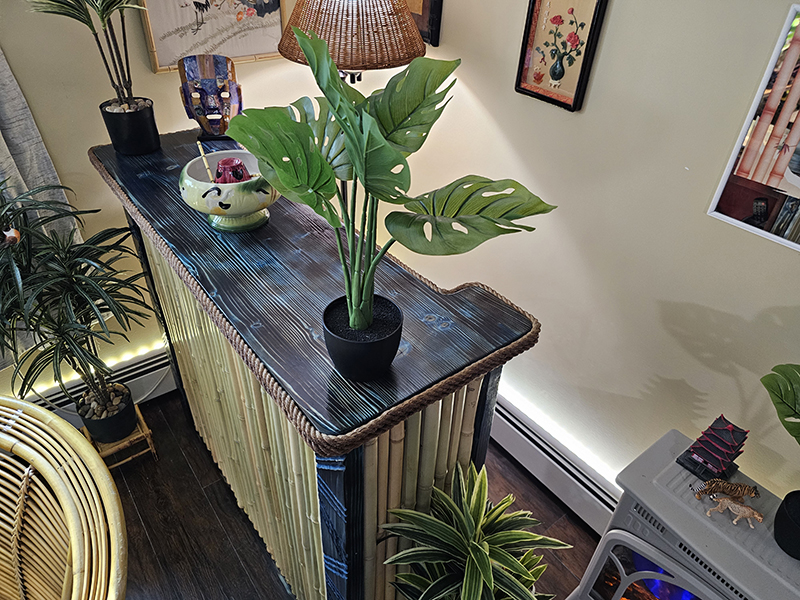
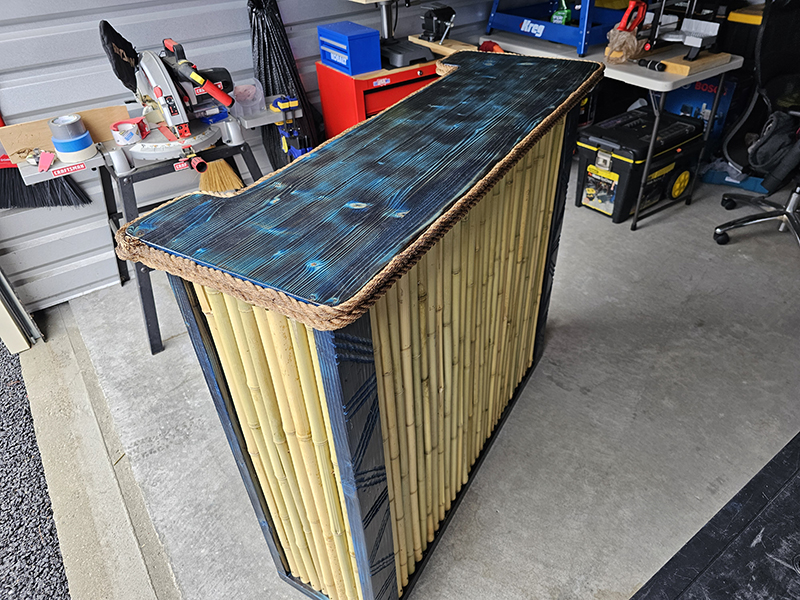
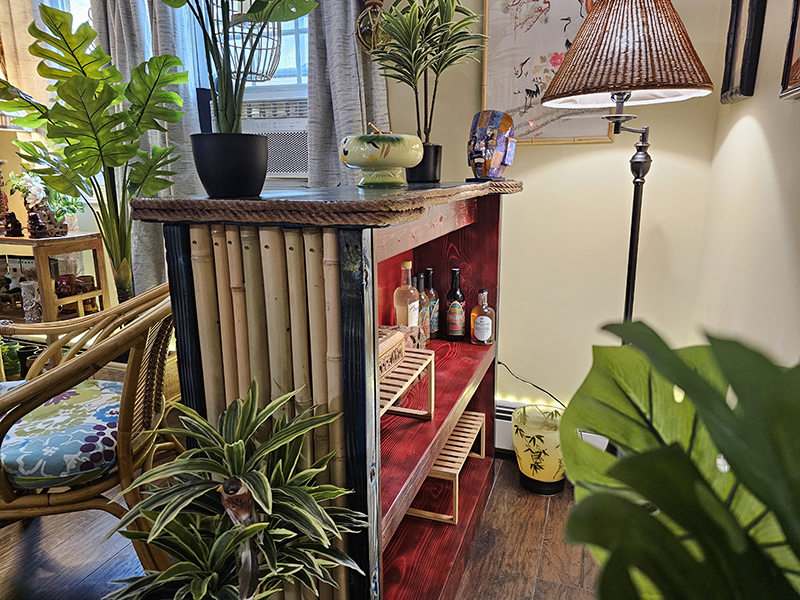
Why a Bamboo Tiki Bar?
I’ve always been drawn to the style and atmosphere of Polynesian-inspired tiki design. With limited space to work with, I set out to create a compact, lightweight tiki bar suitable for an apartment or smaller setting. Simplicity and portability were key — the final result is a bar that can be lifted by one person, though it’s more easily transported with two, especially once the bar top is attached. This build served as my prototype, with the intention of developing a design that could be easily replicated.
Initial Design and Material Selection
As with most of my custom builds, I began with a rough, semi-scaled sketch on graph paper. I aimed for a straightforward design that could evolve during the build process, so I didn’t require a detailed blueprint at the start. While this prototype has room for refinement, it laid the foundation for a repeatable and adaptable concept. A more formal set of plans and documentation will be developed based on this initial build.
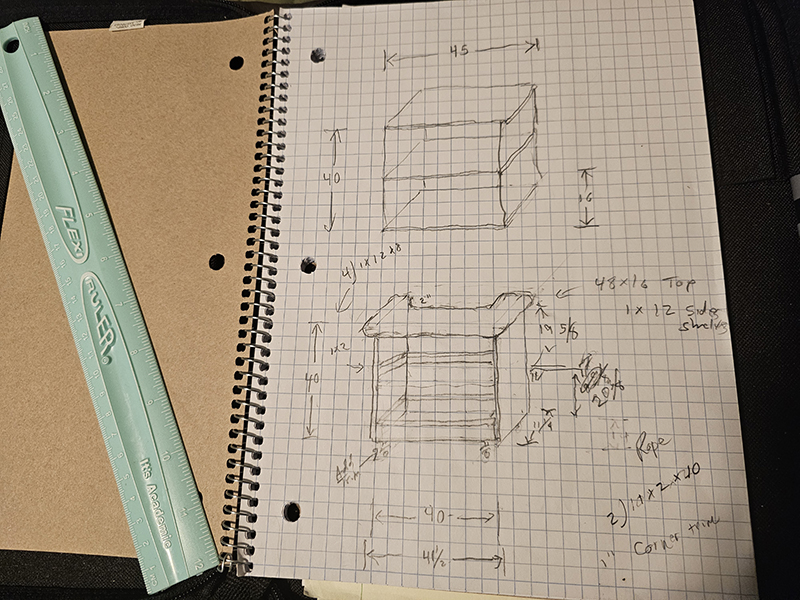
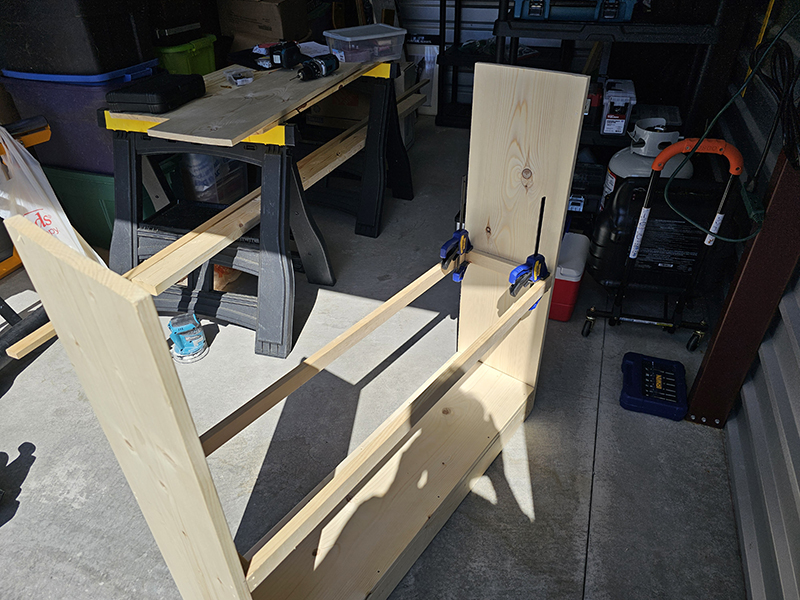
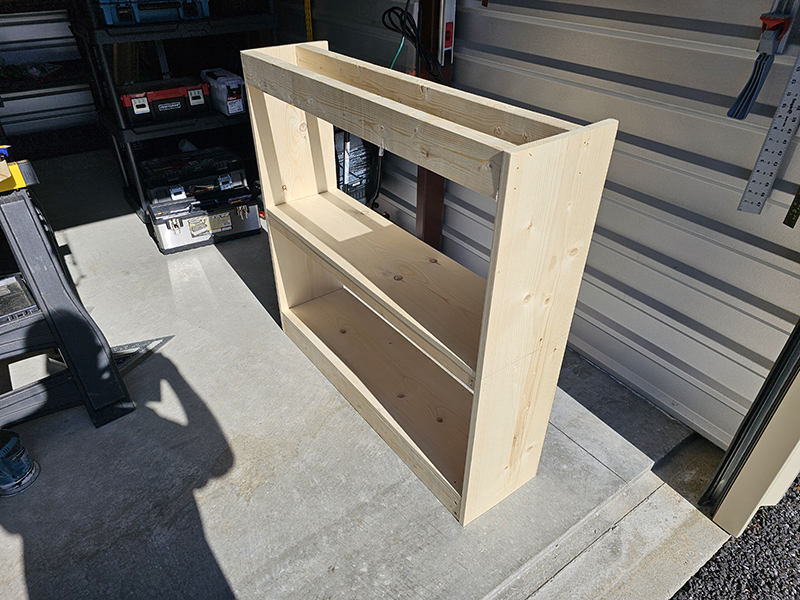
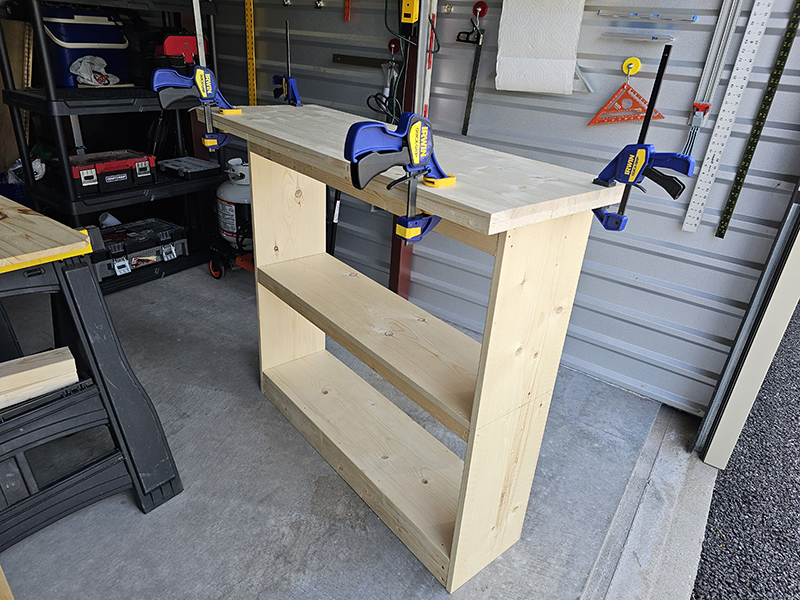
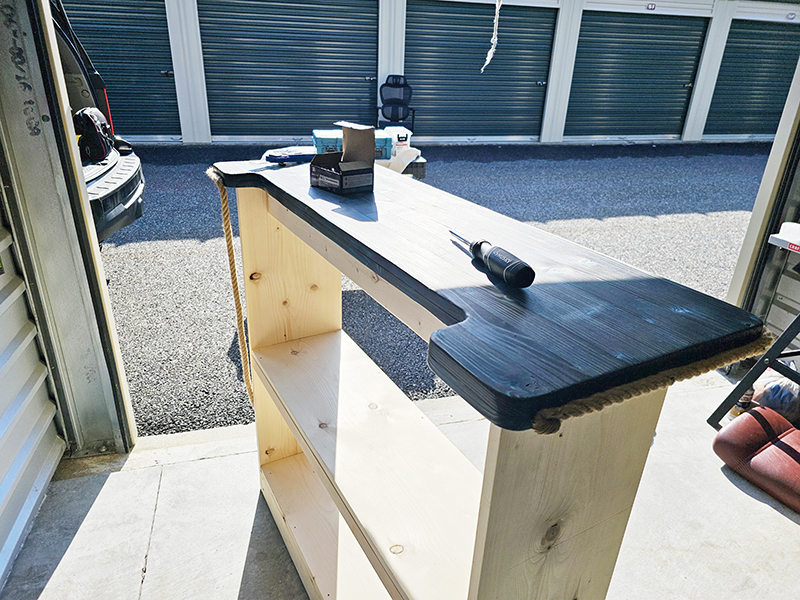
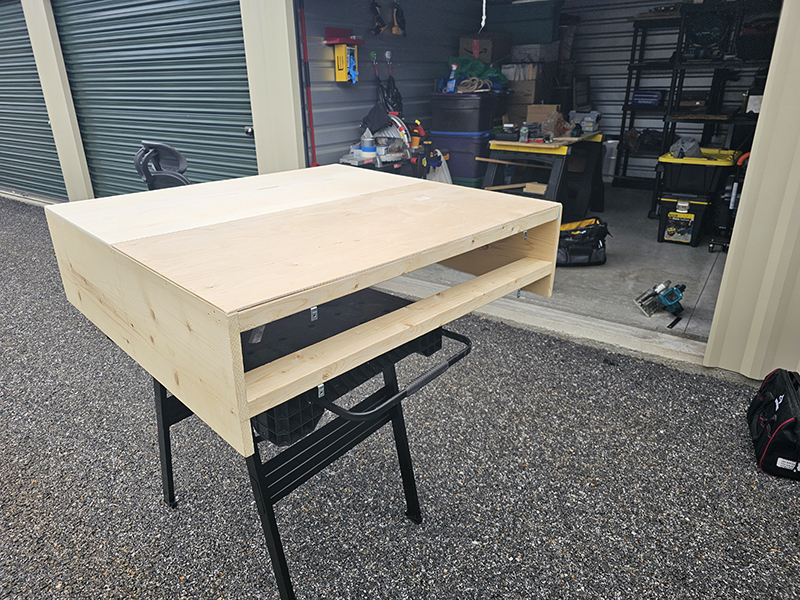
Shelves and Framing Complete
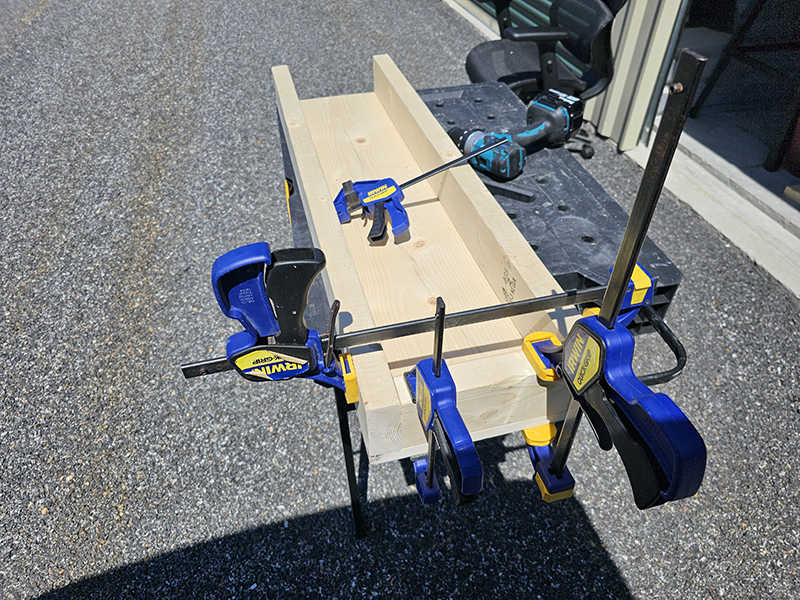
The base shelf is supported by sturdy 2x4 framing, providing a solid foundation for the structure. For the middle shelf, I used 1x2s for support — though in hindsight, 2x4s or 2x3s would have offered better anchoring for the final bamboo finish, particularly for securing with screws. 2x4s were used to support the bar top, and eventually I added additional 2x support on the sides for screwing on the bamboo. The bar top was made from two stain-grade project boards, glued together to add thickness. While they worked for this prototype, I may explore alternative materials for future builds, as the laminated panels began to slightly separate when exposed to torch heat during finishing.
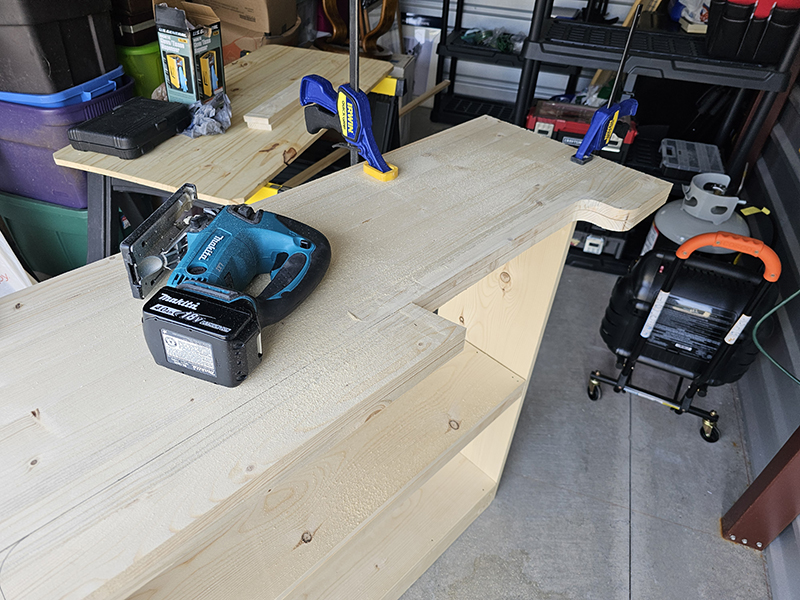
Finishing the Bar Top
Once the two boards were clamped together, I used a jigsaw to shape the bar top — rounding the corners and cutting a recess to allow easier access to the shelves. For this prototype, I cut the boards before gluing them together, though in hindsight, gluing first would have provided more stability and accuracy. The jigsaw introduced some wobble during the cuts, but I was able to refine the shape and angles with a sander.
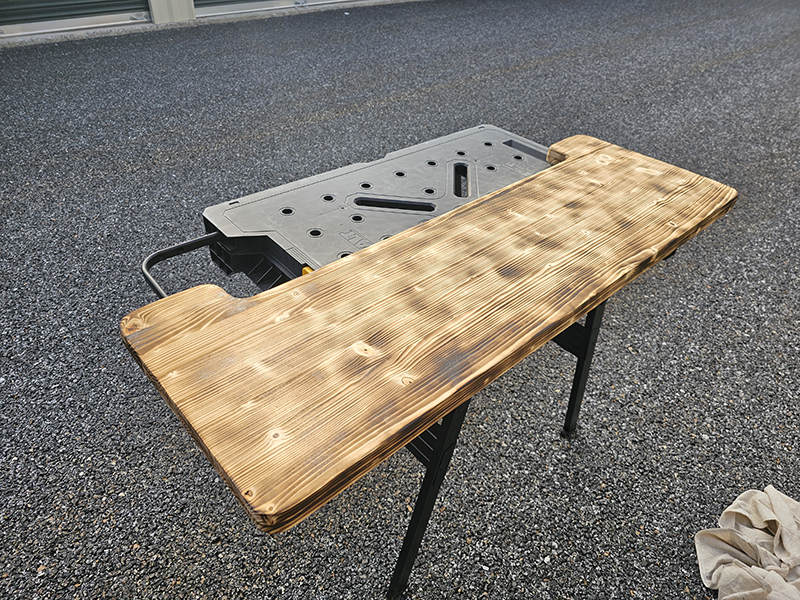
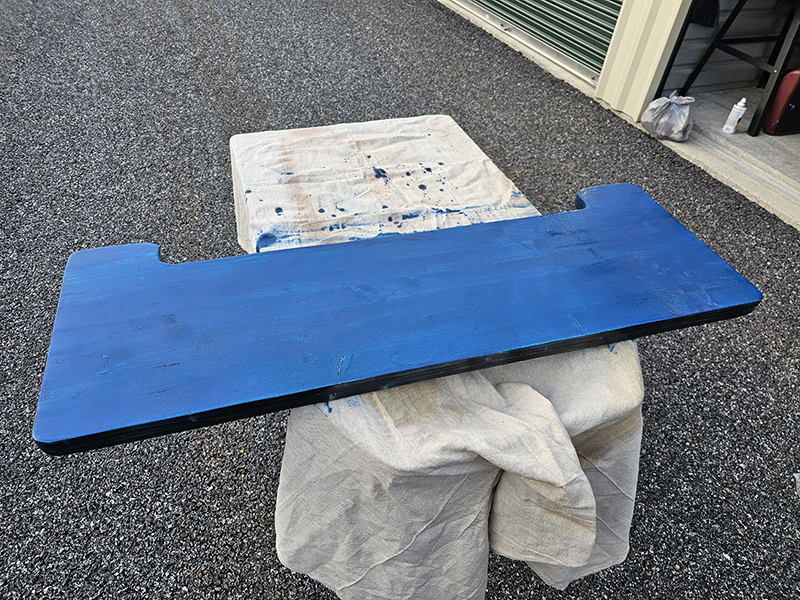
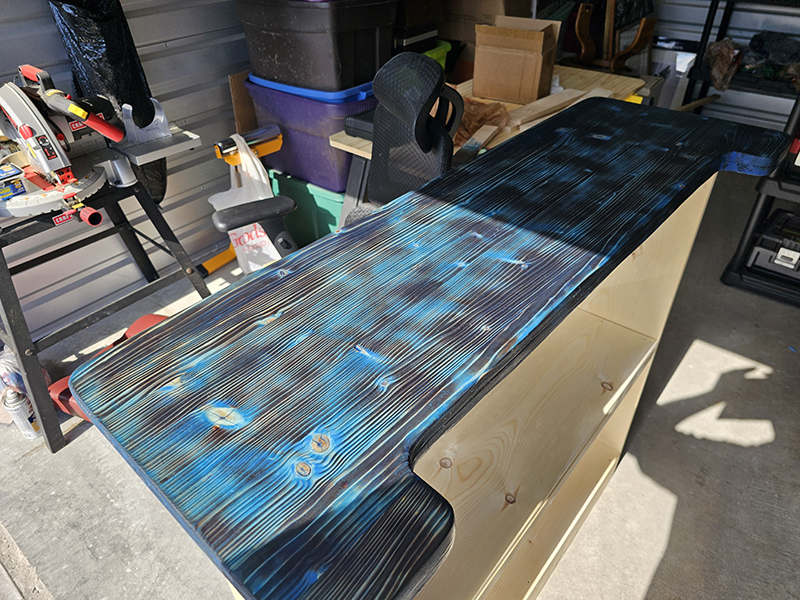
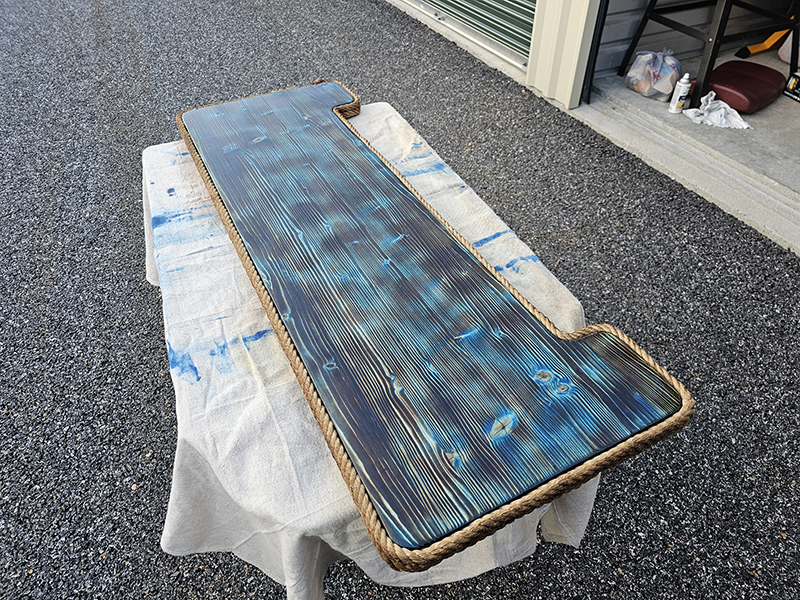
For the finish, I used a modified Shou Sugi Ban (焼杉板) technique — lightly charring the surface with a torch and brushing it out to highlight the wood grain and natural knots. The original light wood tone offers a wide range of stain possibilities, but for this build I experimented with Marine Blue from the Minwax Oil-Based Color Series to complement the ocean/tiki aesthetic. The stain was wiped shortly after applying to expose the wood grain through the stain.
To carry the ocean theme further, I wrapped the bar’s edge with two rows of rope. Several coats of polyurethane were applied to seal and protect the surface while enhancing the depth and sheen of the color and grain.
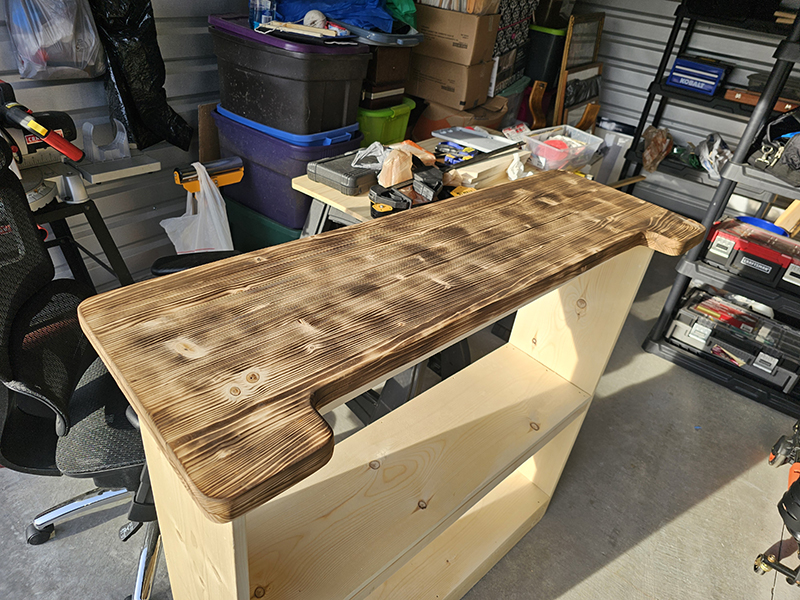
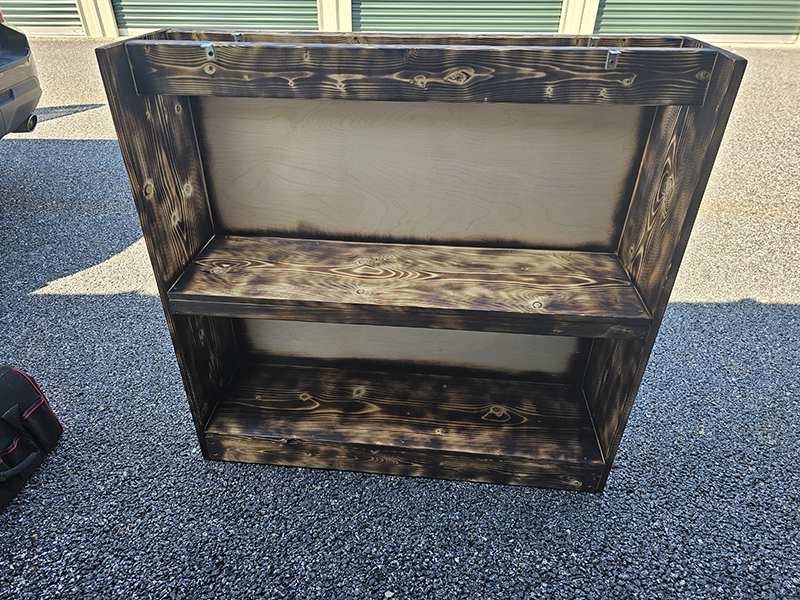
Adding Lauan and Finishing Bar Shelves and Frame
Although I hadn’t originally planned for a backing, I decided to add Lauan plywood panels to enclose the shelves and create a stable surface for the bamboo finish. This backing helped reinforce the bar's structure while offering a cleaner finished look from the inside.
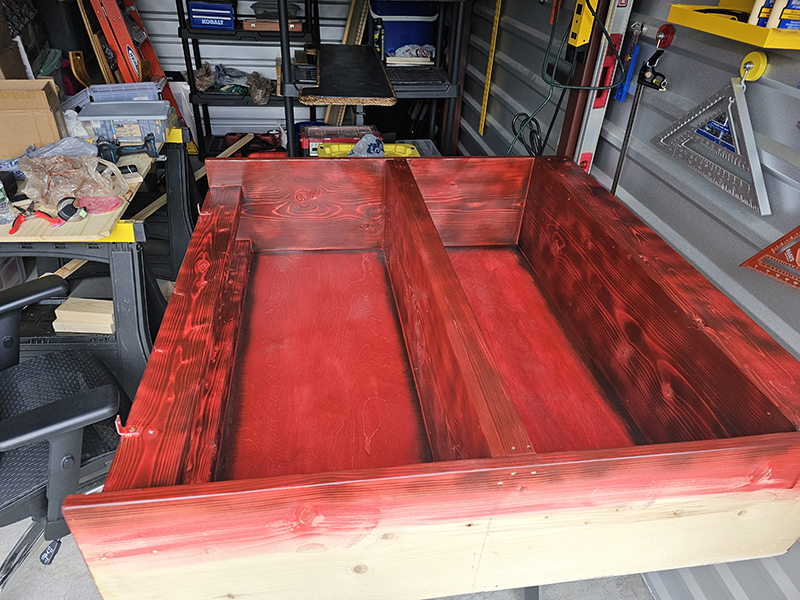
All visible framing and shelving received a modified Shou Sugi Ban (焼杉板) treatment to highlight the wood grain and provide visual depth. For contrast, I used a barn red stain on the shelves and interior frame, offering a warm tone that stands out nicely against the torched texture. While the Lauan panels added structure, their thinness made them prone to scorching when using the torch. Fortunately, the result produced a subtle sunburst effect — an unexpected visual that works for this prototype, though in future versions I may torch surrounding areas first or consider alternative materials for backing.
The bar top will be secured using four angle brackets, which provided sufficient hold for this prototype. However, for production versions or heavier tops, I may opt for additional brackets or larger fasteners to ensure long-term durability.
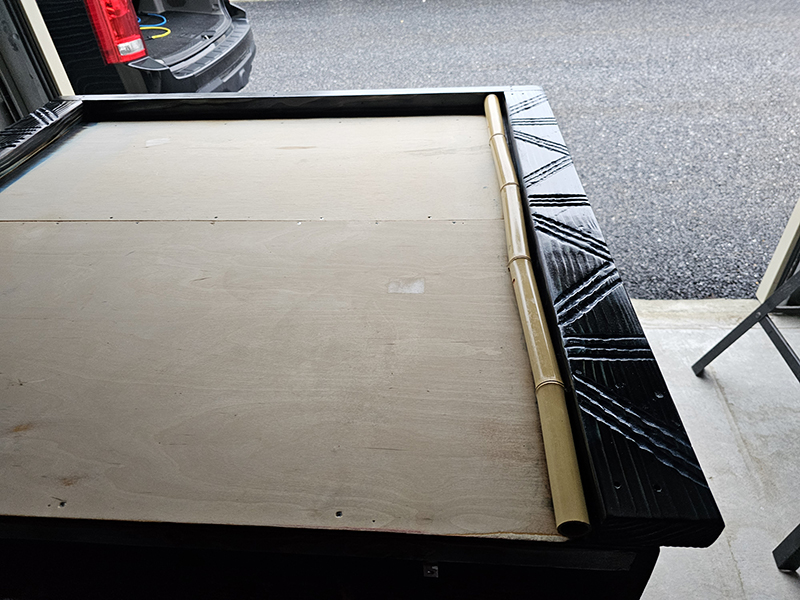
Ready for Bamboo Framing and Application
This stage of the build involved some on-the-fly design adjustments to accommodate the 1-inch bamboo facing I planned to use along the front and sides of the bar. I installed 2x2 boards along the bottom and back to support the bamboo slats, and used 2x4s as vertical framing along the front corners. These 2x4s also served as decorative elements, where I carved a simple tiki-inspired pattern using a Dremel tool with a carving bit. I chose the Dremel over a router to achieve a more organic, hand-crafted look — this was also my first time putting that tool to use after owning it for years.
All framing trim received the same Shou Sugi Ban (焼杉板) treatment used throughout the bar, followed by Marine Blue stain and polyurethane to match the bar top’s finish. For the bamboo surface, I purchased a rolled bamboo fence and carefully disassembled it into individual slats. To minimize splintering and preserve the integrity of each piece, I used a manual miter box for cutting. Though time-consuming, this method allowed me to maintain straight, uniform cuts. The bamboo was secured using finish screws along the top and bottom of each section.
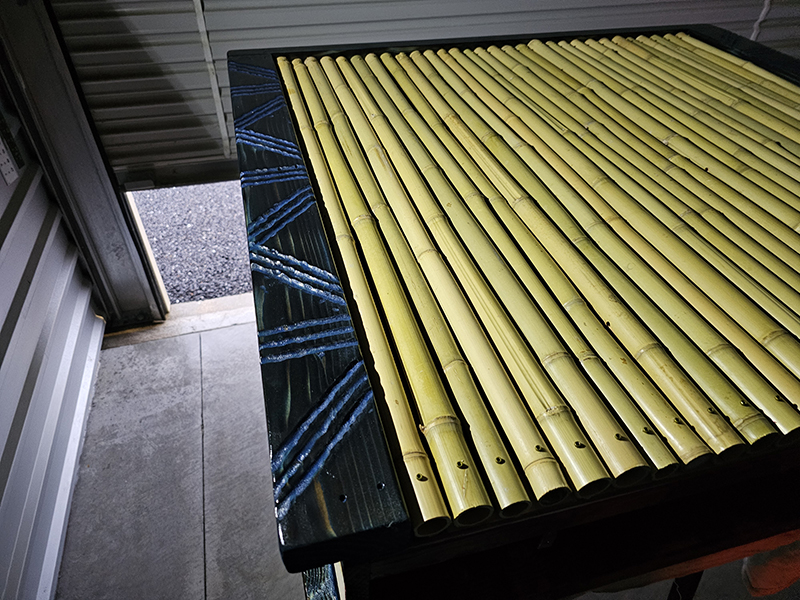
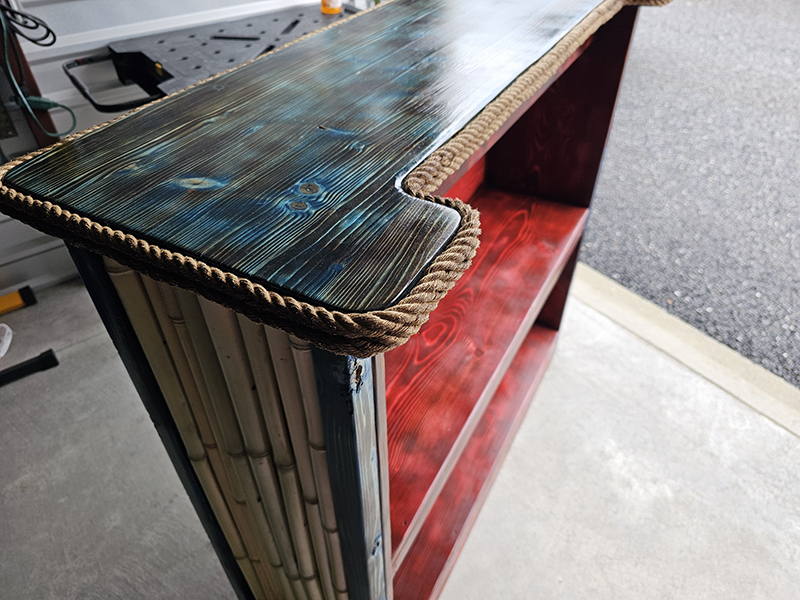
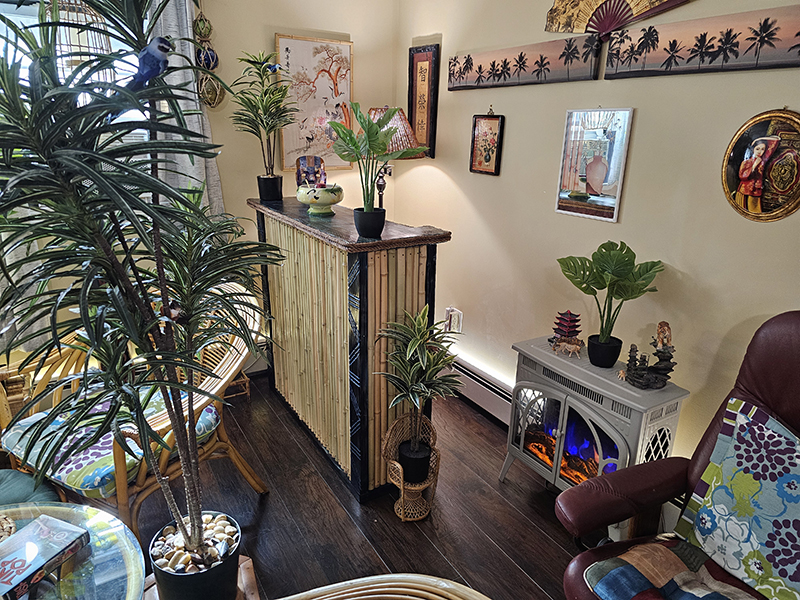
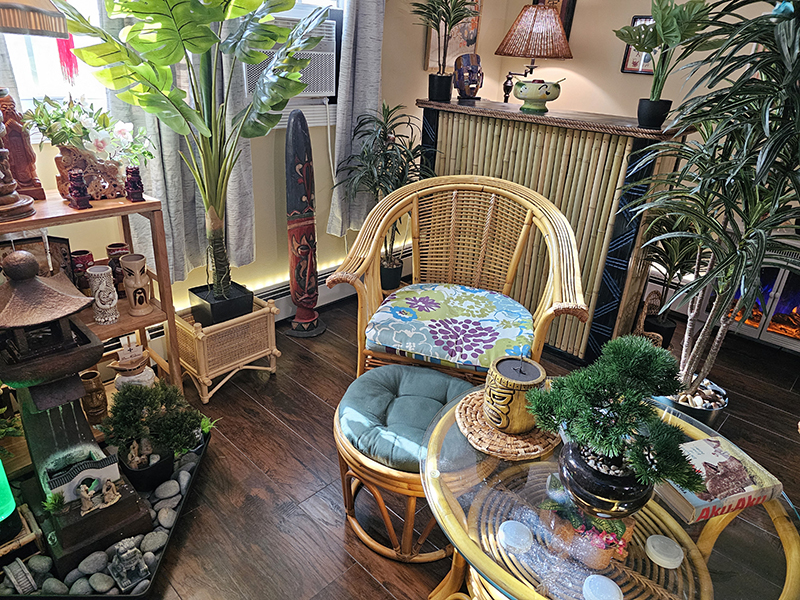
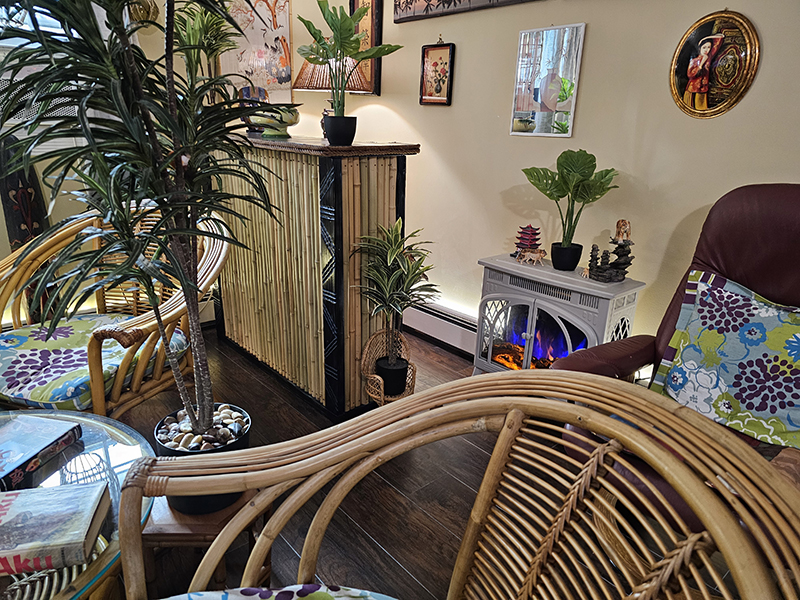
Finished Bamboo Tiki Bar – Prototype Showcase
Here’s a look at the completed prototype of the Bamboo Tiki Bar. While the build itself was a design-as-you-go process, the finished piece came together with both function and personality. I happened to have a good amount of complementary tiki-style decor already on hand — so no, I didn’t go overboard staging the bar just for photos. That said, the result shows how easily a piece like this can become the centerpiece of a themed space.
This prototype represents a versatile design that can be customized in a number of ways. Whether you're looking for bamboo, reclaimed wood, coastal, rustic, or even mid-century styling, this bar can be adapted to suit your space and taste. It's compact enough for small patios or apartments, but still has the visual impact and storage options you'd expect in a full-sized piece.
If you're interested in having a similar bar built — whether it’s tiki-themed or tailored to your own creative vision — feel free to reach out. This is just one example of what’s possible when practicality and personality come together in a custom build.
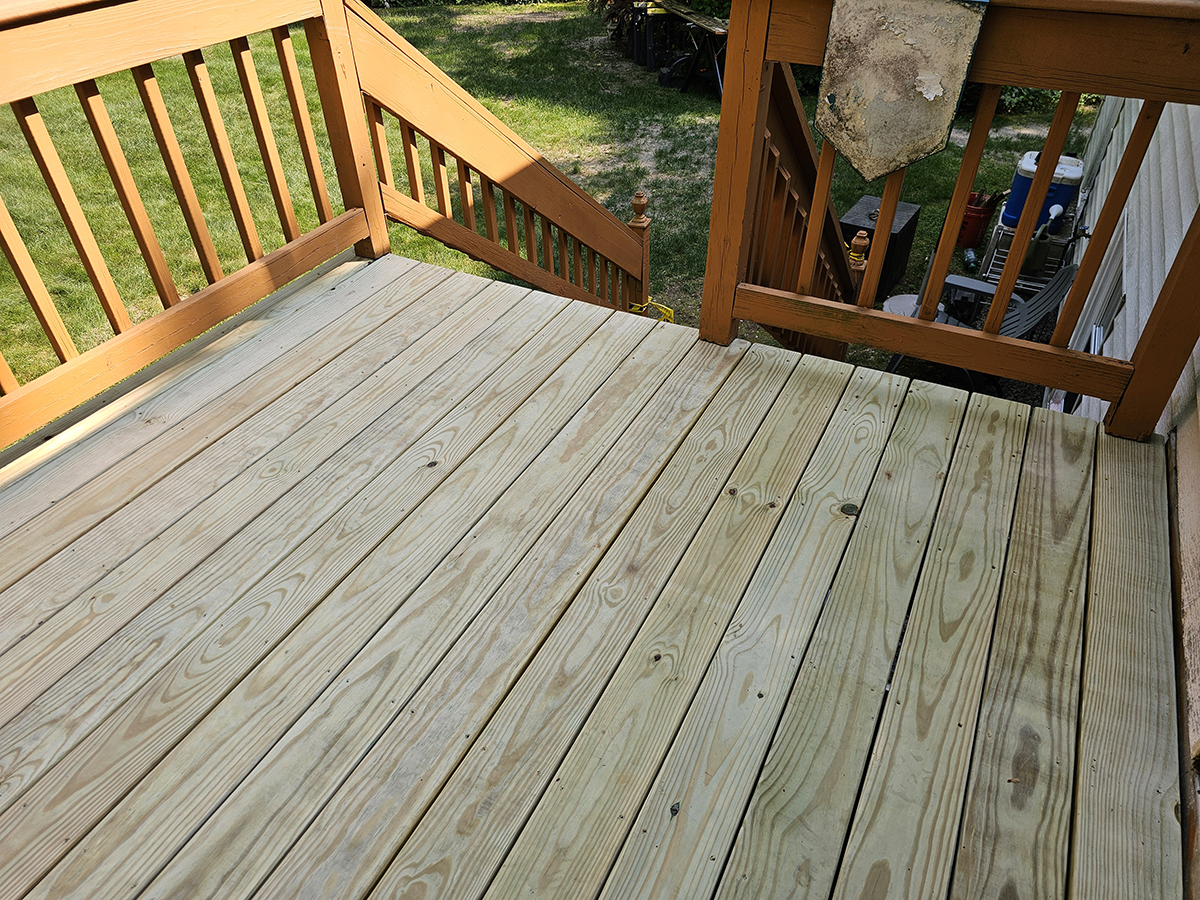
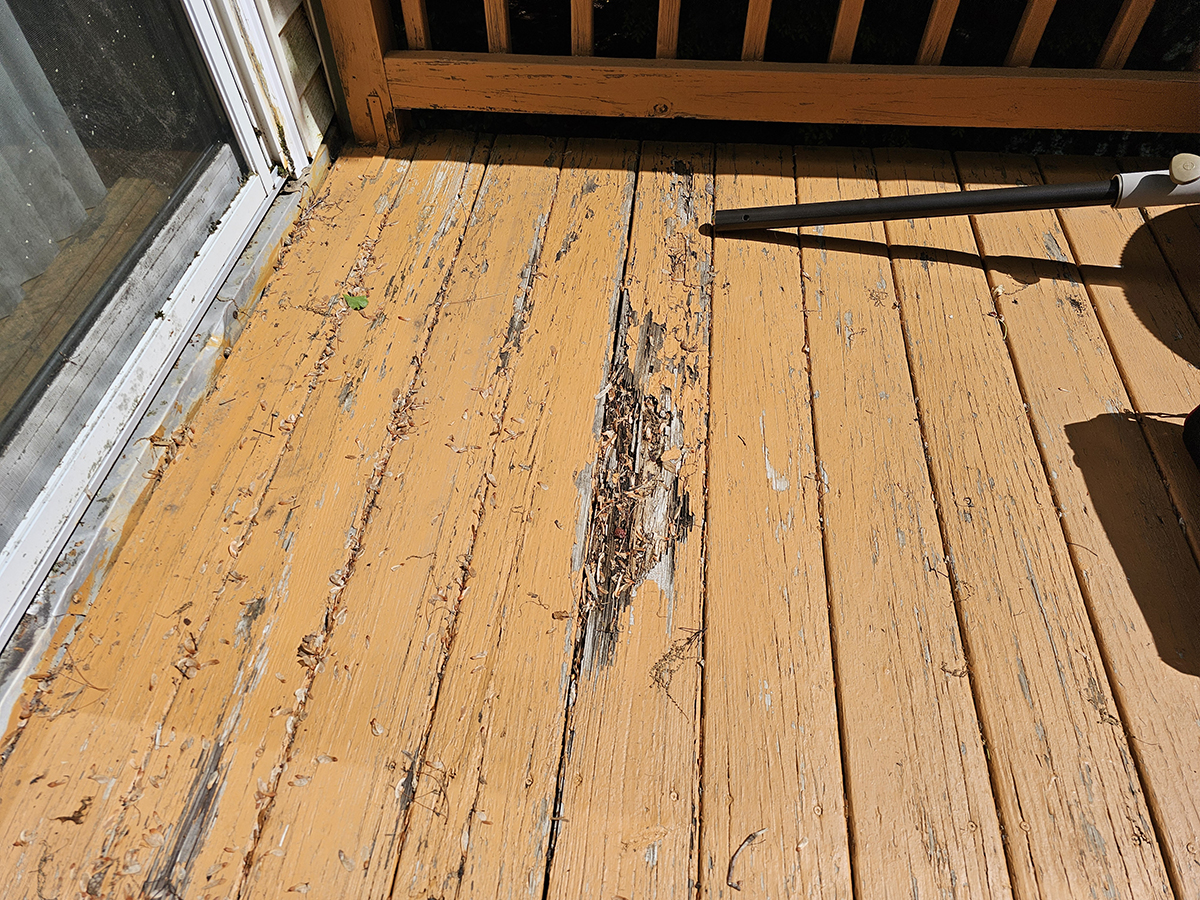
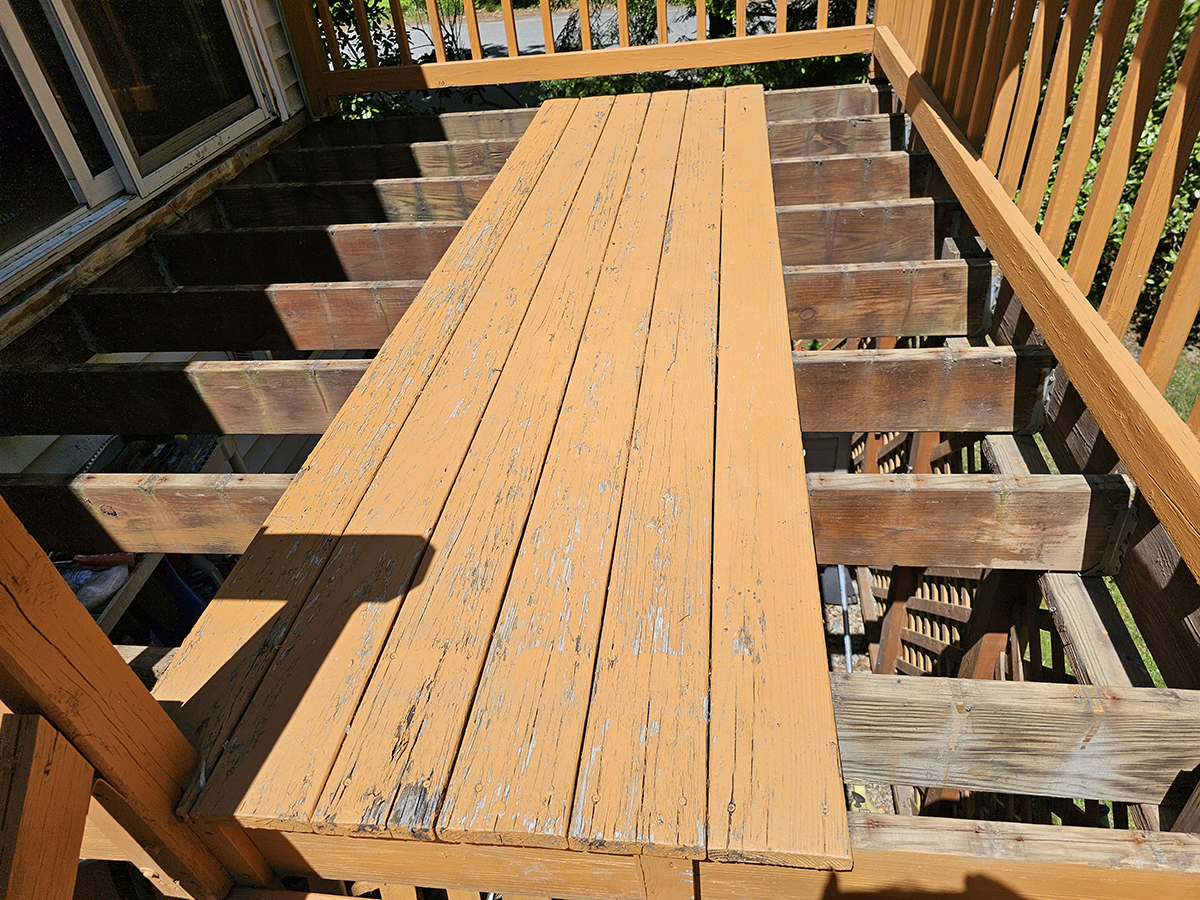
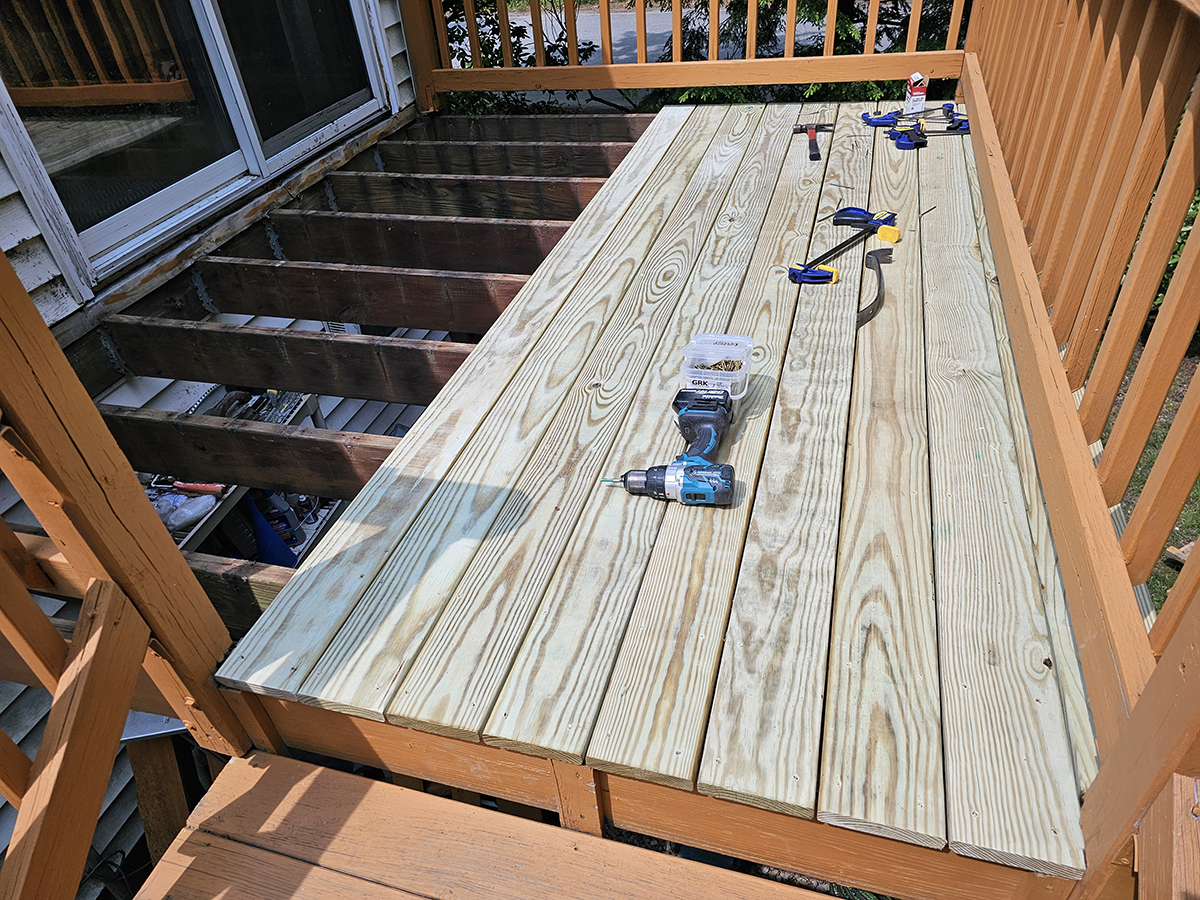
Replacing a 40-Year-Old Deck Surface
Originally built in the 1980s and well-maintained over the years, this deck began to show signs of decay due to prolonged exposure under outdoor carpeting and heavy use. The project scope involved removing all the existing decking boards and replacing them with new pressure-treated lumber. The homeowner opted to keep the original framing and flashing intact.
Identifying the Problem and Getting to Work
Several deck boards had rotted significantly, posing safety risks and compromising the deck’s appearance. On the first day, we began removing enough damaged boards to begin installing replacements the following morning.
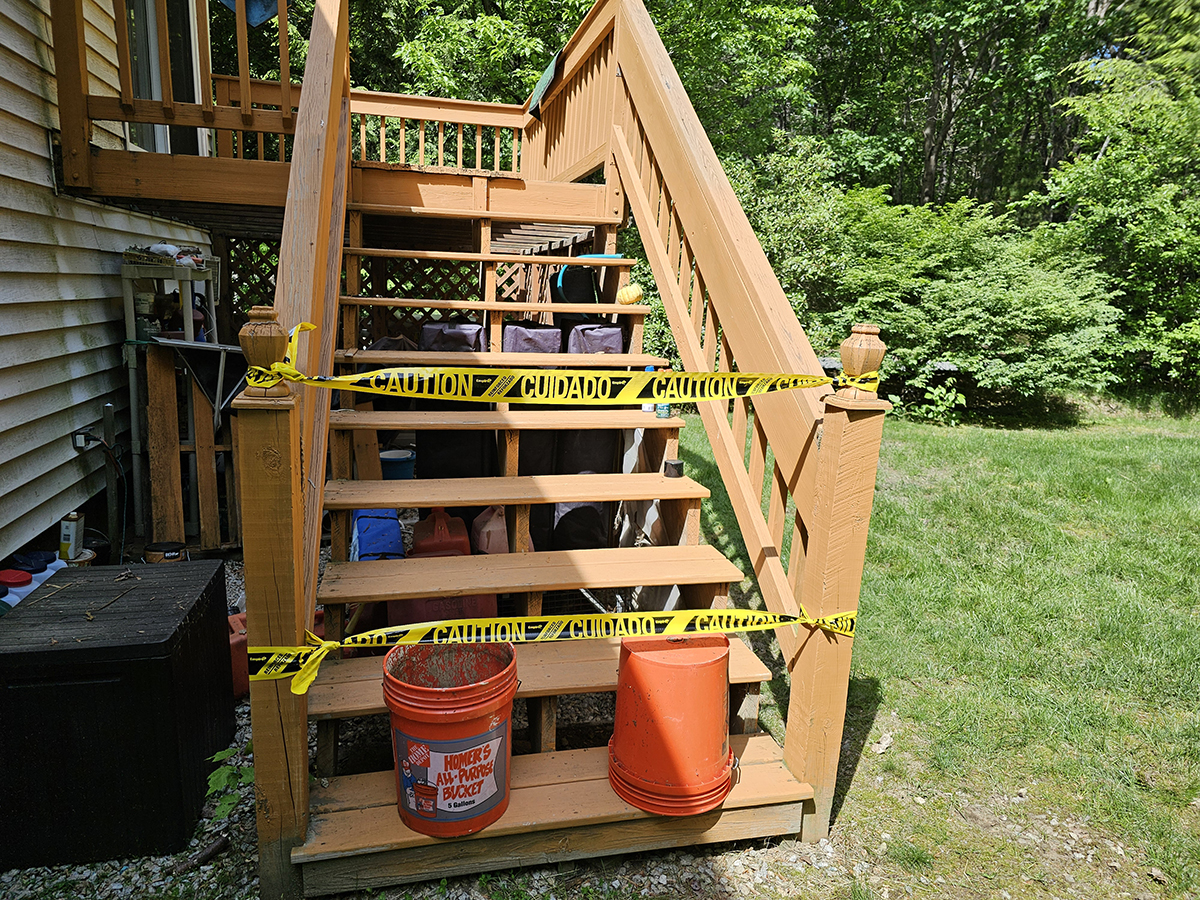
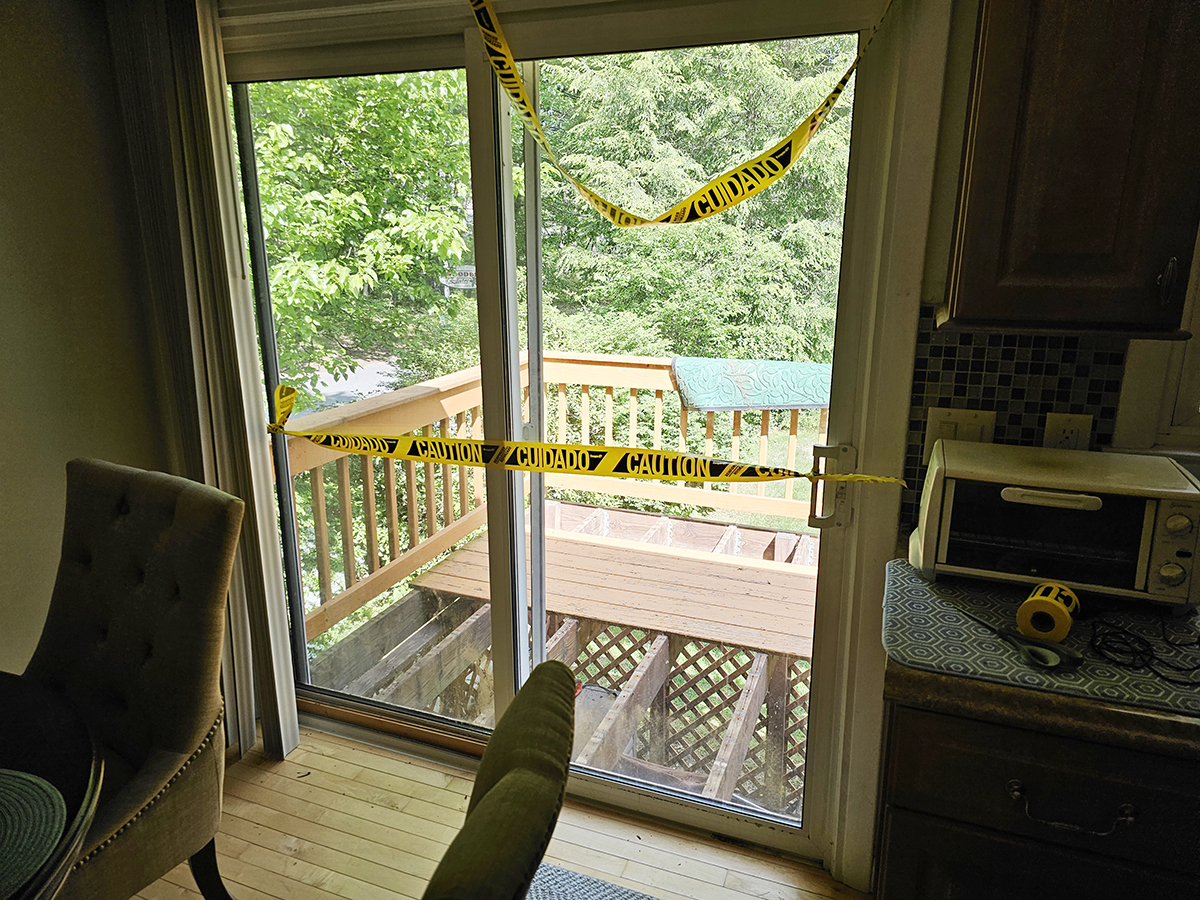
Securing the Area for Safety
To protect both the homeowner and passersby, the deck was cordoned off using caution tape both indoors and outdoors. This precaution remained in place until materials arrived and work could resume safely.
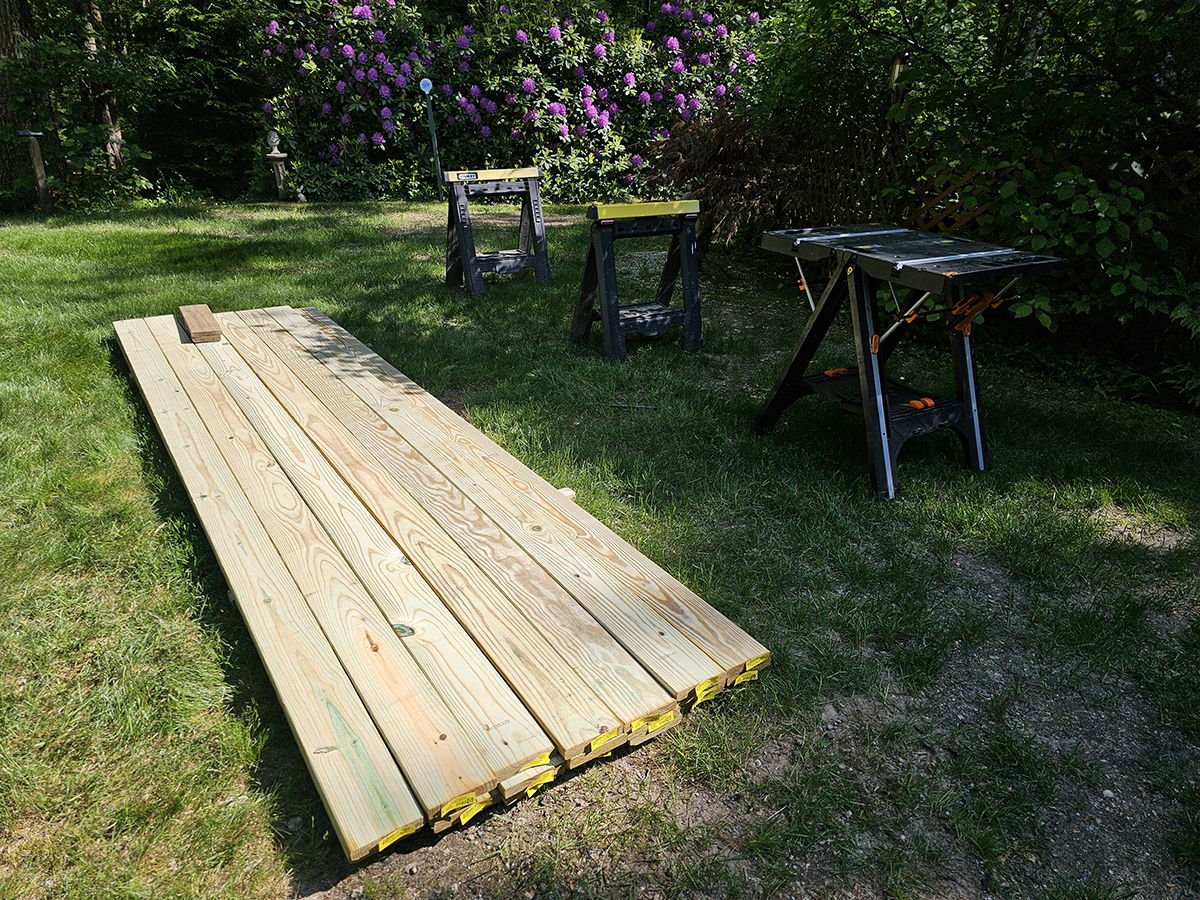
Decking Materials Arrive
Once the new pressure-treated lumber was delivered, it was hand-carried and carefully stacked in preparation for the next day’s installation. Proper material handling ensures no damage and a smoother start to the job.

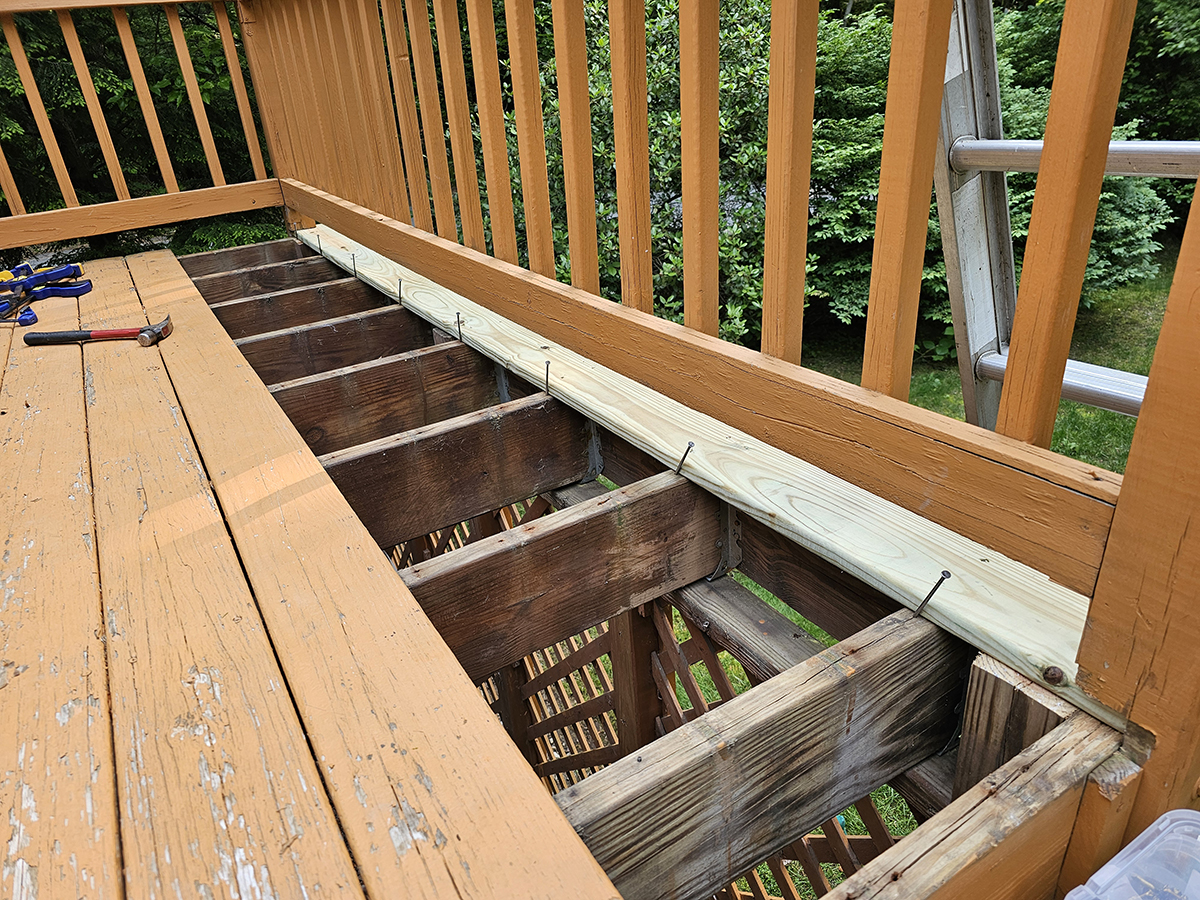
Board Installation Process
Installation began with the first board at the far end of the deck, carefully aligned with a one-inch overhang and kept straight throughout. With a portion of the new boards installed, the remaining old boards were removed to continue seamlessly across the deck surface.

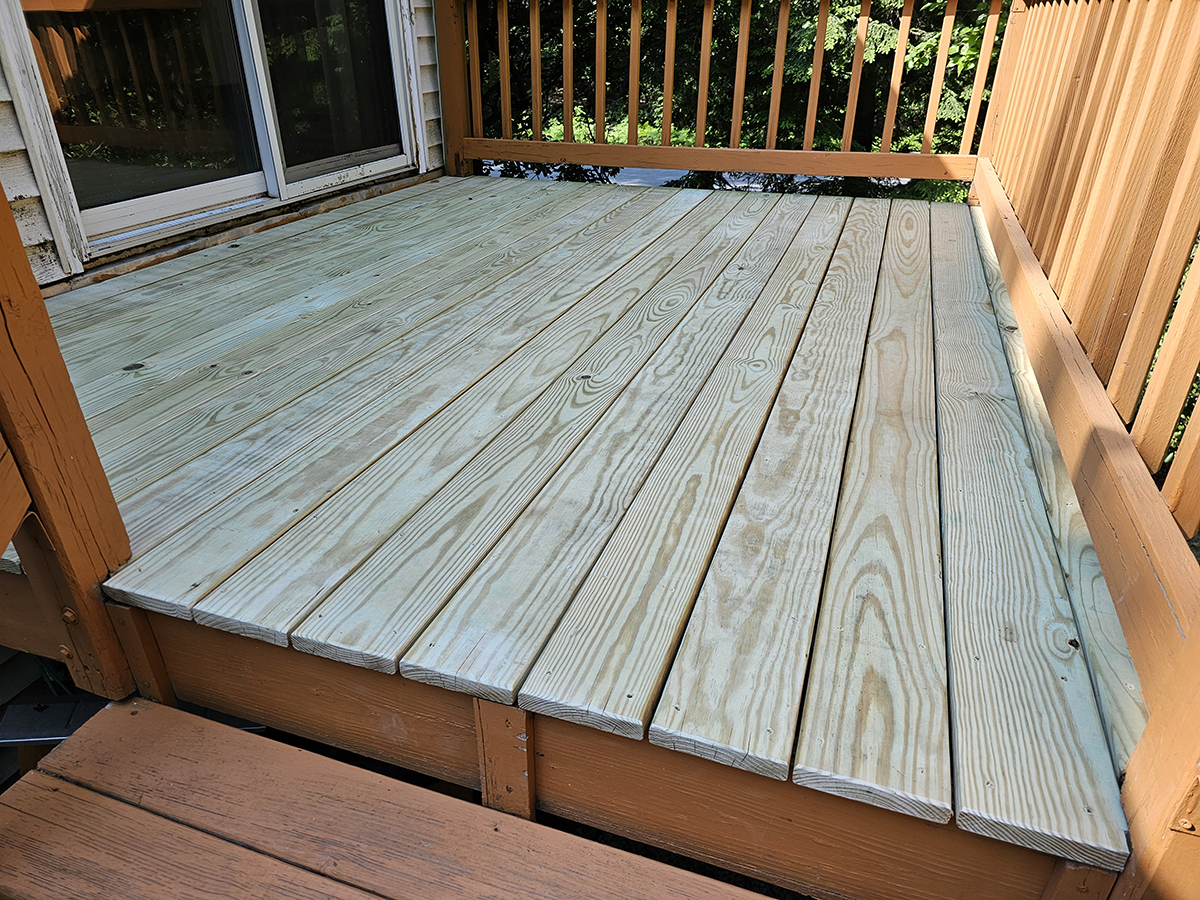
Final Installation and Finishing Touches
Although the plan was to stop halfway through, progress was steady and the decision was made to complete the deck in one go. Some of the lumber delivered was not ideal, requiring adjustments and sanding. At the stair entry, sharp corners were rounded with an orbital sander to improve comfort and safety. The final results were solid and clean — and the client was pleased.
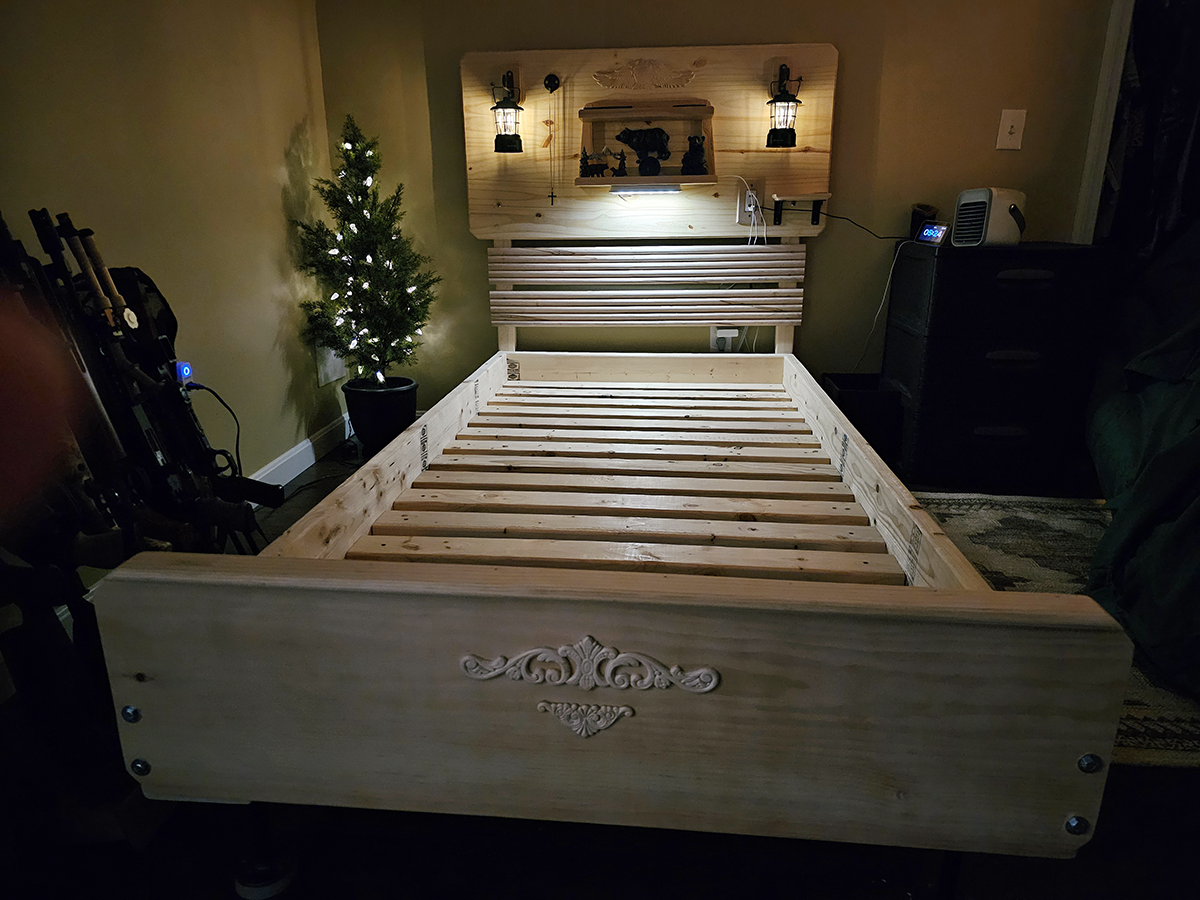
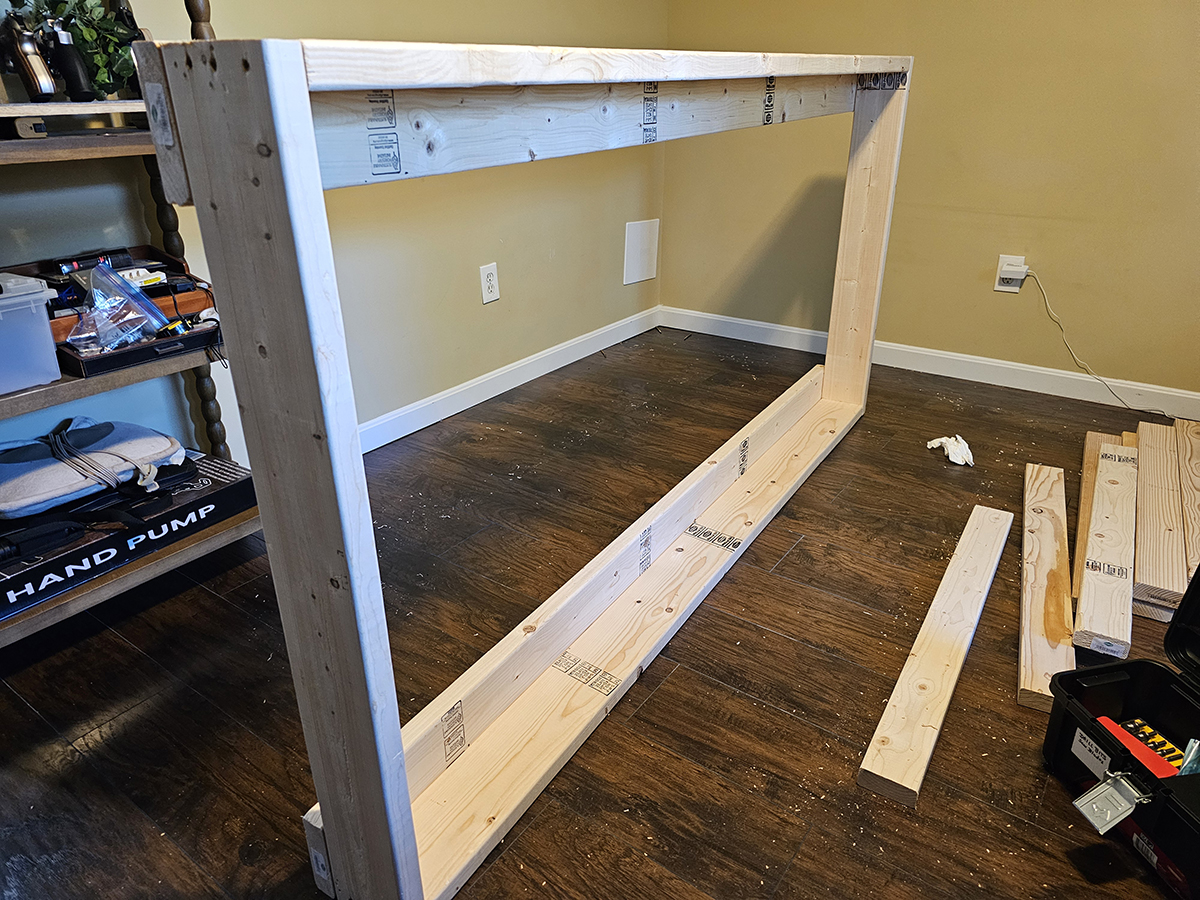
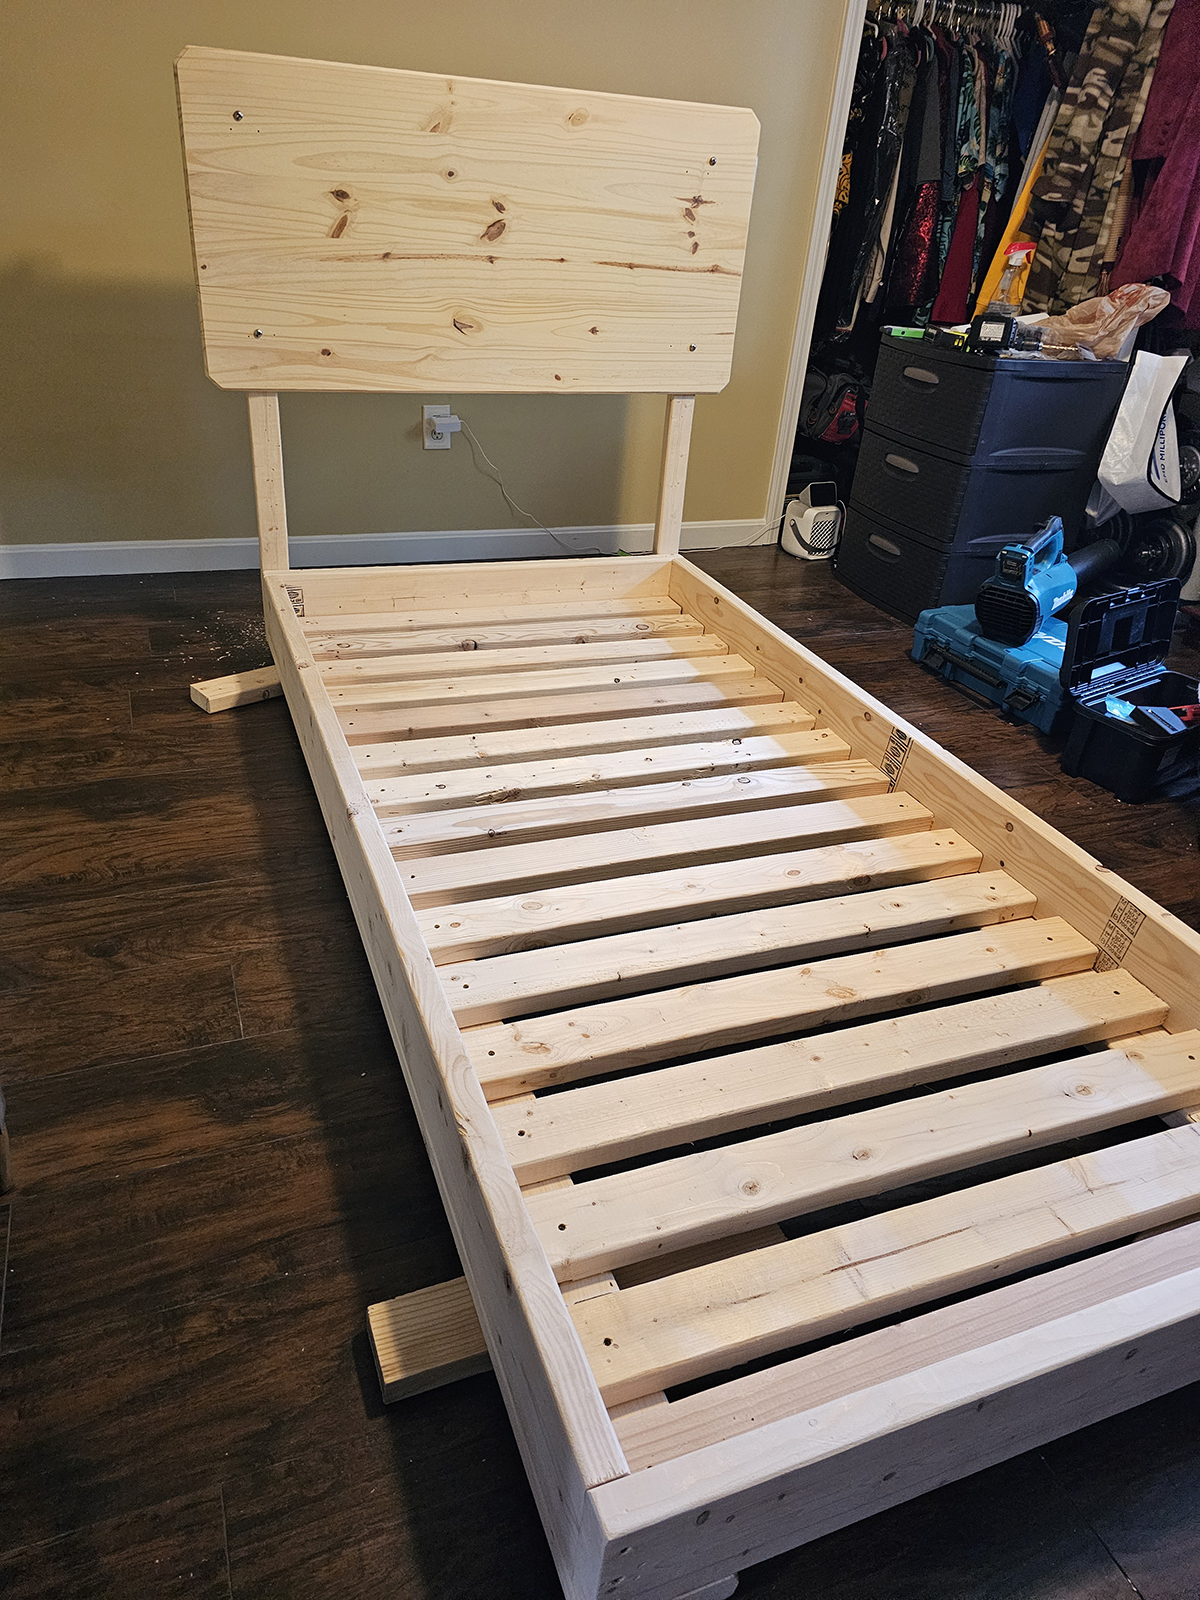
Framing the Bed
Precut all the lumber outdoors prior to assembly inside the apartment. Made initial outside frame using 3.5" deck screws connecting all of the 2x6 lumber. I carried this section outdoors again to use the orbital sander on exposed areas.
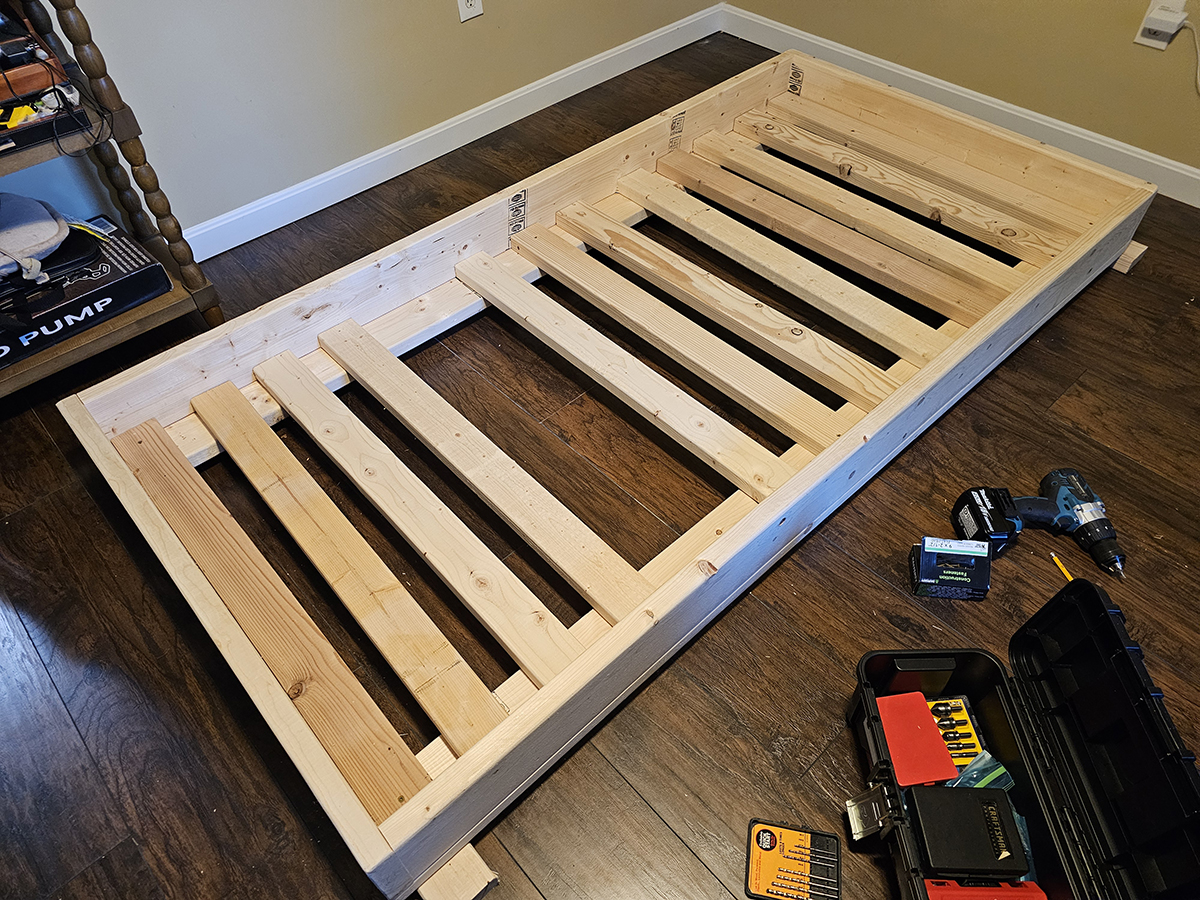
Spacing the 2x4 Slats, Attached Slats, and Added 2x3s to Attach the Headboard
Figured out how many slats I would need and calculated the spacing. Attached all slats leaving about 1-11/16" spaces between. Added the 2x3s that would be used to attach the headboard.
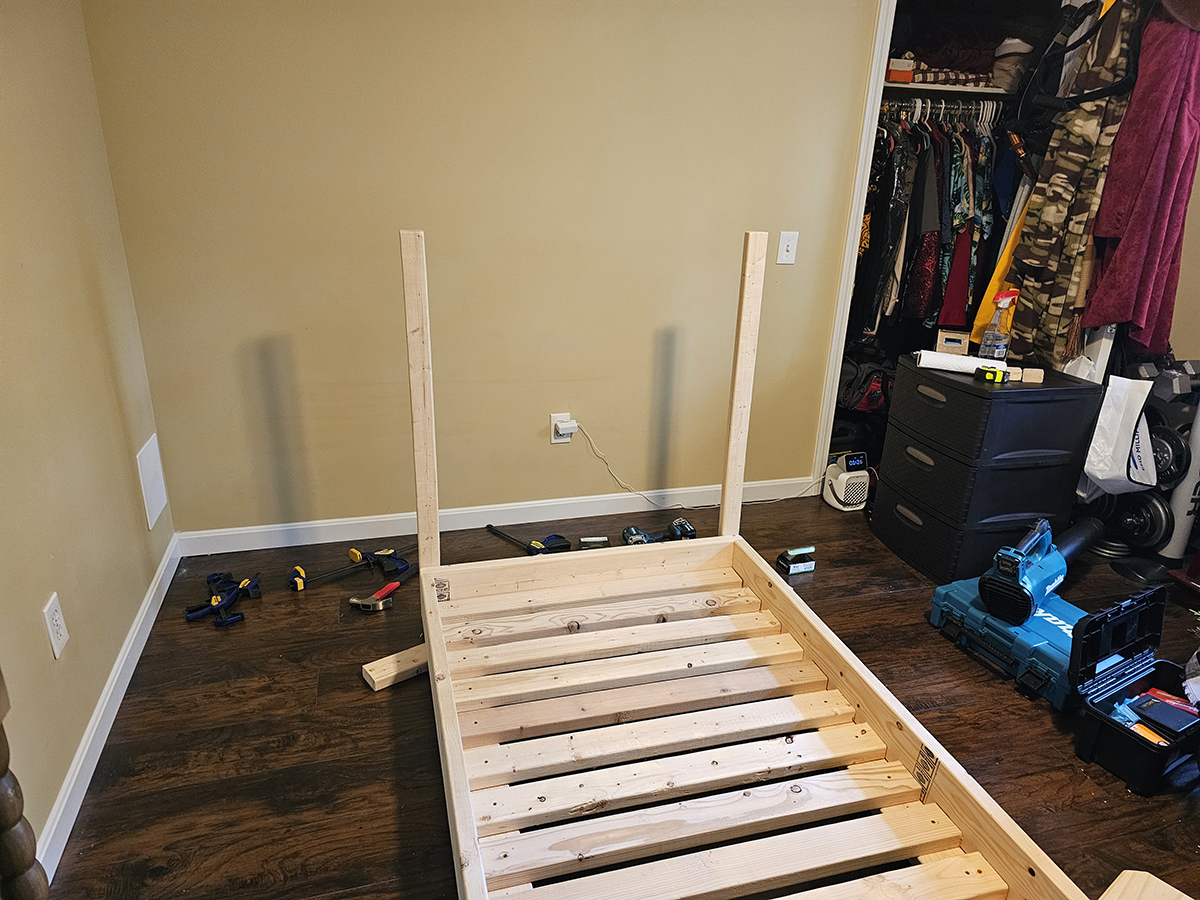
Attached Headboard
I pre routed the headboard outside for a nicer look. Using clamps I drilled and mounted the headboard with nuts and bolts for easy removal if needed.
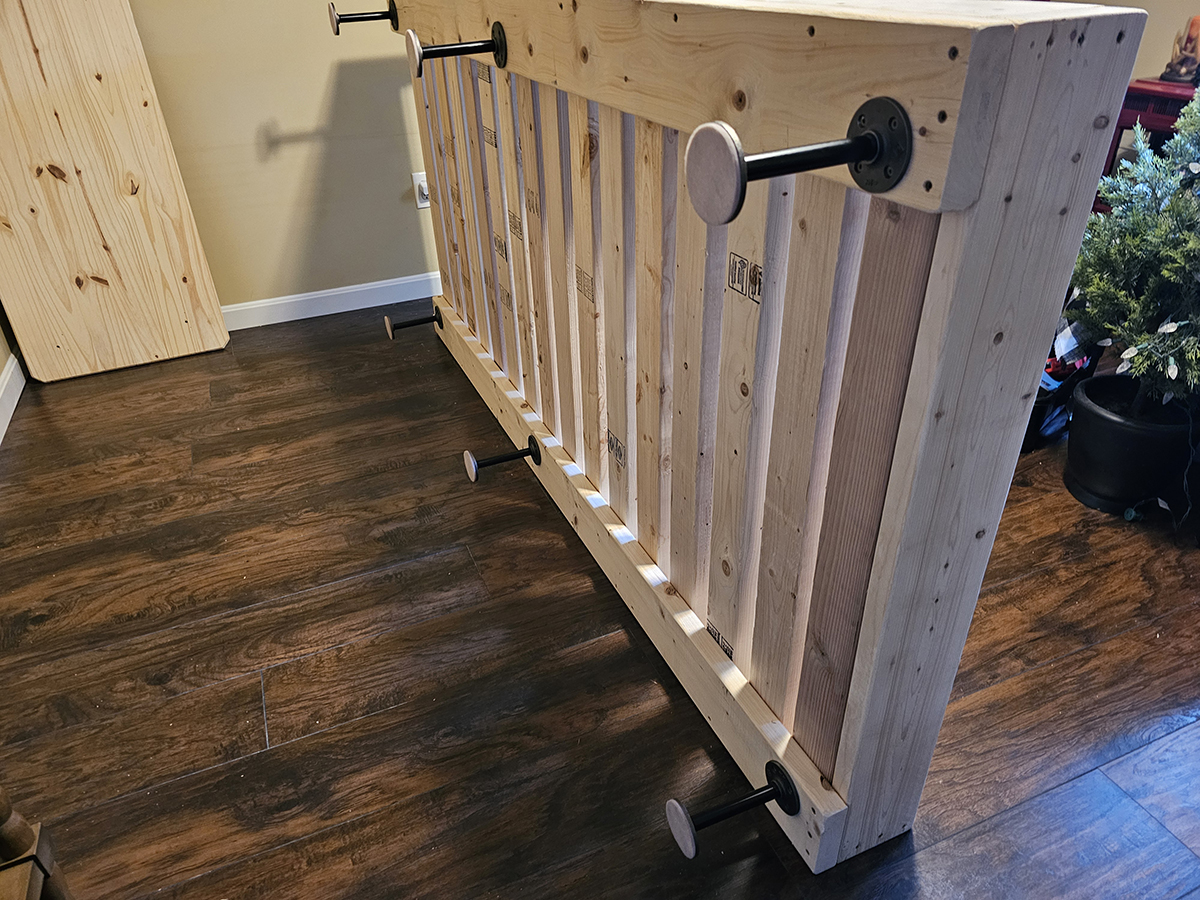
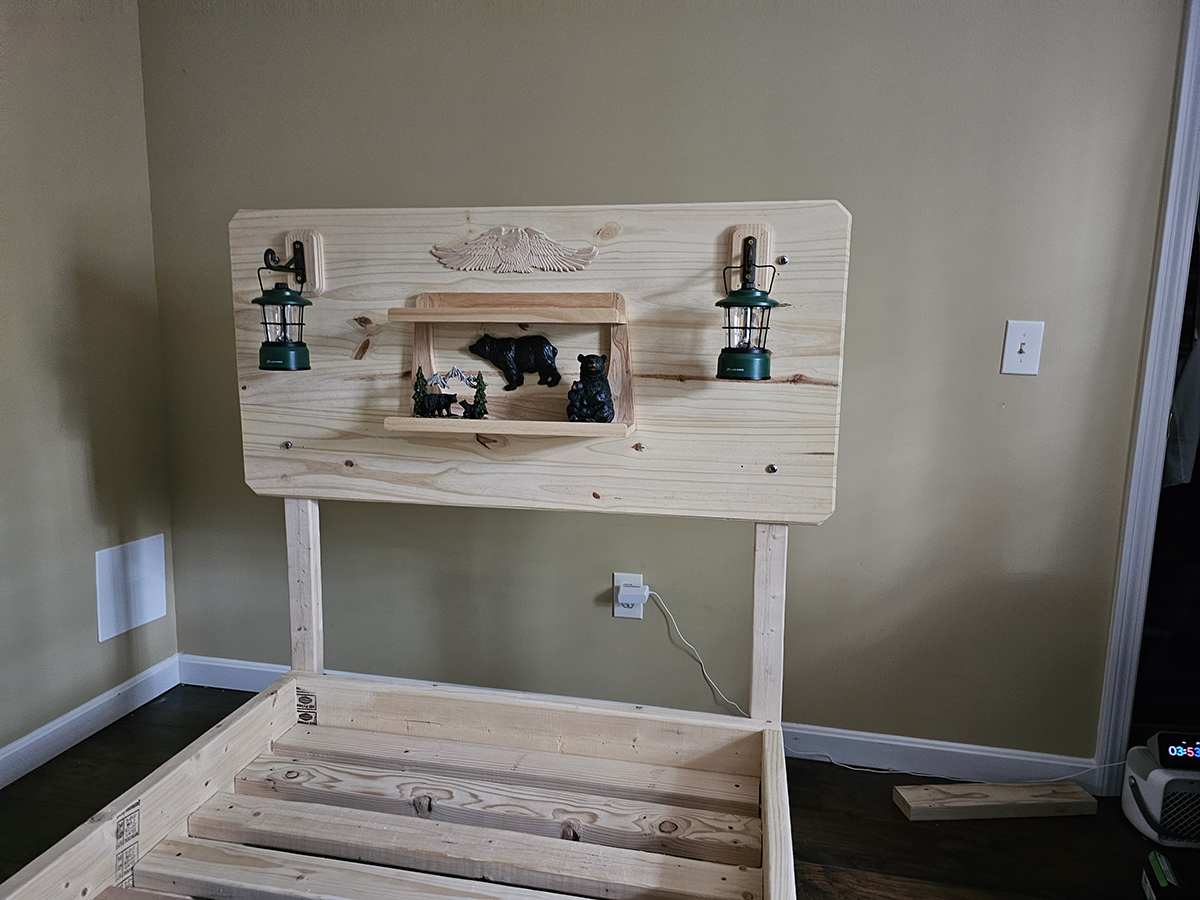
Added Legs and Initial Bling to the Headboard
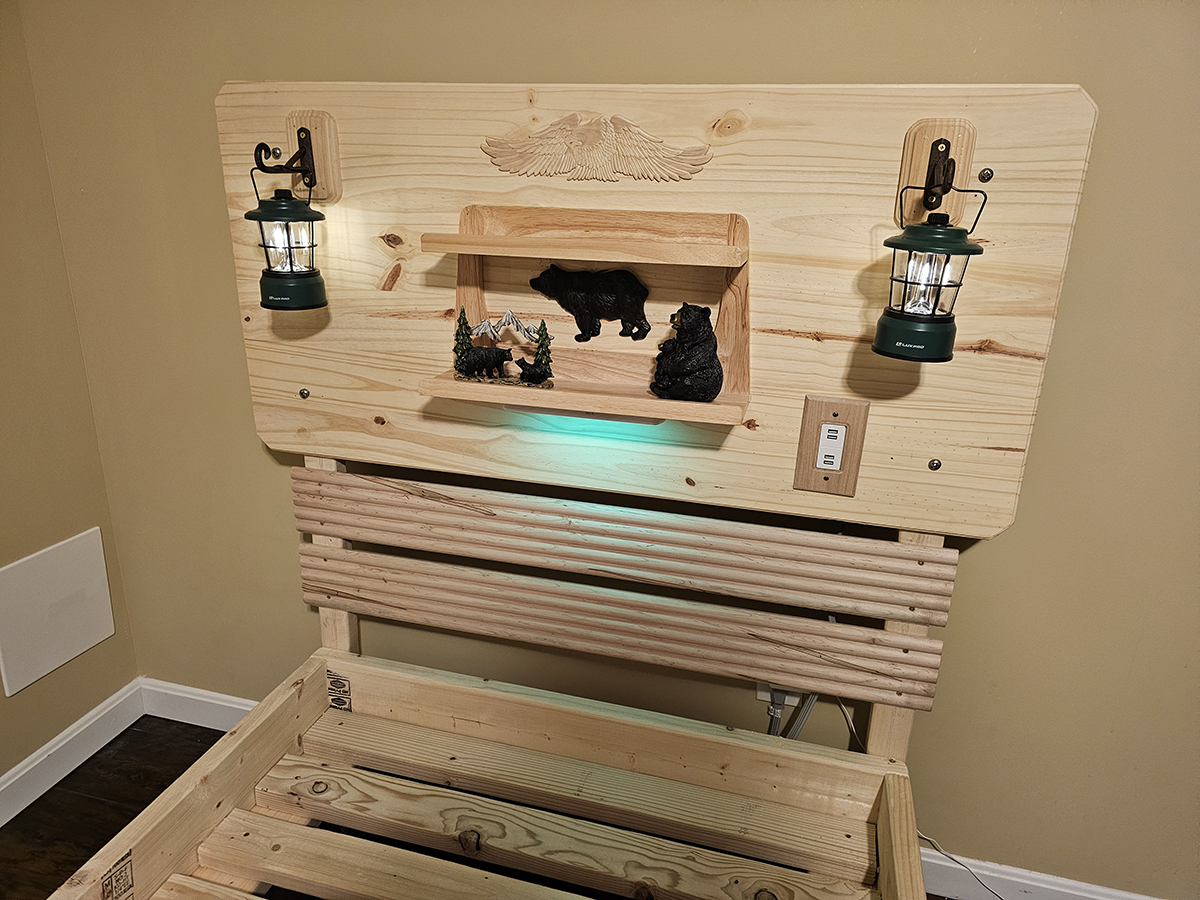
Removed the headboard to attach legs. Re-attached headboard and added the lantern hooks and center shelves (pre-made) for remotes and other items. Also glued on wooden eagle emblem for a little ornate feel.
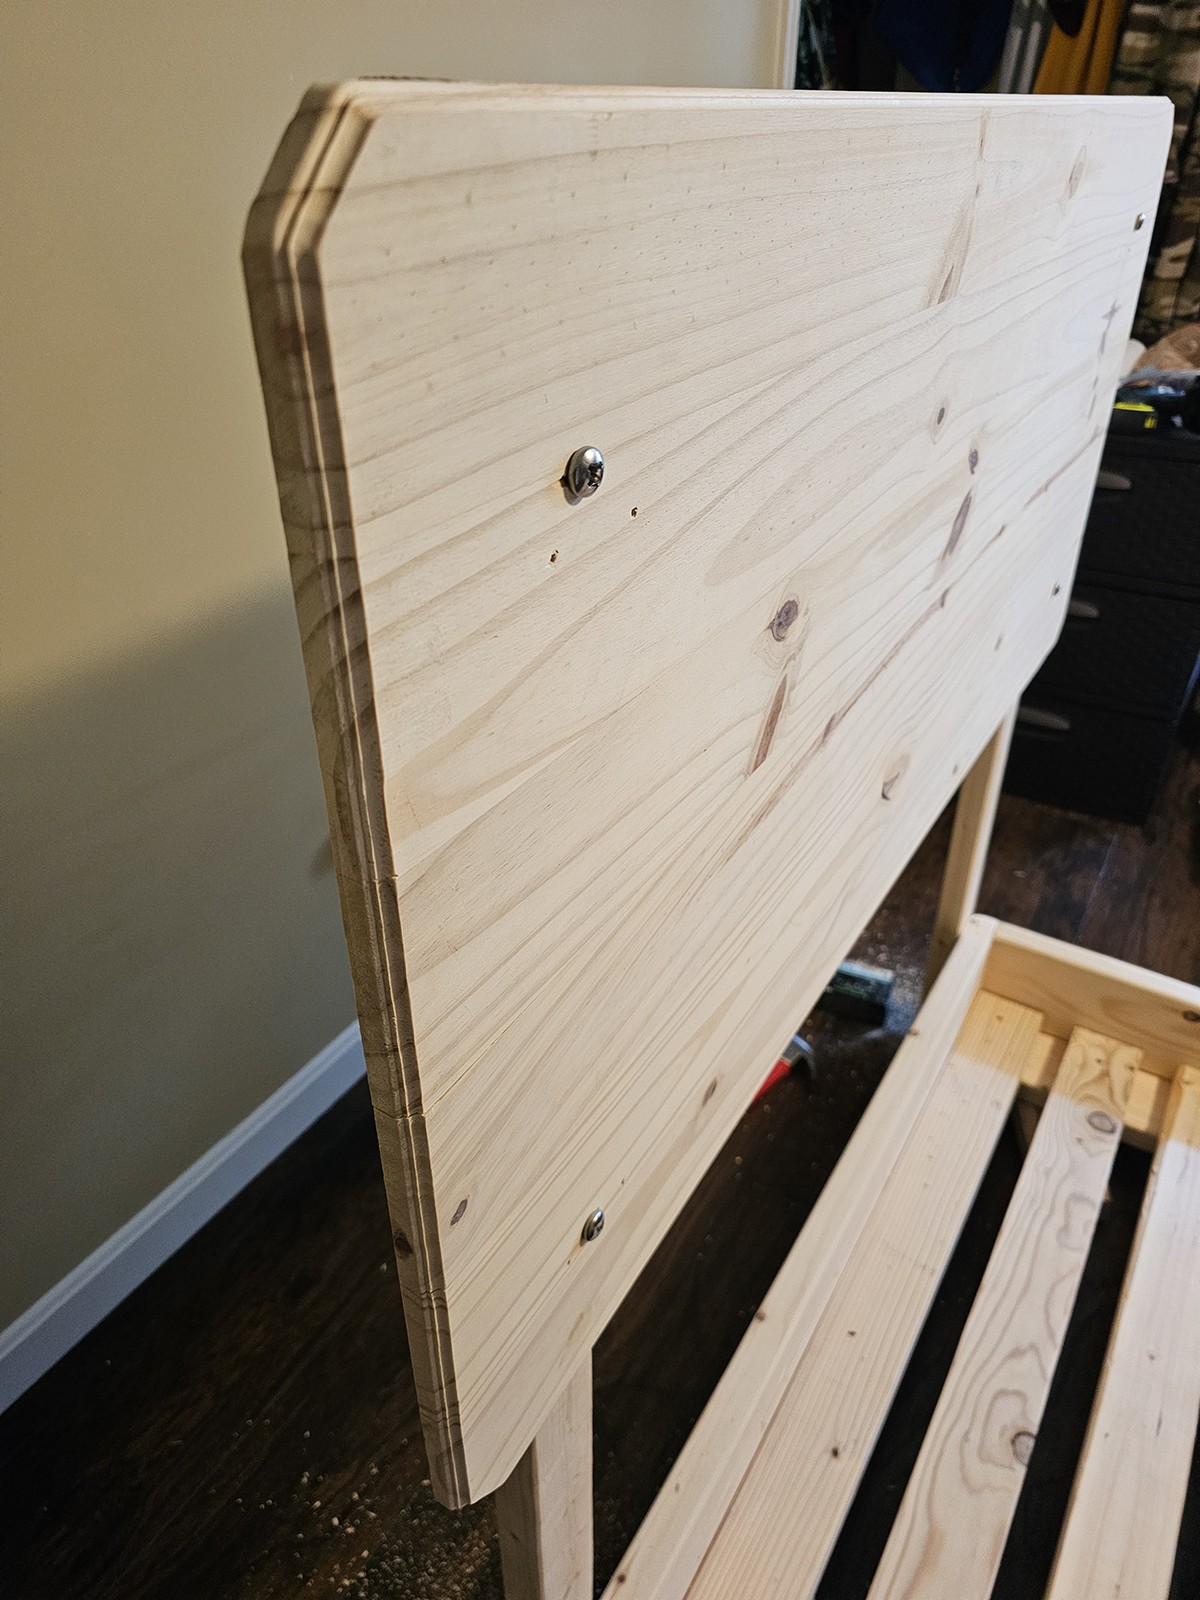
Added More Functional Accessories to Headboard, Trim Under Headboard and Footboard
Added underlighting below the middle shelf and built in a USB outlet for phones, speaker and other devices. To fill the space under the headboard, I used some large bead panel moulding, just to keep pillows from sliding away and for looks. On the headboard, I added a small shelf to hold a phone and a hook for glasses or a necklace. I wasn't initially going to do a footboard, but after seeing it I decided it was necessary for looks. For both the headboard and footboard I used material from a previous project that I dismantled a while back.
Initial Plans and Interior
I didn't take too many pictures while building this addition, as I was doing the work primarily by myself. This was back in the mid 2000s, so cell phone cameras weren't quite as big of a thing. Although I don't plan to build any full additions, this shows some of my prior experience relating to many aspects of carpentry and general construction. I did the entire plans from scratch based on how I thought it should be built.
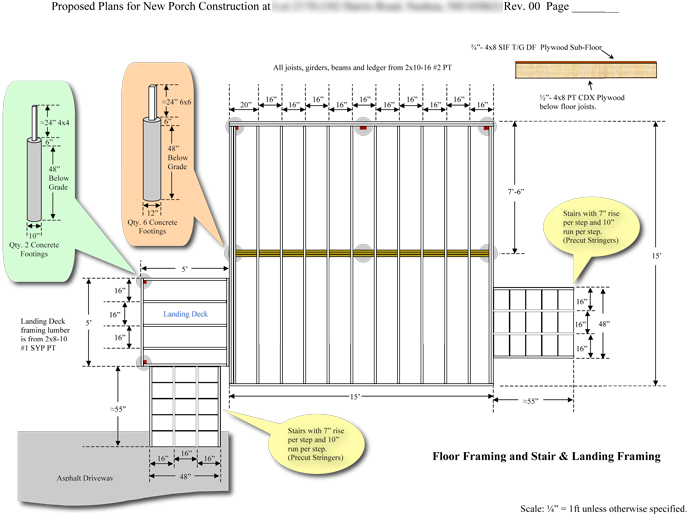
Ground and Floor Plans
These are the footing foundation and floor structure layout. To all of you Microsoft Word users, there was a time when I could do this type of drawing in MS Word. I doubt it is even possible now. I can't believe I was able to do this level of drawing to scale using MS Word. The build was proabably 99% accurate to these drawings. One difference was that the building code required spread footings, so I had to change to that.
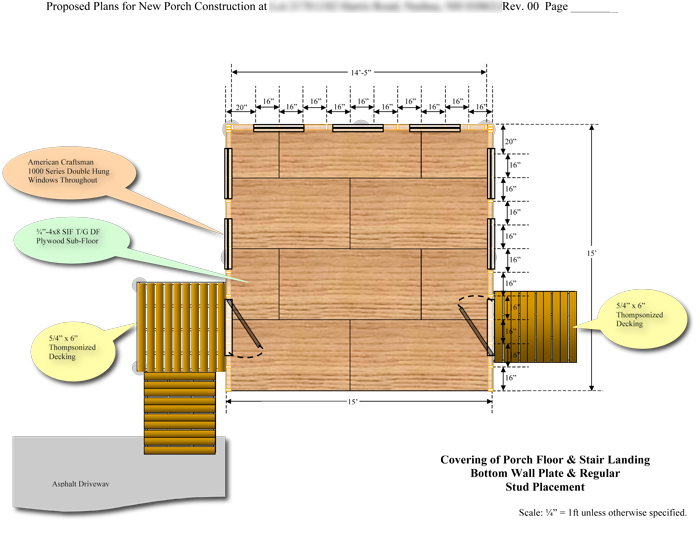
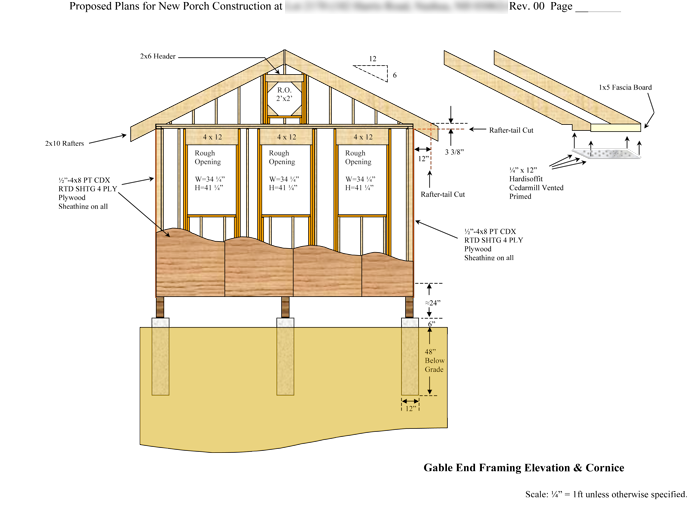
Side and Gable Views of Framing and Construction
Here you can see the layout of the walls, windows, doors, footings, sheathing, rafters, etc.
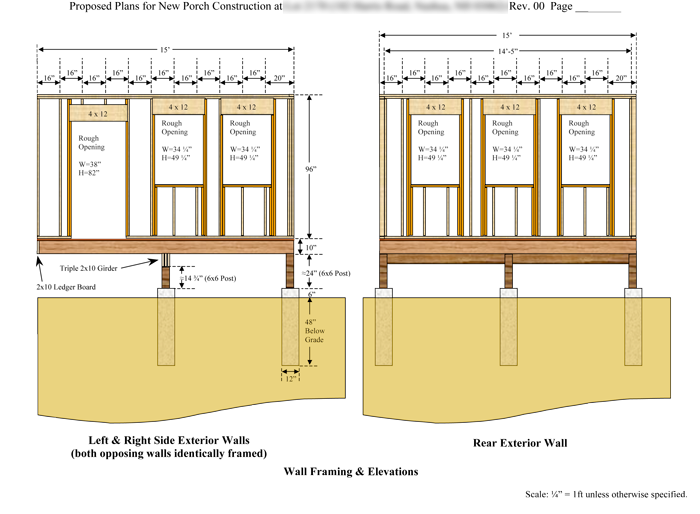
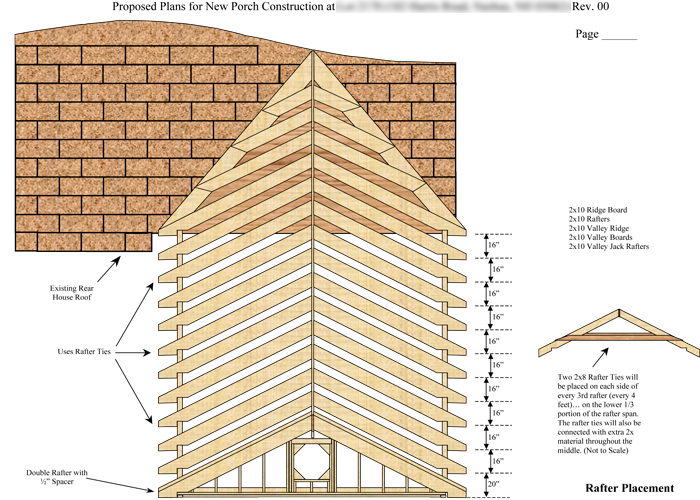
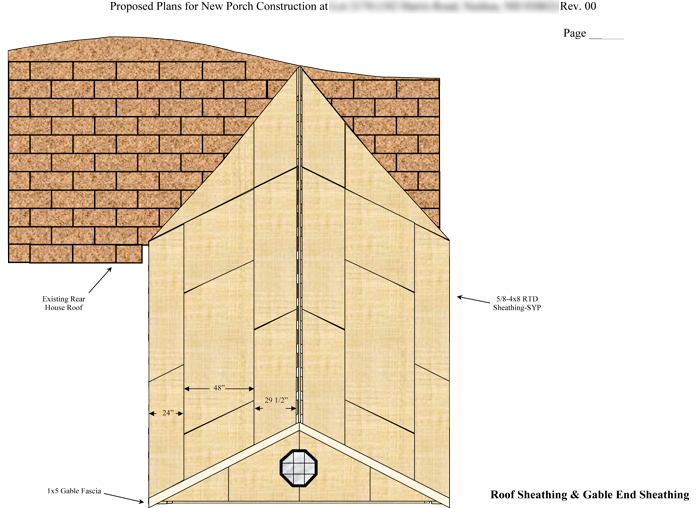
Rafters/Roof Tie-In Plans and Roof/Gable End Sheathing
This shows the placement of the rafters, rafter ties, and the upper sheating of the construction.
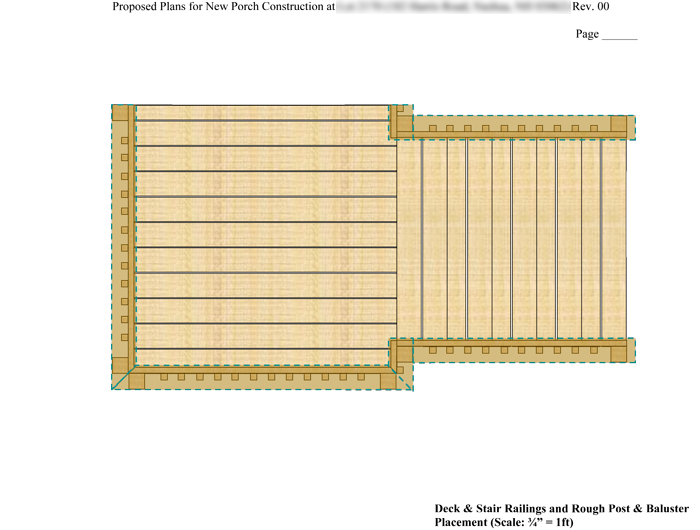
Overhead and Side Views of Deck Layout
Because the deck was going to resolve on some original footings, the plans for the deck were kept to a rough layout, but ended up being very close to the final results.

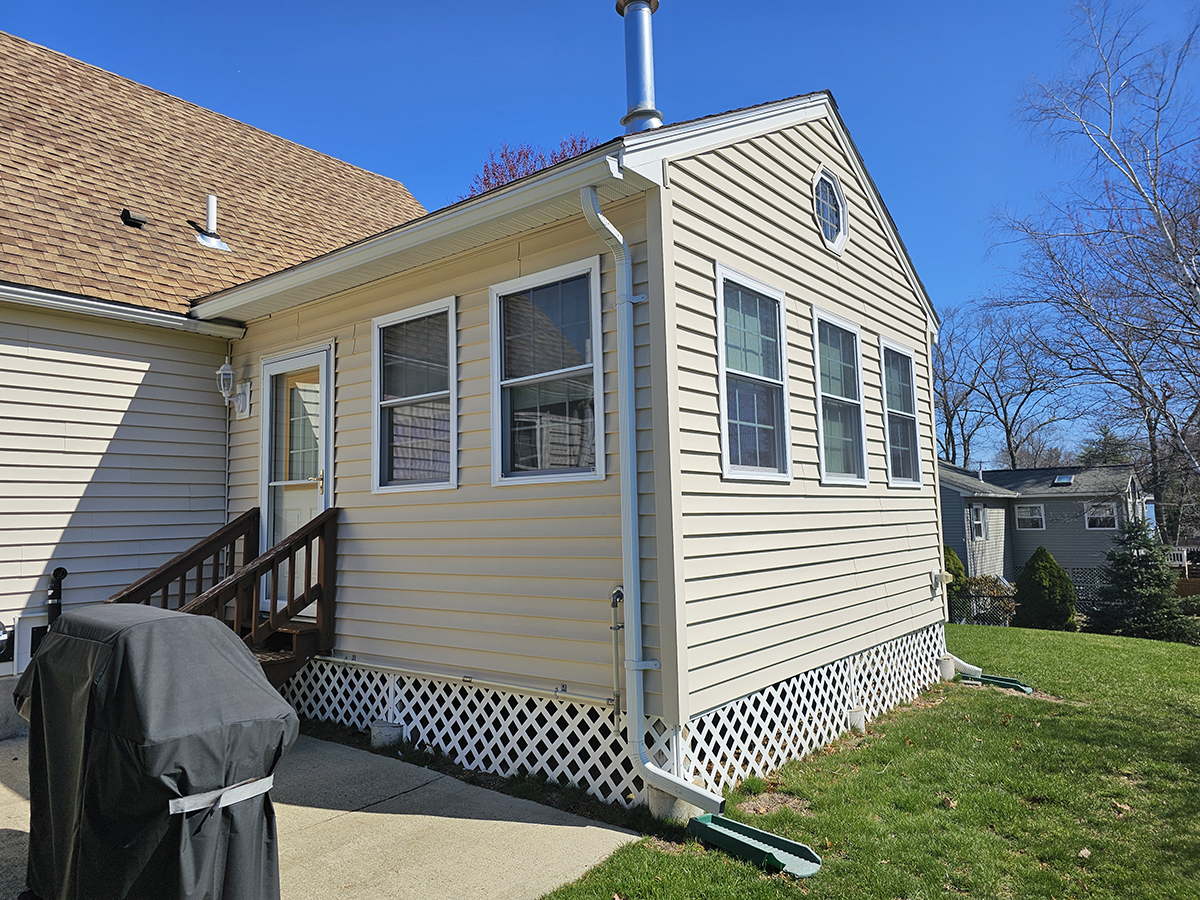
Addition Interior
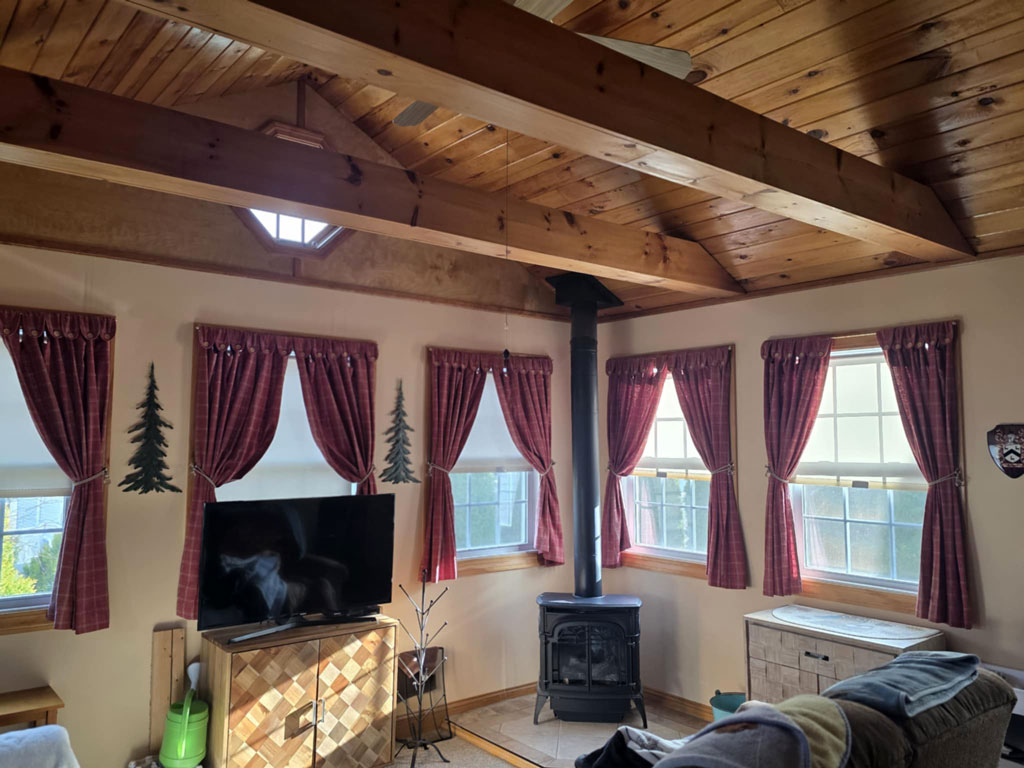
Here is a couple of interior pictures of the finished product. I used tongue and groove pine and finished birch plywood on the gable end upper walls.

Addition Exterior
These are a couple of pictures of the outside of the addition, deck, back stairs, and concrete patio. I dug, made the forms, and spread the concrete for the patio. Note that I did not do the siding or the roofing, leaving that to the experts in those fields. These are recent pictures, so the deck is somewhat in need of new stain at this point.
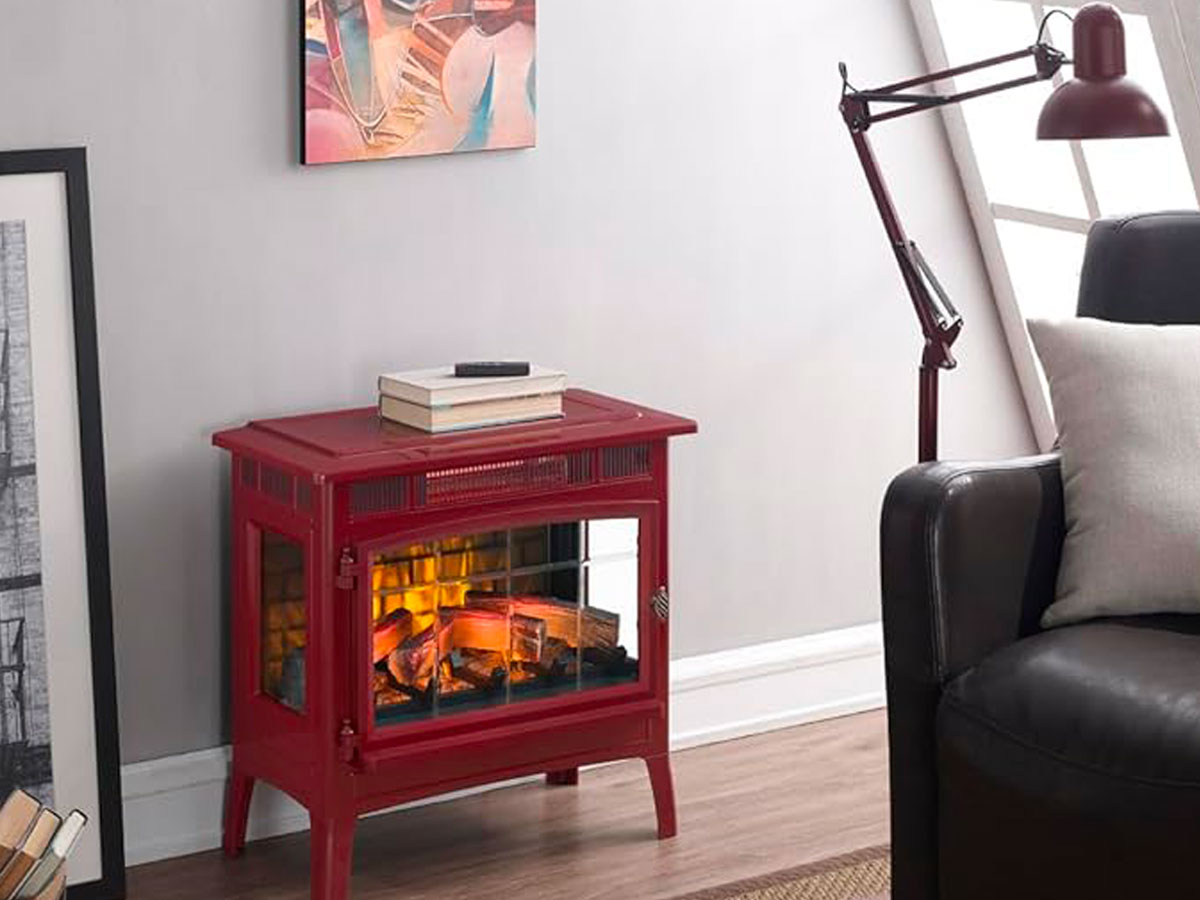
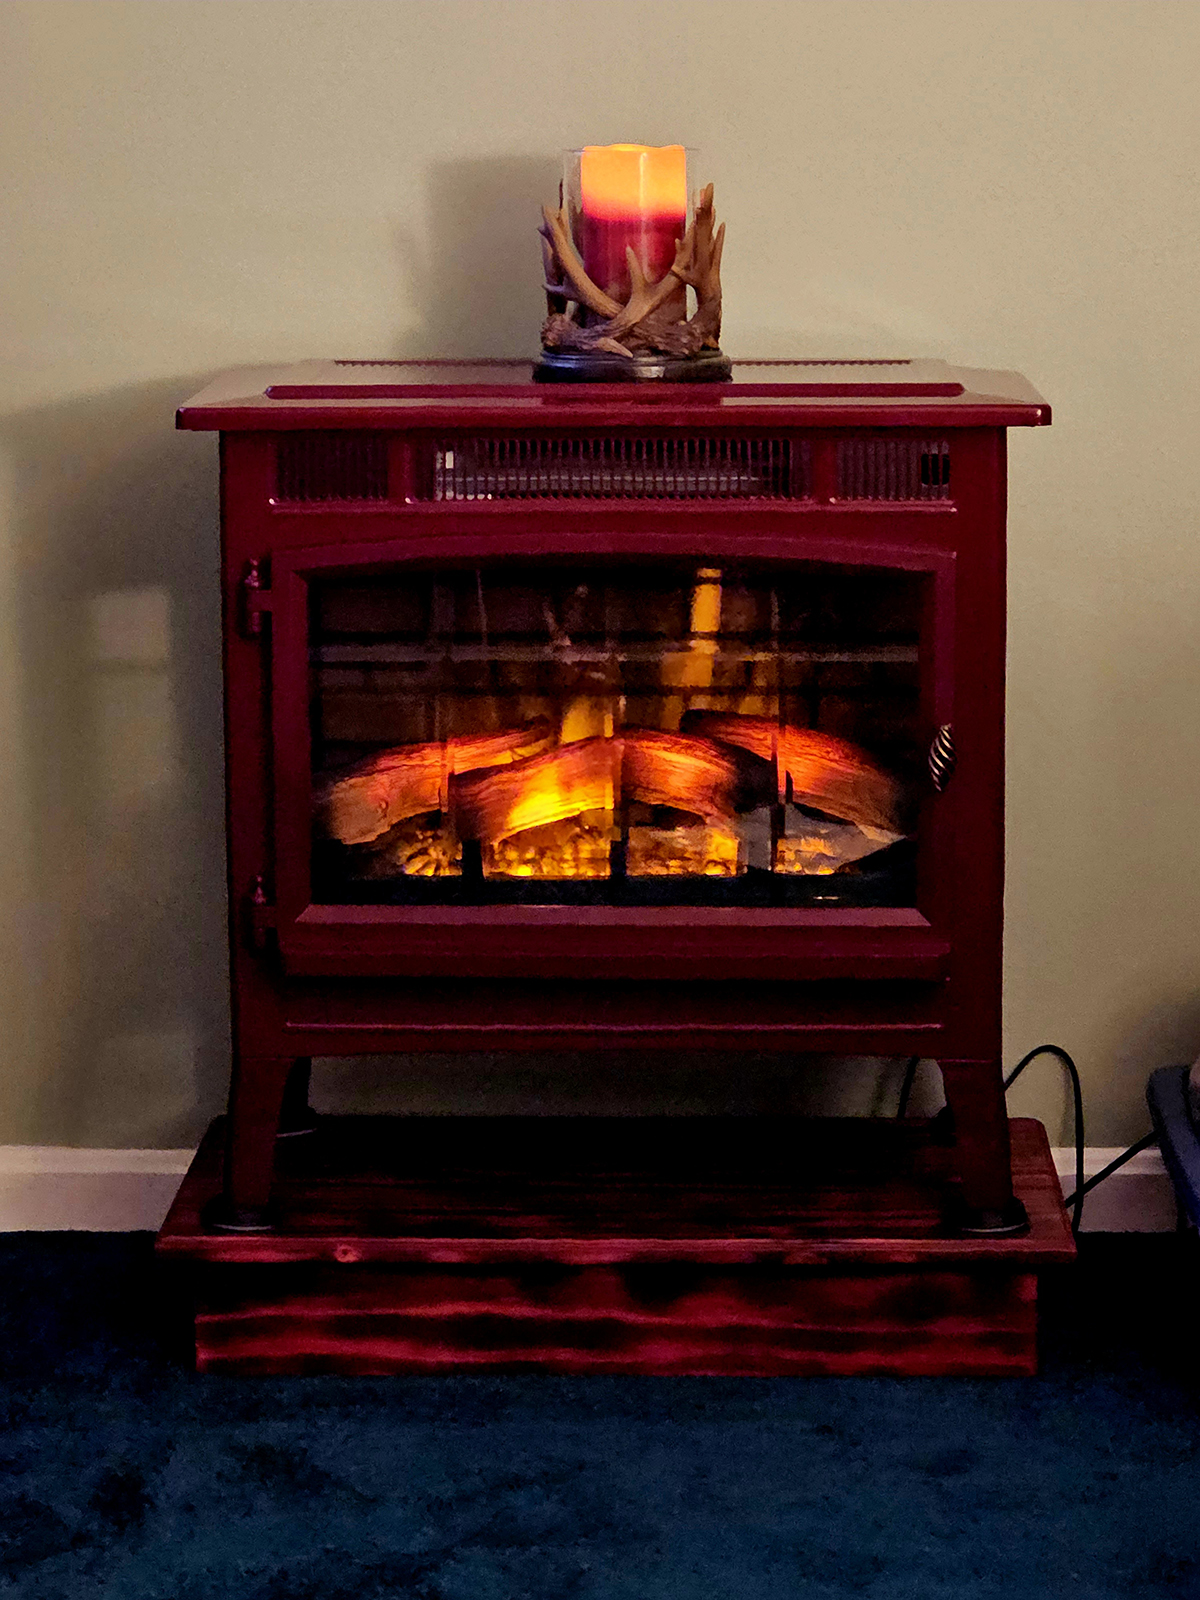
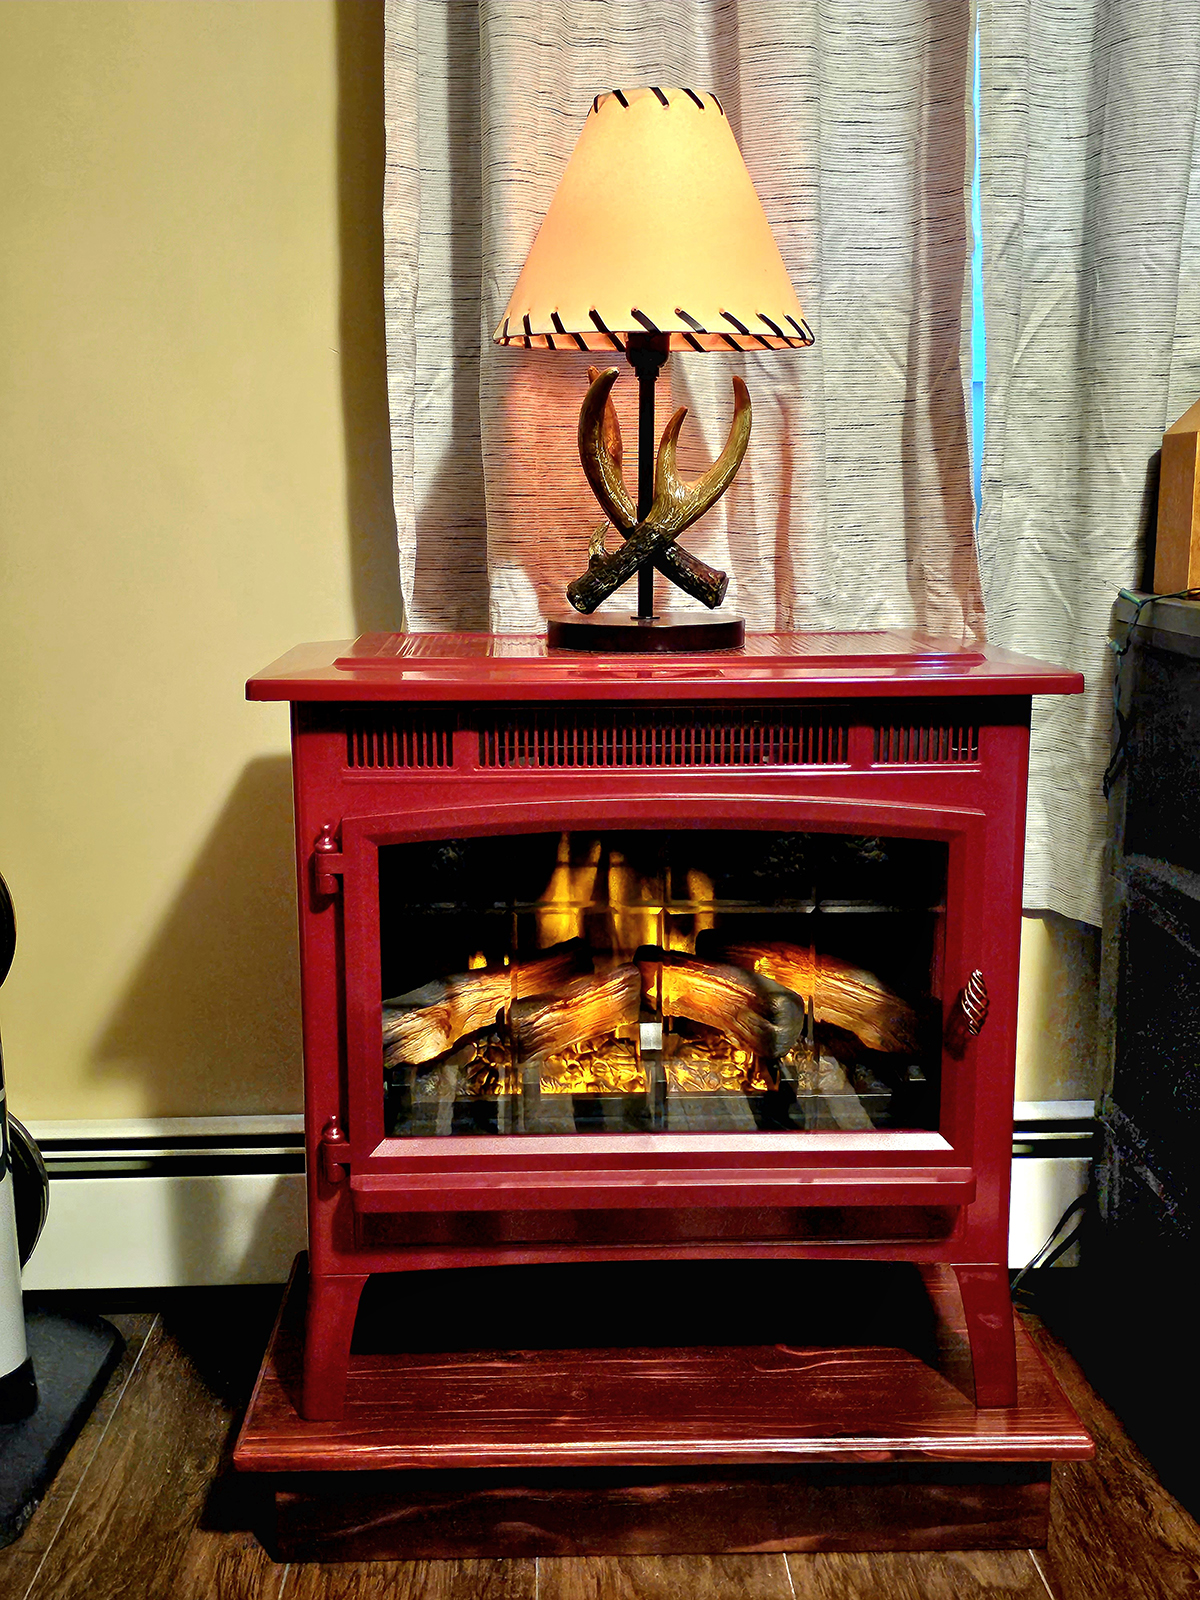
Purpose for the Fireplace Pedistals
These electric stove/fireplaces were bought for ambiance and to take the chill out of the room at times. The issue was that they were just a little too low when sitting on the floor. I designed a pedistal that would raise them up enough to make a difference, but would not look too out of place. I made two of them at the same time, one for myself and one for my client. I gave her the one that I thought ended up with the best finish, but both worked out great. If you are looking for a realistic looking flame, logs, and brick background, I highly recommend this model fireplace. You can order here. I may receive a small commission, but at no extra cost to you. Thank you for your support!
The Duroflame DFI-5010-03 Fireplace and Assembled, Routed, Sanded Pedistal
After cutting and assembling with pocket holes and angle brackets inside, I sanded and used a Makita trim router to give a nice shaped edge to the pedistals. I was experimenting with pocket holes at the time, but if I were to do this again, I probably would just use glue and finish nails in this application.
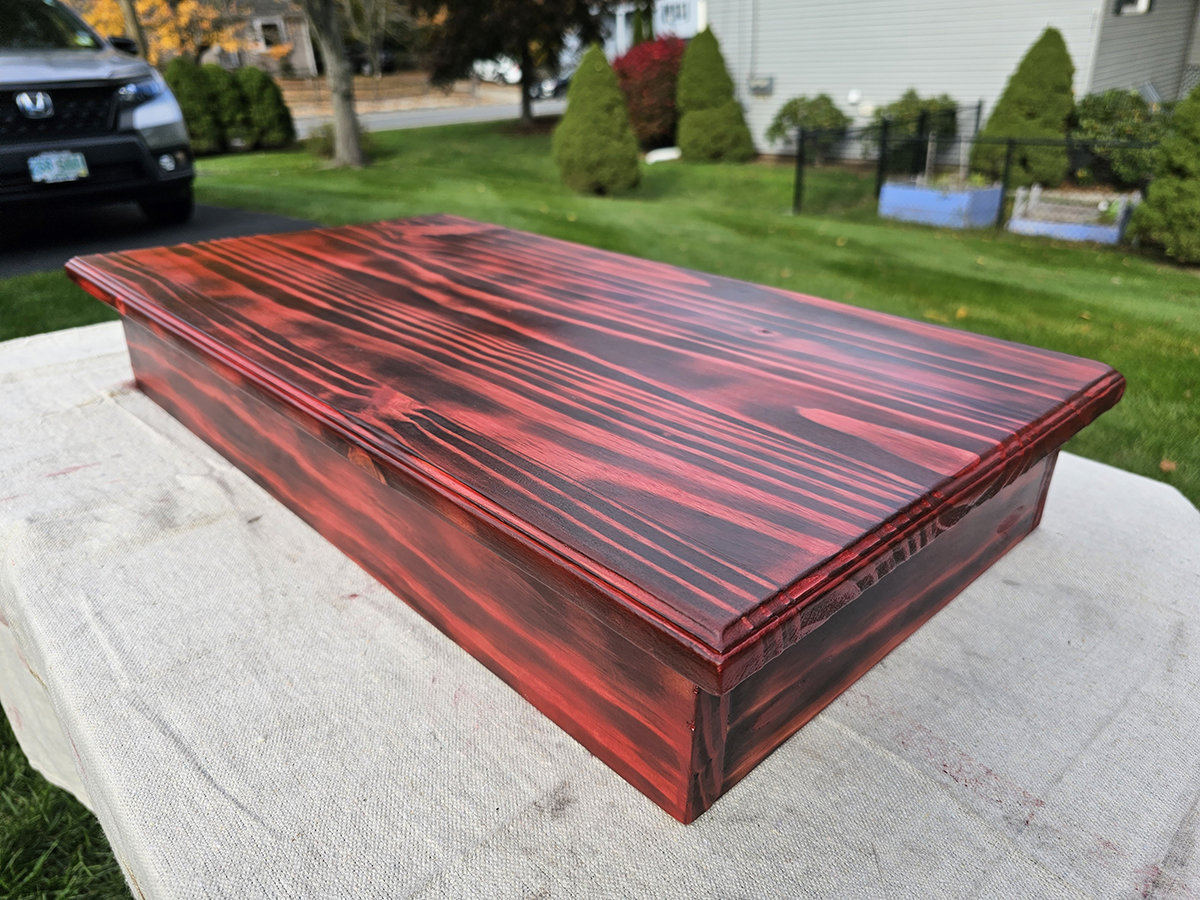
Fireplace Pedistals Prepared for Staining
Using a quasi Shou Sugi Ban (焼杉板) technique, I burned, brushed, wiped, and ligthly sanded the pedistals preparing for stain.
Fireplace Pedistals Finished and Wiped
I used a red stain to match the cinnamon color stoves, wiping down immediately after staining to expose the grain. The first one here is the one I gave to my client as the color match came out a little better and her's was going to be in a more prominent place. The second one is the one I used for myself is in a bedroom that is usually a darker environment. Both came out good, but you can just never tell exactly how the final product will look using this technique. How much you burn, brush, wipe and sand can change a lot, as well as the grain of the wood.
Both Fireplaces on Pedistals
The first is my in my client's living room and the second is in my bedroom. Again, I highly recommend this model fireplace. You can order here. I may receive a small commission, but at no extra cost to you. They come in multiple colors. If you want a pedistal built for it, just contact me.
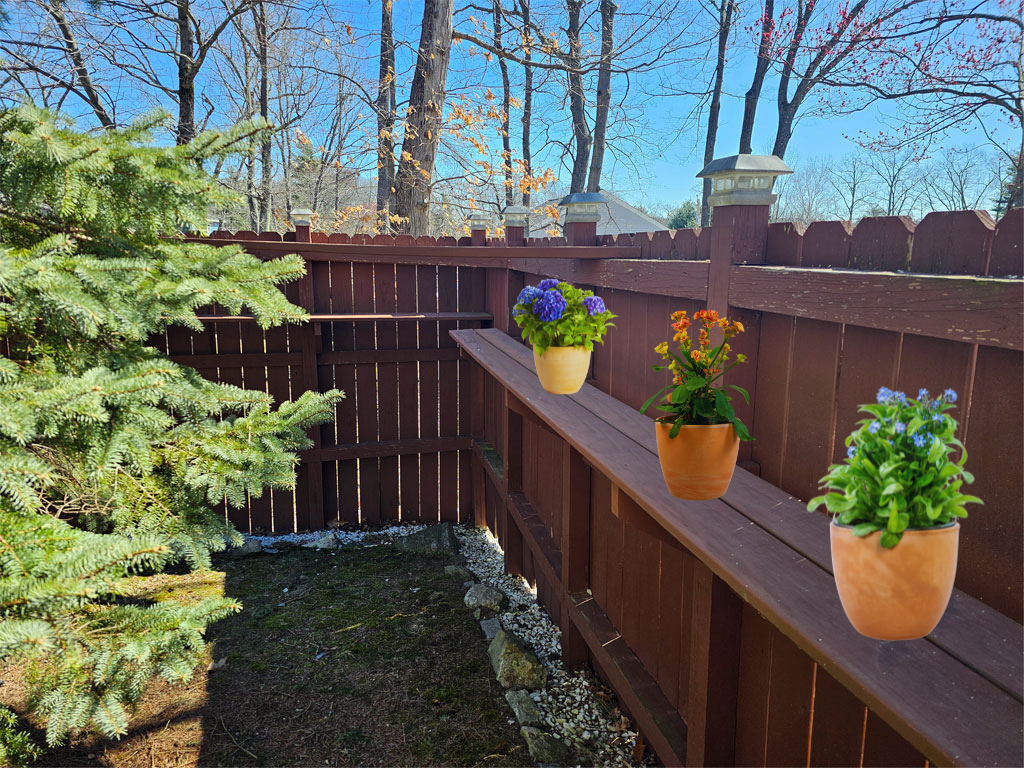
Trees Removed, Privacy Fence Constructed, and Spruce Tree Planted
Many trees and bushes were removed by neighbors, which exposed the street and neigborhood behind. Adding a privacy fence and a new spruce tree restored the look of the yard. Because of the large rocks and possibly ledge, this fence was constructed on concrete blocks and attached to the shed. Only two posts are fully into the ground.
Privacy Fence Finished and Shelves Added
The fence was built entirely with standard pressure treated lumber and decking boards. It has been standing strong for many years, as you can see by the new height of the spruce tree. The shelves were added later to display plants and other decorations.
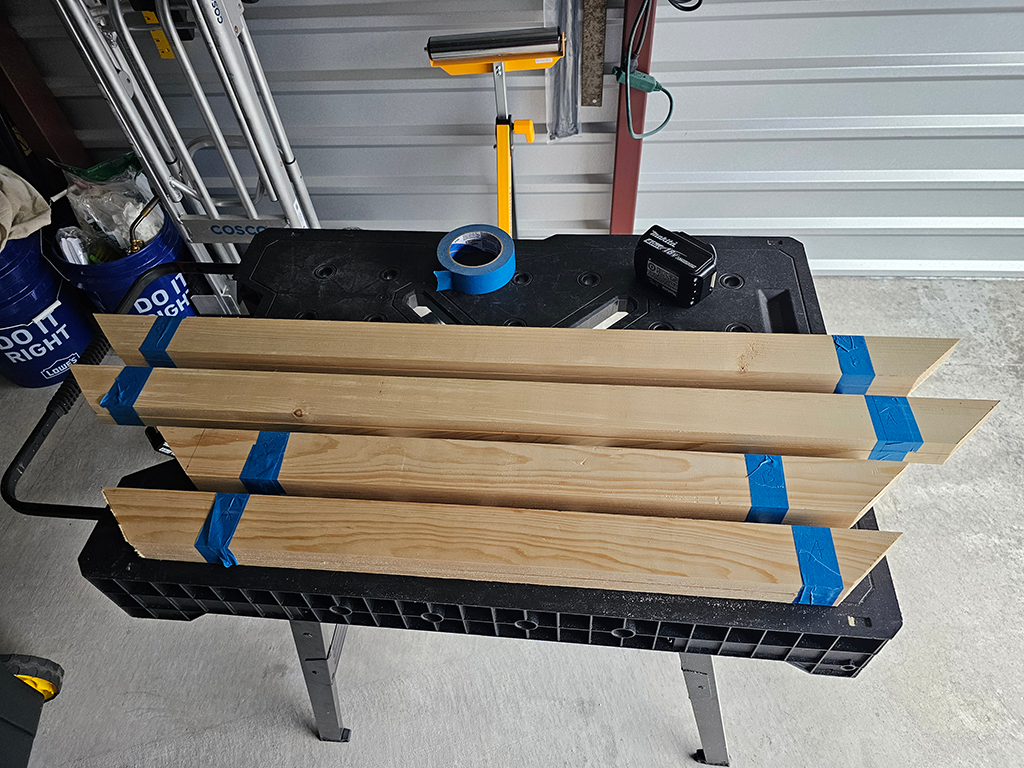
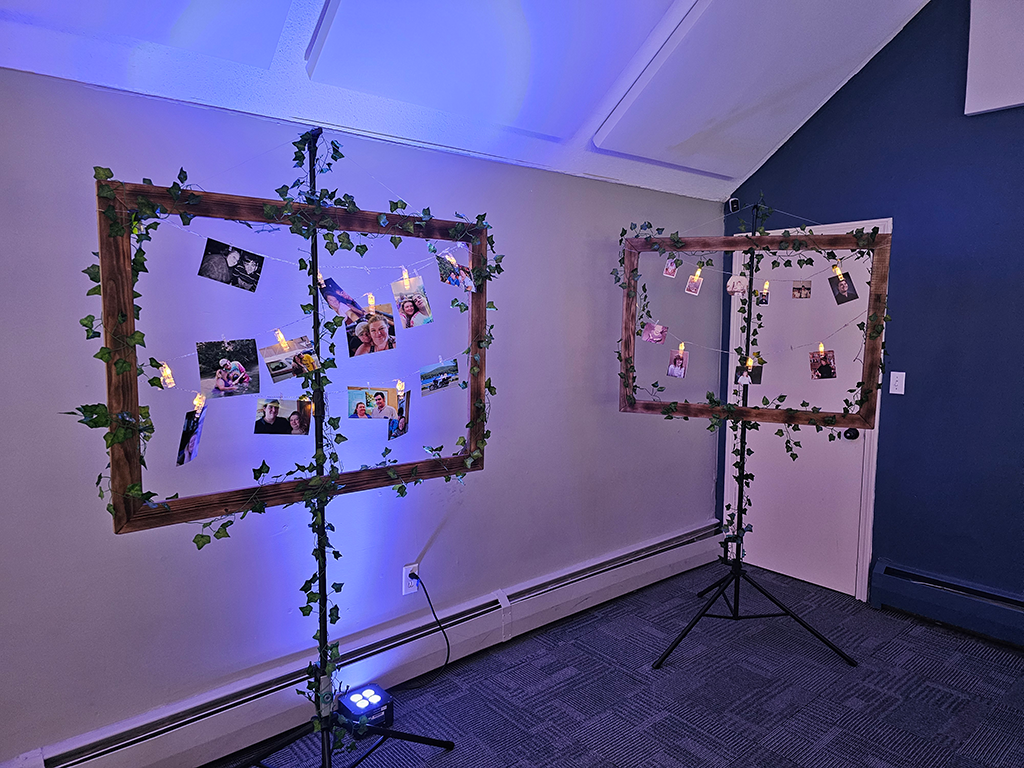
DIY Rustic Photo Frames – A Last-Minute Wedding Gift
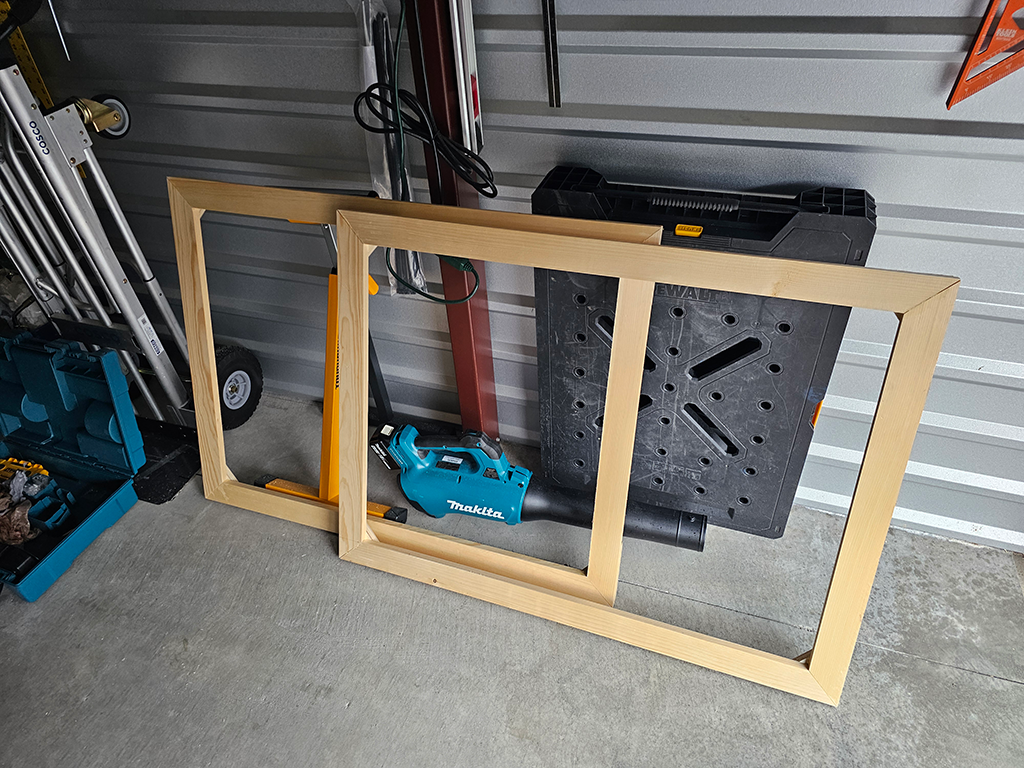
About a month before his wedding, my neighbor casually asked if I could build some large display frames for hanging photos. He later decided against it—until two days before the wedding. I jumped in to help. I picked up some pine boards (not ideal for frame building, but workable) from Home Depot and got started constructing two 4x3 foot frames.
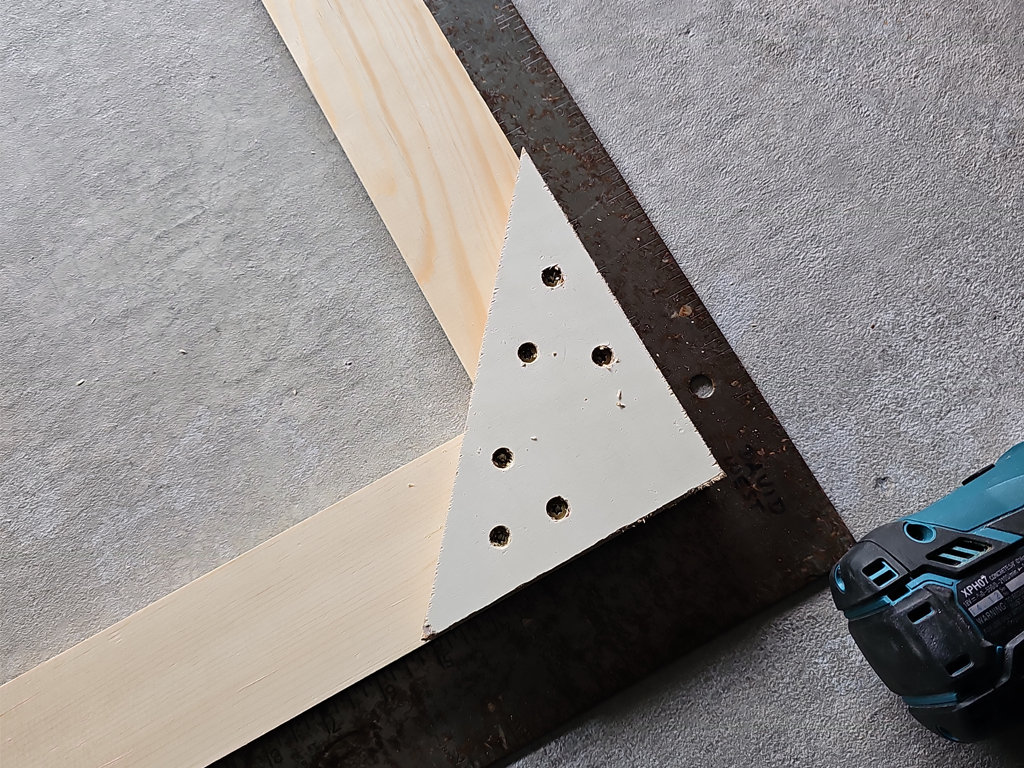
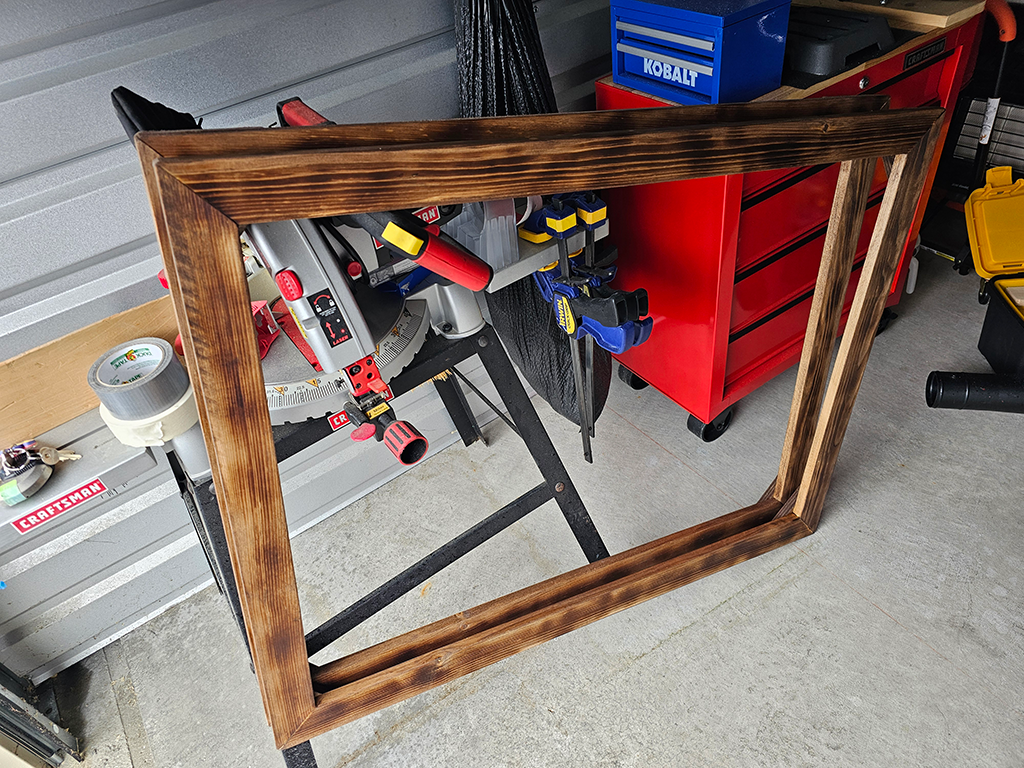
With no specialized framing tools, I grouped the boards together with tape to cut the miters as accurately as possible. To reinforce the joints, I repurposed some scrap plywood triangles from another job as sturdy corner braces. Once both frames were assembled, I used a torch to lightly char the surface for a rustic, antique effect. After brushing out the grain, I finished with a rich stain.
Installed Just in Time – Wedding Photo Display Success
After allowing the frames to dry overnight, I delivered them the evening before the wedding. The couple used LED lighting to highlight old family photos, creating a stunning and sentimental display for guests to enjoy. These handmade frames served as both functional decor and conversation starters during the celebration.
Request Our Service
In addition to filling out the form below, please provide detailed images emailed to: davidwest316@gmail.com or texted to 603-438-1903. You can also mail images to 251 Daniel Webster Highway, 2B, Merrimack, NH 03054.
After clicking "Submit", scroll up to complete CAPTCHA verication to complete submission.
New Hampshire Towns and Cities Serviced
We proudly serve a wide range of New Hampshire towns within approximately an hour of Merrimack. For locations beyond 30 minutes from our base, we’re happy to accommodate — though a modest additional trip cost may apply depending on the distance. Feel free to reach out for a quick estimate based on your location!
Albany, Alexandria, Allenstown, Alton, Amherst, Andover, Ashland, Barnstead, Barrington, Bath, Bedford, Belmont, Bennington, Bethlehem, Boscawen, Bow, Bradford, Bridgewater, Bristol, Brookline, Campton, Candia, Carroll, Center Harbor, Chatham, Charlestown, Chesterfield, Chichester, Claremont, Concord, Conway, Danbury, Deerfield, Deering, Derry, Dorchester, Dublin, Dunbarton, Durham, Easton, Effingham, Enfield, Epsom, Farmington, Fitzwilliam, Francestown, Freedom, Gilford, Gilmanton, Goffstown, Gorham, Greenfield, Greenville, Groton, Hampstead, Hampton, Hancock, Hanover, Harrisville, Haverhill, Hebron, Henniker, Hill, Hillsborough, Hinsdale, Holderness, Hollis, Hooksett, Hopkinton, Hudson, Jackson, Jaffrey, Jefferson, Keene, Kensington, Laconia, Lancaster, Landaff, Lebanon, Lee, Lempster, Lincoln, Lisbon, Litchfield, Littleton, Londonderry, Loudon, Lyme, Lyndeborough, Madbury, Manchester, Marlborough, Mason, Meredith, Middleton, Milan, Milford, Milton, Mont Vernon, Moultonborough, Nashua, Nelson, New Boston, New Hampton, New Ipswich, New London, Newbury, Newmarket, Newport, Northfield, Northwood, Nottingham, Orford, Ossipee, Peterborough, Piermont, Pinardville, Pittsfield, Plaistow, Plymouth, Portsmouth, Randolph, Raymond, Rindge, Rochester, Rollinsford, Roxbury, Rumney, Rye, Salem, Salisbury, Sanbornton, Sandown, Seabrook, Sharon, Somersworth, South Hampton, Strafford, Sugar Hill, Sullivan, Sunapee, Sutton, Swanzey, Tamworth, Temple, Thornton, Tilton, Troy, Tuftonboro, Wakefield, Warner, Warren, Washington, Waterville Valley, Weare, Webster, Wentworth, Westmoreland, Whitefield, Wilmot, Wilton, Winchester, Windham, Wolfeboro, Woodstock.
Outside Normal Service Area
If you're located beyond our standard service area — or in a neighboring state — feel free to reach out. We're happy to consider special requests when possible. Please note, however, that out-of-state service may be limited due to insurance coverage and legal requirements that vary by location. As our business evolves, we’ll continue to evaluate how far we can travel while staying compliant and properly insured.